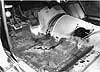
In certain parts of the country you just assume rusty floorpans are lurking under the carpet of '70s and older vehicles. If you're lucky, only one or two sections of the floor have rotted out from underfoot instead of the whole pan. Luckily, replacement panels for most popular body styles are available that can make repairs to a Flintstone Flyer a relatively easy endeavor. Welding equipment is necessary to install the patch panels, but you don't have to be a craftsman with the torch, because the repairs will appear only on the underside of the car. Of course, a clean floorpan installation is a true sign of a good body man.
To show you exactly how to replace rusty floorpans and provide some tips from a professional, we went to Reiter's Metal Craft in Mount Clemens, Michigan, and took notes as Todd Reiter cut and replaced the pans in a Nova. He used four replacement panels and a toe panel (the area just under the firewall on the driver's side) from C.A.R.S., Inc. Reiter TIG-welds everything with a Miller Synchrowave 250, which produces beautiful welds with excellent control but is a little pricey for the do-it-yourselfer. Another option for a TIG-welder is the more affordable EconoTIG from Miller, which will weld most material up to 3/16 inch thick. A MIG welder can also be used to install floorpans, but the welds will not be as clean. Reiter mentioned a few safety concerns as well as tips to make the job easier and cleaner.
His experience made the job look as easy as a bolt-in, and it really is as easy as the photos show, but novices should plan on taking extra time to minimize mistakes.