 Attention to detail will make swapping a clutch disc one of the easiest and most rewarding jobs you can do on your musclecar.
Manual transmissions are making a major comeback in the performance world. Regardless of whether you have a four-, five-, or even six-speed manual gearbox, the one common denominator with any of these trannies is that they get their power directly from a spinning clutch-and-pressure-plate assembly. If that clutch doesn't make a firm connection, the chain of power is broken and all your hard-earned horsepower will make is a bunch of lining-melting heat in the bellhousing.
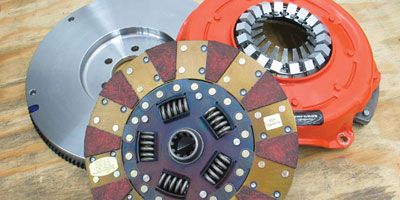
A clutch-and-pressure-plate assembly can be considered a consumable item. Sooner or later, it will wear out and you will need a new one. Such was the case with our four-speed-equipped cruiser, which needed help in the clutch department when oil got onto the clutch disc from a failed rear main seal. We sent a call out to Centerforce for a brand-new flywheel, clutch, and pressure-plate assembly, and we thought you might like to tag along as we run through the details on a clutch-and-pressure-plate revival. There's nothing fancy here, no multiple disc chicanery or fuss about hydraulic linkages. Just a simple clutch install that will remind you how to do it right the next time you suffer a slipped disc.
Yanking The Trans
The best way to make this job easy is to begin with a clean working area and the right tools. We are lucky enough to have access to a hoist to make the photos better, but you can easily do the work on the floor. Support the car as high and as safely as your jackstands will go so you have sufficient room to work. Lift the car at all four corners, as this will make moving around underneath easier. You'll only need a few handtools, and unless you're working on a GM six-speed or possibly a Chrysler New Process cast-iron four-speed, most manual transmissions are light enough that you can yank them yourself. Here we go.
Swap Check
Before you start bolting all the parts in place, take a few minutes to check on the parts you plan to reuse and to make sure all the new parts will fit properly. For example, we noticed that our clutch fork had seen better days, and the pivot-ball stud was also worn. Luckily, we had Year One pieces left over from a previous project that filled the bill. We also realized that the clutch linkage was in sorry shape. This might be a good time to upgrade the linkage pieces (see the Linkage Rebuild sidebar). Spending a little more time in this area will not only save you grief later, but also make the entire clutch operation much smoother.
Tech Tip
Sometimes the trans just won't slide all the way into place no matter how much you wiggle, curse, and shove. When this happens, it's usually because the clutch is not perfectly aligned with the pilot bushing. Start all of the trans bolts, but do not tighten them against the trans, and never try to pull the trans into the bellhousing with the mounting bolts. Hook up the clutch linkage and have a friend lightly push the clutch pedal just enough to reduce pressure on the disc. Push the trans in toward the bellhousing at the same time. This will usually seat the transmission into the bellhousing.
Hurst Shifter Rebuild
If you're like us, there's a Hurst Competition Plus shifter attached to your four-speed. In addition to needing a new clutch, our shifter has seen better days. Rather than plunk down around $220 for a new shifter, it might be worth checking out the Hurst shifter rebuild service. According to Hurst, it will completely rebuildyour shifter for the reasonable price of $165 plus $9.50 for shipping. Hurst also rebuilds automatic and Dual/Gate shifters. The whole rebuild process will likely take several weeks, so if the downtime isn't a problem, this is a great time to service your shifter while you upgrade the clutch. The first step is to go to hurst-shifters.com, click on the rebuild service button, fill out the form, and send it in. The service is located at Hurst's facility in Chatsworth, California.
Linkage Rebuild
Classic musclecar clutch linkages are actually pretty crude. On our Chevelle, both clutch linkage arms and the Z-bar are metal-to-metal pins with no lubrication. These tend to wear, especially if the car has been subjected to a stiff pressure plate. Our clutch linkage is well past the four-decade mark and is showing its age. We've welded the pins before and polished them smooth, but the best solution is to eliminate them altogether and go to spherical rod ends. There are several approaches, but we like to use thin-wall tubing and weld in 51/416-inch threaded bungs on each end. Then just thread in a pair of male spherical bearings with jam nuts set to the length of the original rods and you're done. You need to make up one rod from the clutch pedal to the Z-bar and the other rod from the Z-bar to the throwout bearing release arm. We bolted our pieces together with fine-thread bolts and locking nuts to prevent them from coming loose. We found our parts at Art Morrison Enterprises. If you don't want to build this system, you can buy similar pieces from SpeedDirect.