
Due to some colder than usual weather, we decided to place part two of our three-part bodywork segment we featured in our April issue on hiatus till the weather warmed up. In the meantime, we decided to tackle some garage maintenance, starting with our air compressor. When we purchased our 26-gallon air compressor, we knew it would have to be occasionally drained of condensation. But draining the tank with the OEM stopcock was a pain and a better device was needed. Longevity of your compressor is the key. The last thing you want is a rusted tank that has the potential to explode. Compressor manufacturers recommend draining after each use but I needed a way to drain the tank, drain it often, and drain it easily. The method of draining the tank provided by the manufacturer was a pain at best, not to mention the stopcock at the very bottom of the tank would eventually wear out and begin to leak.
 |
Home Air Compressor Modification - Tricks of the Trade
|
Home Air Compressor Modification - Tricks of the Trade
We decided to pay our local hardware store a visit and ended up spending $30 in parts to fix this problem. Here's a list of parts:
 |
Home Air Compressor Modification - Tricks of the Trade
|
Home Air Compressor Modification - Tricks of the Trade
- 1/4-inch NPT stainless steel ball valve
- 1/4-inch NPT street elbow (male to female fitting)
- 1/4-inch NPT extension tubes (3- and 4-inch)
- One 1/4-inch NPT to 1/4-inch id barbed hose adapter (optional)
- Pipe sealing Teflon compound
- 3/4x1/2-inch hose
 | Home Air Compressor Modification - Tricks of the Trade
1-2 To begin the modification, lay your air compressor on its side to gain access to the stopcock that needs to be removed.
 |
Home Air Compressor Modification - Tricks of the Trade
|
Home Air Compressor Modification - Tricks of the Trade
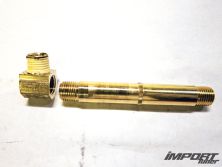
3-5 Next, screw on your street elbow and position the outlet pointing to the side you want your ball valve to sit on.


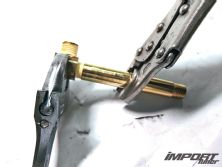
6-8 Attach the 4-inch extension to the street elbow while making sure to use Teflon to ensure a leak-free setup.
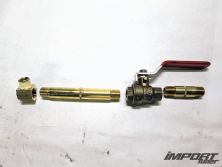
9. Install and position the ball valve to be accessible without having it so short that you have to reach under the compressor. On the flip side, you don't want it protruding too far out from the main body.
 |
Home Air Compressor Modification - Tricks of the Trade
|
Home Air Compressor Modification - Tricks of the Trade
10. Once the ball valve is on, you have the option of using a hose barb fitting of a 3-inch extension similar to the one we used. Either setup will work when attaching the hose on the valve so you can send the moisture outside (and it's quieter to drain).
 |
Home Air Compressor Modification - Tricks of the Trade
|
Home Air Compressor Modification - Tricks of the Trade
11. To aid in filtering unwanted moisture, we also replaced our Craftsman filter with an Eastwood moisture and oil filter combo to keep our spray equipment and air tools working in top efficiency.
 |
Home Air Compressor Modification - Tricks of the Trade
|
Home Air Compressor Modification - Tricks of the Trade
12. So there you have it. A simple DIY setup and turn of the valve can vacate that rusty water that comes out with the drain valve air and keep your compressor running like a champ.
 |
Home Air Compressor Modification - Tricks of the Trade
|
Home Air Compressor Modification - Tricks of the Trade