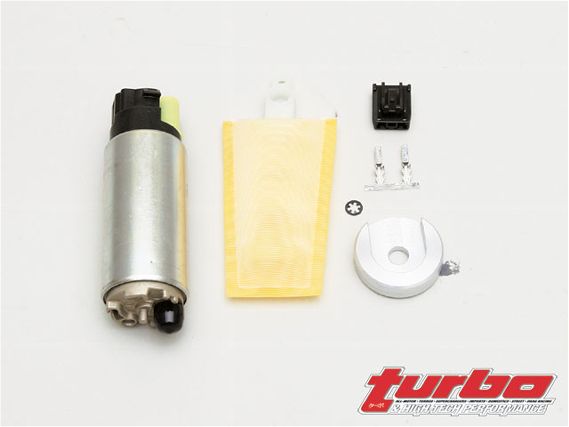
 | The fuel pump for this install is an AP Boss CT9A 240lph LAP pump. The pump is based off of a Denso unit and increases volume assuring that you get the adequate amount of fuel fed to your injectors.
Fuel System HarnessIt's no surprise that OE engineers designed fuel systems to match the set parameters and performance of a vehicle as it comes straight from the factory. As we tune our cars and extract the power outside of the stock box, the amount of fuel the engine needs to run safely and efficiently goes up. More often than not, the stock fuel pump has to be replaced to handle the sufficient volume of fuel needed. The misconception here is that you need more fuel pressure when actually it's the volume of fuel that needs to be increased when you bump up the duty cycle on the injector or change to larger-sized injectors.
Fuel pumps are electric motors that are voltage dependant. The more voltage you add, the harder it works (in a safe range of voltage, of course). In the case of newer model vehicles-like the Mitsubishi Evolution-the pump runs on a staged voltage, increasing as more throttle and load is added. On that premise, ensure that the pump is running the maximum amount of voltage under wide-open throttle.
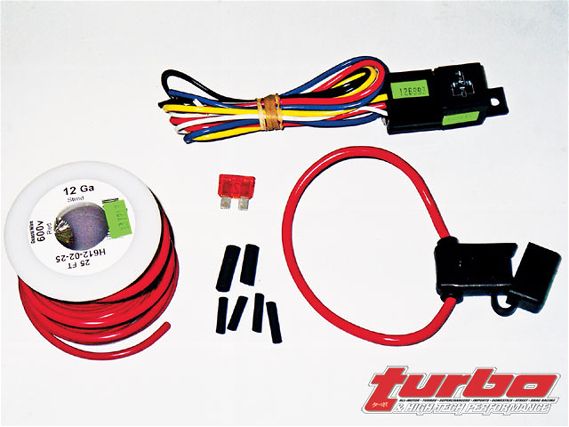
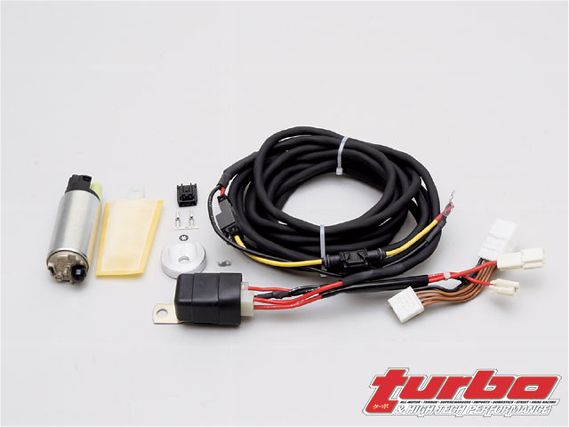 | AP Boss' pump relay harness comes equipped with all high-quality factory-style plugs for easy plug-and-play installation. The AP Boss pump is sold as a separate unit.
Unfortunately for Evos and other vehicles using the staged voltage setup, the pump doesn't always get the maximum amount of voltage. The fluctuation in pump capacity is due to the voltage having to travel through several hoops (i.e. the fuse box and ECU, before it finally reaches the main pump). Along the way, there's a drop in the voltage signal-often seen on the dyno when attempting to tune at a higher rpm. To remedy this problem, we found a simple yet effective solution that can be done in the comforts of your own backyard by using a over-the-counter relay harness to safely divert battery voltage from the battery straight to the pump.
Here are some solutions for a relay harness on two cars that are common candidates for fuel pump upgrades. For the first vehicle, an Evo VIII CT9A, we went with an Auto Produce Boss LAP pump relay harness, which is a popular upgrade among Evo owners overseas. The AP Boss harness is premade with factory-type Molex connectors and high-grade wire shielding. The harness is a plug-and-play unit that will work on the Evo 7, 8 and 9, including the MR. We also opted to swap the fuel pump with an AP Boss 240lph LAP fuel pump, as the owner had plans to increase horsepower in the near future. The second vehicle we put under the knife was a '91 240SX S13. The 240SX with aftermarket turbocharged SR20DET swaps in the states demands more fuel for obvious reasons. To remedy the issue of pump voltage here's a step-by-step process on how to build your own harness from scratch.
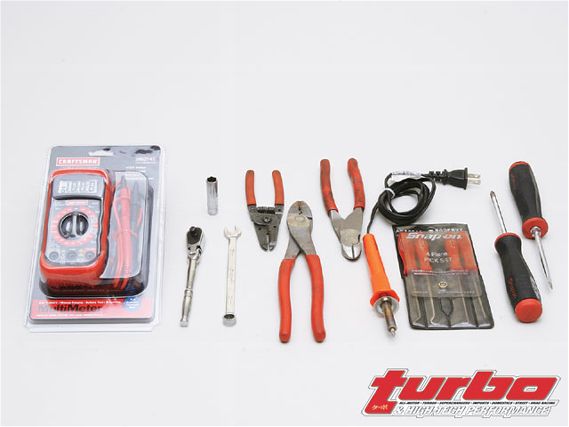
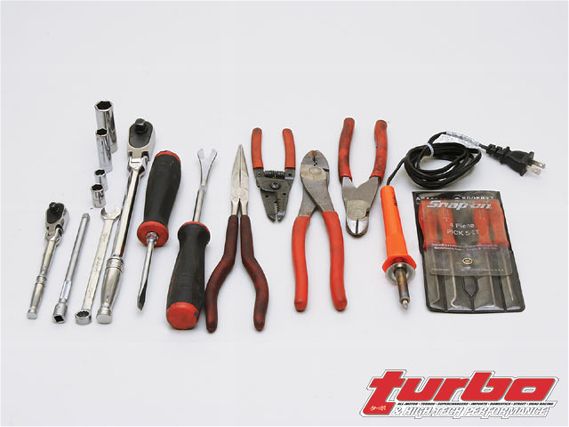 | Here are the tools used during this installation. Since you're dealing with fuel, keep a fire extinguisher handy.
Tools and supplies you'll need: 1/4-inch ratchet, 10mm shallow socket, 10mm deep socket, 8mm socket, 3/8-inch ratchet, 14mm deep socket, 10mm open-end wrench, Phillips head screwdriver, flat head screwdriver, panel popper, needle-nose pliers, dikes, pick set, crimpers, soldering iron, razor blade, cable ties and rags. Note: Make sure you're working in a well-ventilated area with access to a fire extinguisher.
Step 1
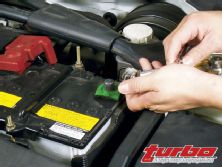
Remove the negative terminal from the battery. Make sure you have the radio code or you'll have to go to the dealer. Loosen the fuel cap to relieve fuel pressure.
Step 2
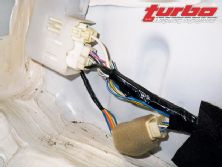
Locate the tab under the rear seat. Pull the tab while pulling up on the rear seat to remove it. To give access to the carpet, remove the step covers by the door. Remove the two clips on the far side of the carpet and pull back to expose the fuel system harness. On the passenger side, locate the pin eight connector D-12 and pin one connector D-30. To provide easier access to the connectors, remove the two screws holding the harness down.
Step 3
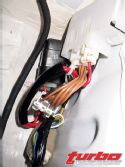
Connect the relay harness inline and find a suitable place for the relay that's not in the way of passengers' feet.
Step 4
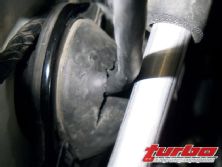
Run the harness along the side of the carpet up to the firewall. Remove the main harness grommet. Make a slit in the grommet and run the harness through the grommet. We made a slit in a cross to give enough clearance for the positive side connector to make it through without leaving a hole. Don't damage the harness in any way! Note: You might need to remove the clip behind the 10mm nut inside the vehicle to gain access. You may also want to remove the strut tower bar to get better access underhood.
Step 5
Run the harness to the battery. Make sure the harness can be secured out of the way from anything that could damage it. Attach the positive side to the battery. Wait until the pump installation is finished to attach the negative terminal.
Step 6
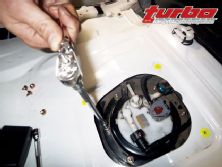
Back inside the car, remove the fuel pump assembly access cover (driver-side cover) Underneath, you will find one connector, two fuel couplers and one hose.
Step 7
Remove the 8mm nuts that hold down the pump assembly. The top ring will come free from the assembly. You'll have to finesse the ring, twisting it to free it. Don't force it; it will come out in the right position. Remove the pump assembly and be cautious of any fuel that might drip.
Step 8
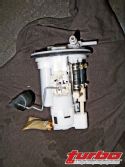
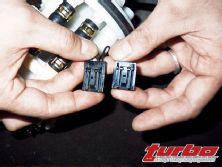
Remove the bottom cover of the fuel assembly. With a twisting motion, remove the pump from the assembly. Disconnect the electrical connector from the pump. The AP Boss fuel pump uses a different style connector so we have to cut off the stock connector and crimp the new pins and insert them into the new connector. Note: Do this one at a time so that you don't mix up which wire goes into which side. Add a bit of solder to the connector before you re-install to ensure that the wire doesn't come loose from the terminal. Remove the plastic o-ring from the stock pump and install it on the new pump. Install the assembly in this order: harness, pump, rubber grommet, aluminum spacer and bottom cover.
Step 9
Re-install the pump, making sure to not over-tighten the cover. Attach all of the connections. Before you put everything together, attach the battery to ensure there are no problems. Prime the pump by turning the key on and off a couple of times. Once the car starts, put everything back together and you're done!
 | Boost It Up - Garage.Tech
 | Here are some of the tools and supplies you will need for the install. Make sure you buy a high-quality relay. The difference in price is only a couple of dollars, and will keep you from having to go back and forth to get parts.
Nissan S13 Custom Fuel Pump Relay Harness Install:
Tools and supplies you'll need: 10mm deep socket, 10mm combination wrench, wire strippers, crimpers, soldering iron, voltmeter, screwdriver set, coat hanger, Bosch relay, premade relay bottom, 12-gauge wire (enough to run to the battery), 12-gauge female terminal, 12-gauge ring terminal, 16-gauge ring terminal, inline fuseholder, 15-amp fuse and shrink-wrap.
Step 1
Locate the fuel pump harness. For the S13, it sits right by the cap to the pump assembly in the trunk and to the right of the spare tire. Remove the cover to reveal the harness. With your multimeter, locate the trigger wire for the fuel pump and the ground. The wire should momentarily show voltage when the key is turned to the "on" position. The 12V should be blue with a red wire; the ground is white with a purple wire. Note: This vehicle is already outfitted with an aftermarket pump, so we're just adding in the relay harness and upgrading the wiring harness.
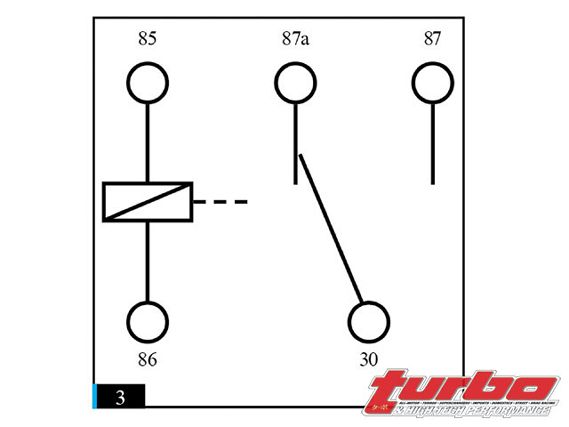 | When the circuit is open, the leads have no connection. No power is sent through the relay.
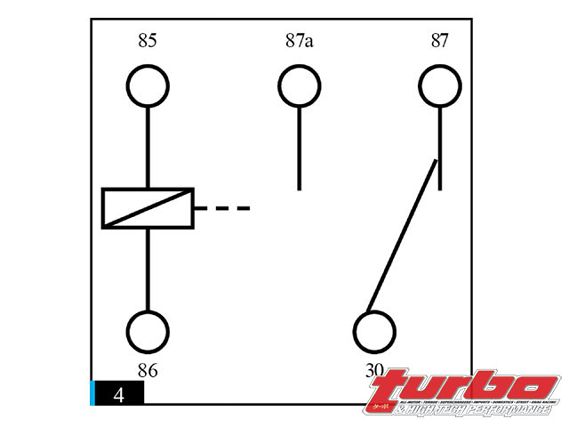 | When the circuit is complete, the connection is made between the feed power and the output. Power is now sent to the pump.
Step 2
Turn the key to the "off" position and disconnect the negative terminal on the battery. Examine the schematic on the relay itself; it should have a bunch of numbers and a bunch of symbols. To understand this, you have to understand how a relay works. A relay is like a door to two entrances. One entrance is always open, while one is always closed. A magnet inside the relay opens the second door when the circuit is complete and closes the previous one. On a Bosch relay, the numbers should correspond as follows: 30 is the feed; 87a is normally open; 87 is normally closed; 86 is trigger ground and 85 is the 12V trigger. If you bought a premade relay bottom it should be color-coded. Since we're only working with voltage going in one direction, 87a will not be used. You can de-pin this if you're using a premade connector. We also opted to de-pin the feed (30) since we're using a 12-gauge wire as our feed.
 | Boost It Up - Garage.Tech
Step 3
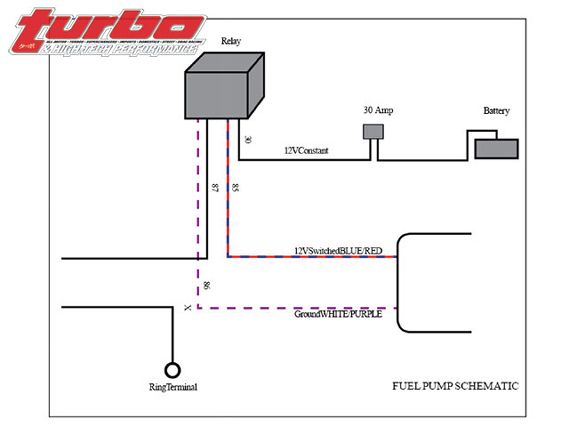
Cut the 12V wire (blue with red) and wire it (side closer to the harness) to the 12V trigger on your relay (85). Do the same with the ground wire (white with purple) to the GND trigger on your relay (86). For the wire from your harness that goes to the fuel pump, wire the normally closed on the relay (87) to the other side of your 12V wire (blue with red). For the remaining ground wire (white with purple), crimp a ring terminal and attach it to an appropriate ground location. We used the continuity function on the voltmeter to find out that the fuel pump cover was a ground. Crimp a female terminal to your feed wire and attach it to your relay.
Step 4
Run the feed wire to the front of the car. Solder your feed wire to your inline fuse holder. Make sure to properly shield your connection with shrink-wrap or electrical tape. Crimp a ring terminal on the opposite side of the inline fuse holder and attach it to the positive terminal on the battery. Secure your wiring so that it is out of the way of damage. Make sure to insert a new 15-amp fuse into your fuse holder.
 | This is roughly what you should have when you're finished. Be sure to check all connections and properly secure the relay to the body.
Step 5
Check all of your connections, since a short in your wiring can cause an electrical fire. Attach the negative terminal to the battery. Turn the key to "on" to check if the fuel pump is working. It should momentarily turn on as it normally does if you wired it right. Start the car to check if everything is working properly. Mount the relay in a location that it cannot get damaged. Put everything back together and you're done.