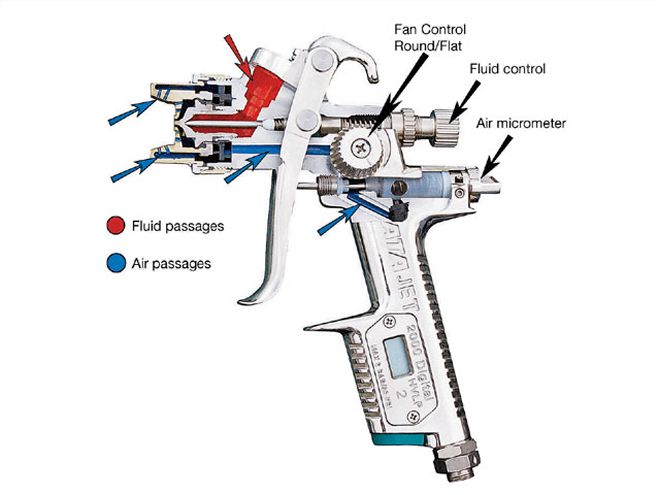
The Basic SetupMost spray guns have three basic controls that will allow you to adjust for optimum performance on your projects. These controls are: the fluid adjustment, the fan control, and the air micrometer (see diagram).
| spray Gun Basics spray Gun
(1.) The fluid control knob will allow you to adjust the distance that the fluid needle will travel back, away from the fluid tip, with each pull of the trigger. By setting this control all of the way open, you are allowing the full amount of fluid that the fluid to pass through the nozzle opening. To set the fluid adjustment, start by unscrewing the fluid control almost completely. Next, pull the trigger back to the full open position, and screw the fluid control in until you feel a force from the back side of the trigger. Setting the fluid adjustment in this manner will allow full-fluid volume to exit your spray gun.
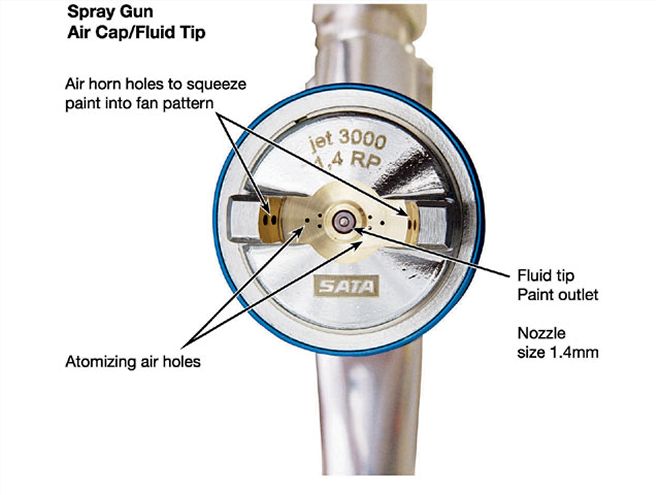
(2.) The fan control, commonly found on the side of the spray gun body, adjusts the amount of air distributed to the different drillings or air passages in the air cap. The air passages that are located around the fluid nozzle are the atomization air passages. The air flow from these drillings helps to draw material from the gravity cup and also disperse and atomize the fluid. The air passages that are located on the horns of the air cap help to squeeze and shape the fluid into an elliptical spray pattern. With the fan control adjusted fully open, air will be distributed to both atomizing and horn passages in the correct ratio. This provides your spray pattern, which is called flat spray. When you start to turn the fan control in or close it, it will begin to restrict the air traveling to the drillings of the horns of the air cap. Once you have turned the fan control knob fully closed, you will have what is called round spray.
(3.) The air micrometer, or air adjustment valve, is the last of the control knobs commonly found on a spray gun. Although not all spray guns have an integrated air adjustment. The air micrometer is used to adjust the air volume and pressure that is delivered to the air cap of the spray gun. This should be used for final, small adjustments to the air pressure. Normally, the air micrometer should remain in the full open position to reduce the amount of restriction and pressure lost within the spray gun. Whether adjusting pressure at the spray gun or controlling from a wall-mounted filter or regulator, the manufacturer's guidelines for operating pressures should always be closely followed.
| spray Gun Basics fluid Tip
Using the Controls to Create the Perfect Spray PatternNow that you know all of the controls on a spray gun and their basic functions, how do you make them work together to create the perfect spray pattern for the object to be painted? Let's start with the fluid control knob (1) and the fan control knob (2), which are generally the simplest parts of the set-up procedure. Start with the fluid control knob (1) adjusted to full open, full fluid delivery as previously described. You'll also want to start with a similar setting for the fan control knob-fully open, full fan. By doing this, you've allowed for full fluid delivery and the proper ratio of air to be distributed for proper fan size and atomization. You'll also want to ensure that you have the proper air pressure and air volume supplied to the spray gun as per manufacturer recommendations.
The next step is to connect the spray gun to the air supply and put fluid in the cup. When choosing your air supply hoses and fittings, you want to use large diameter fittings and air hose to supply sufficient air volume to your spray gun. Air volume or CFM (Cubic Feet per Minute) is very important for today's spray gun technology. Most spray gun operating instructions will list the CFM which is required by that spray gun. Once the air volume is delivered to the spray gun, it is then measured in pressure (psi). All spray guns will have a recommended operating pressure, as well.
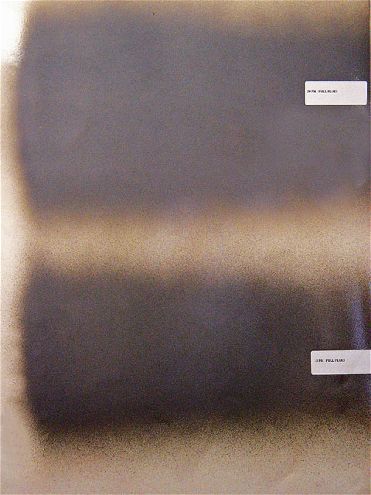
Now that the controls have been set, air supply has been connected to the spray gun, and fluid is in the cup, you are ready to begin spraying. Begin by checking the spray pattern on a piece of masking paper that has been taped to a wall or other flat, vertical surface. Depending on the spray gun you are using, you'll need to set the air pressure according to the recommendations. For example, if you are using the SATA KLC-B HVLP, you'll need to set the inlet pressure to the recommended 29 psi. Ultimately, you're looking for an elliptical spray pattern with a full wet center and an outer edge consisting of very small, consistent droplets of paint.
| spray Gun Basics spray Patterns
If you look at the spray pattern pictured, you can see the small droplets of paint become much larger when you do not have the correct air pressure (psi) being provided to the spray gun. Insufficient inlet pressure leads to low pressure at the air cap, resulting in larger droplets or lack of atomization. Proper atomization is the result of a balance between fluid delivery and air pressure. If you have an unsatisfactory spray pattern, as pictured, there are two basic ways to make improvements. First, the air pressure can be increased resulting in better atomization. Or, second, the fluid control knob can be used to decrease fluid delivery, which will also result in better atomization. A lower amount of fluid delivery will result in a smaller spray pattern, but will help to achieve an even spray pattern with fine atomization.
Following these steps will enable you to achieve optimum performance of your spray gun for perfectly finished results. For more information, contact SATA at www.sata.com.