The parking brake is an essential safety feature of any automobile. Many vehicles, especially older models, use drum brakes on the rear wheels, in which case the parking brake function is performed by the drum brake. On vehicles with rear disk brakes, a separate drum style parking brake is normally incorporated into the rear brake assembly. From time to time this shoe on this type of parking brake will wear out and require replacement. When this happens the amateur mechanic can save time and money by doing the job himself.
Block the vehicle wheels securely to prevent it from rolling. With the parking brake disengaged, loosen the lug nuts on the rear wheels. Jack the car up and make sure it is securely supported. Remove the rear wheels. Work on one wheel at a time and use the other wheel as a reference in case you forget how to get all the parts back together again.
Remove the brake caliper by removing the guide rod bolts and then sliding the caliper assembly off of the disk. Hang the caliper out of the way using a wire or bungee cord. Take care not to stretch or tear the flexible brake hose.
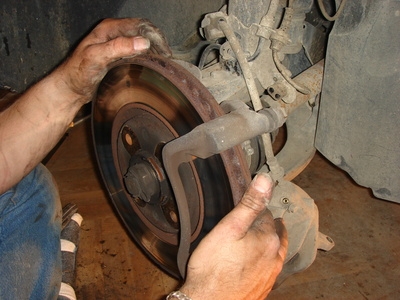
Remove the disk by unfastening the bolts that hold the disk to the hub assembly and pulling the disk straight off. If the disk is seized on to the hub assembly it can be loosened by tapping the shoulder of the center drum area of the disk with a mallet. Never tap the outer part of the disk or the braking surface area. Some disks have two threaded holes incorporated into their design to allow jacking bolts to be used to remove a seized-on disk. The parking brake mechanism is now visible.
Remove the return springs by firmly grasping the end of the springs with pliers and unhooking them from the retaining eyes. There are normally two return springs in an upper and lower position. The upper spring is usually paired with a solid strut. If a strut is present, remove it with the upper return spring.
Remove the hold-down pin and spring on each shoe by depressing the spring and turning the pin (usually clockwise) until it can be removed. Some pins will require a hex key while others can be turned with a large screw driver. On some vehicles spring clips are used to hold the shoes rather than a pin and spring arrangement. If clips are present then depress them and pull them out with pliers.
Remove the tension spring located right beside the star wheel. Use pliers to firmly hold the end of the spring and unhook it from the retaining eye. Remove the star wheel by sliding it out from between the shoes.
Remove the front (primary) and rear (secondary) brake shoe by pulling them straight out. Remove the parking brake cable retaining ring from the cable, and then remove the cable from the parking brake shoe lever.
Clean the brake and all removed components by spraying with brake cleaning fluid. Catch excess fluid in a metal drip pan and dispose of used fluid in accordance with local regulations.
Apply brake grease (high temperature grease) to the backing plate at the points where the brake shoes contact the plate. Apply brake grease to the star wheel threads.
Reverse the steps to reinstall the components. Refer to the other wheel to remind yourself where everything goes. When reinstalling the disk be sure the adjustment port is directly over the star wheel. Once the brake disk is back on, remove the plug (if any) in the adjustment port and rotate the star wheel with a screw driver until the shoes contact the disk housing. Back the star wheel off about eight notches to set the brake clearance.
Test the parking brake. Repeat the procedure on the other wheel.