Drum brakes are the rear brakes used on some vehicles. A drum brake is a braking system that consists of a steel housing (the drum) and pads (brake shoes). When you want to slow down, you press the brake pedal, which pushes hydraulic fluid through the system and actuates springs inside the drum which push the shoe against the inside of the drum to slow your car down. Over time, the brake shoes will wear down and you will have to replace them (once they become 1/8-inch thick).
Place the tire wrench over the lug nuts and turn them counterclockwise to break them loose. You should only loosen them. Do not remove the lug nuts. This is to make it easier to continue to loosen and remove the lug nuts when the vehicle is on jack stands.
Put your vehicle in first gear if it is a standard transmission. Otherwise, leave the transmission in "park" and put the emergency brake on.
Jack the vehicle up using the rear jack point. It should be located near the trunk area underneath the vehicle, and will be an extension of the frame of the vehicle.
Place a jack stand on either side of the car, under the frame or under the pinch welds in the rear of the vehicle. The pinch welds are an extension of the unibody. However, they are structurally sound enough to support the weight of the car. Lower the car onto the jack stands and check to see that the car is stable. To do this, gently push on the front and sides of the vehicle and make sure that the vehicle does not shift on the jack stands.
Remove the lug nuts and wheel the rest of the way using the tire wrench.
Loosen and remove the bolts holding the spindle on. There should be either four or five bolts depending on your vehicle. Once the bolts are removed, you may need to hit the drum in order for it to come off. Rust and corrosion have likely built up over time so you may need to hit it rather hard. To do this, take your hammer and hit the side of the drum all the way around.
Remove the drum when it comes loose.
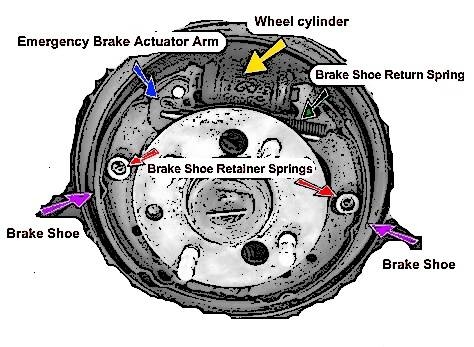
Inspect the brake shoes, springs, and boots for wear. Using the brake spring tool, carefully remove the brake shoe retainer springs for each of the brake shoes
Hold the back of the retainer pin (not visible in the illustration) and place the brake shoe removal tool over the retainer spring (the red arrows point to it). Press "in" and turn the tool counterclockwise. This will remove the spring and the retainer. The brake shoes will then come lose so that you can remove them.
Put the new brake shoes on and put the drum back together. Installation is the reverse of removal.
Put the outer part of the drum back on and replace the bolts and spindle you removed.
Line up the holes on the rim of the wheel and slide it back on. Hand tighten the lug nuts and give them a 1/4 turn with the tire wrench clockwise to tighten. The wheel should sit firmly against the drum brake assembly.
Lower the car off the jack stands. Torque the lug nuts anywhere between 75 and100 foot pounds, depending on your manufacturer's recommendations. Use a crisscross pattern to tighten the lug nuts. For example, tighten one lug nut and then tighten the nut across from it.
Check the braking system and ensure that there is correct pressure in the brake lines by pumping them a few times.