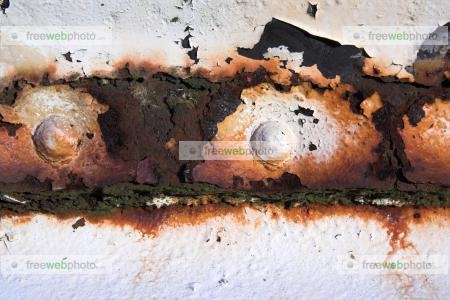
Untreated rust on a car is like an untreated disease: The longer the rust remains, the larger the spot will become, spreading and destroying the body of your car. The cure for this disease is to remove the sick panel and replace it with a healthy panel. The doctor curing this disease is a mig welder.
Buy your welder and accessories. When performing auto restorations, a mig welder has the power needed to weld through the steel that cars are made of. You will also need welding wire as it is the actual metal that is melted into place by the mig welder. Welding gas is needed to run the welder, and a welding helmet will protect your eyes from the sparks emitted during the welding process. You will also need clamps to hold the new panel in place while welding, and a hand grinder to trim any edges that may overlap.
Fit the new body panel to the old. Before beginning the welding process, you need to fit your new body panel to the existing frame. It is essential that the lines of both panels match to avoid overlapping. If the new panel is larger than the area being removed, measure and cut the excess length with your hand grinder. It is at this stage you will need a clamp to temporarily hold the new panel in place so you can mark the spot needing to be removed. Simply draw a line along the edge of the new panel so you know where to make your cut, and then remove it until you are ready to weld.
Remove the old panel. The worst thing you can do when trying to prevent any rust from spreading is to weld the new body panel over the existing panel. Over time the rust will eat through to the new panel. To remove the old panel, make a mark that is about 1/2 inch below the line you made in Step 2. This is so you will have something to weld the new panel to. Then take your hand grinder out and cut along the second line until the panel can be removed.
Adjust your welding current. The welding current controls the speed at which you weld. The best current to use for this body job is between 40 and 60 amps. Welding at a high speed not only causes holes to burn through the panel, but can also decrease the depth of weld you want to achieve.
Reattach the new body panel. Once the diseased panel has been removed, place the new panel back on and use clamps to hold it in place. If you do not have clamps readily available, you can tack weld with your mig welder. This will create small welds that will hold the new panel in place, allowing you to weld the entire piece on.
Begin welding. For welding body panels, use the stitch welding method. This is simply a series of welds that create a continuous line of weld across the body panel. Once you have welded the entire panel onto your vehicle, fill in any gaps by plug welding, which is the process of filling gaps with welded metal.
Finish your job. Once everything has been welded, grind the new metal down so it is flush with the rest of the vehicle. After grinding, you can apply primer and paint to the new panel so it matches the rest of your vehicle.
