How to use a timing light, and how to adjust your timing.
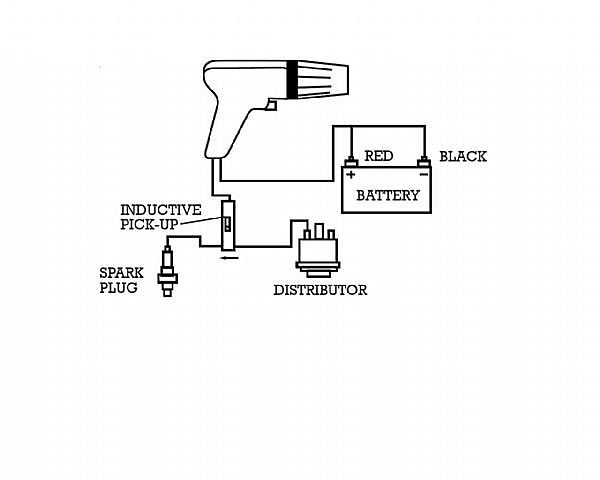
Whether man or woman, it is always good to read the instructions first, no matter what you are doing. You can use the picture here as an example, but hook up your timing light as instructed by your manual. Most all timing lights have three clips on them and these instructions will discuss those types.
How to Use a Timing Light
Make sure the auto engine is off and the key is removed from the ignition.
For the next steps, make sure the battery terminals are clean enough to allow for a good connection. If not, then clean as required being cautious not to allow any contact on your skin because this is battery acid. If it does come in contact, then just wash with soap and water.
Clamp the red clip to the positive terminal of your car battery.
Clamp the black clip to the negative terminal of your car battery.
The largest clip (the one with the thickest insulation) goes on your #1 spark plug wire by attaching the clip around the wire that leads to your #1 spark plug.
Next, you will want to rotate the lower crankshaft pulley so that it has the timing marks called out on the crankshaft pulley. Be aware that on some cars the timing marks are located somewhere else and you should consult either your owner's manual (another instruction manual), or automobile dealer. You may also see a pointer on the engine block that will point to these marks as well.
Your auto's spec sheet should tell you what your timing degree should be. For example, a 1969 Ford 429, 6 Degrees BTDC @ 550 rpm in drive gear - with automatic trans, with a firing order of 1-5-4-2-6-3-7-8. All this means is that you want to line up the pointer on the timing light with the 6° timing mark when the engine is idling in gear at 550 rpm. As you can see, it also says something about "BTDC" for this Ford. There is also an "ATDC." "Before Top Dead Center" and "After Top Dead Center" - top dead center is the point where the piston reaches the highest point in the cylinder and that is when the compression is the greatest. Now, your timing marks with have a line labeled "0" with marks above and below it, and depending on which way the wheel rotates, you will see the lines before the "0" (BTDC), or after the "0" (ATDC).
If you want, you can use some chalk to mark the timing marks to make them more visible. Then, on the side of the distributor, disconnect the rubber hose from the vacuum advance and put a piece of duct tape on the end of the hose to seal it off.
Okay, now start up your engine, letting it warm up. We will assume that your auto is properly idling, otherwise, if the idle is off, and your mechanical advance may influence your timing adjustment.
Take your timing light and aim it at the timing marks, pressing the button on the light. Because you have the light hooked up to your spark plug means that it has current passing through it every time your spark plug fires, making the light go off and on, creating the strobe effect. Because of this, the timing marks should appear to be standing still. Now, is that pointer (earlier described) pointing at the correct mark? If yes, you are all set, you do not need to adjust your timing. You are good to go! If it is not, you should adjust your timing. See the next steps to adjust the timing.
Adjusting the Timing
Below the distributor, at the base of your distributor shaft, is a fastener called the distributor hold-down clamp. We want to loosen this fastener so the distributor can turn on the shaft. Grasp the vacuum advance and move it back and forth.
Rotate the distributor slightly, then aim your timing light back at the timing marks again. How does it look? If it is farther away from the marks, then move the distributor in the opposite direction. Then, check again with your timing light. Continue doing this until the pointer is pointing at the correct degree point as required.
Once the timing is good, re-tighten the fastener for the distributor hold-down clamp, making sure you do not move the distributor!! After re-tightening this fastener, just double check your timing again to make sure -- tightening the distributor may change your timing.
Turn off your engine, remove the key from the ignition, and disconnect the timing light.
That is all there is to it! You have done well! Pat yourself on the back after you wash your hands!