Speedy Auto > Car Tech > 4x4 > Engine

1992 Jeep YJ Wrangler Header Install - 4Wheel & Off-Road Magazine

1992 Jeep YJ Wrangler Header Install - No More Wheezing 1992 Jeep Wrangler Yj exhaust Manifold Photo 9609265

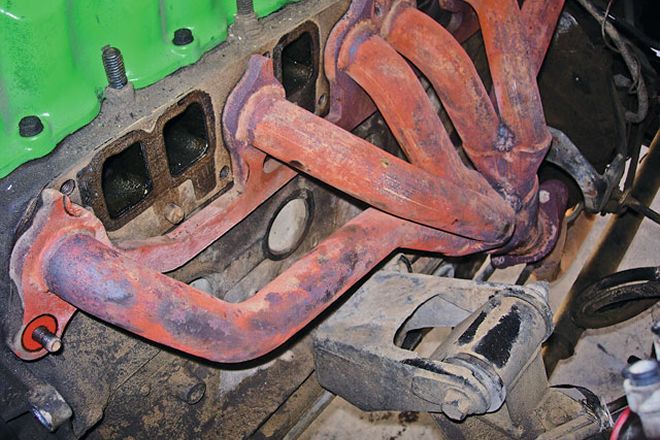
If you own a Jeep with a 4.0L engine, chances are pretty good that you either have, or will have, a cracked exhaust manifold. Oft-cited causes range from bad motor mounts to poor factoryprocesses. Whatever the reason, a cracked exhaust manifold on a Jeep 4.0L engine is almost guaranteed. This was the case with our '92 Wrangler.

For the past year, we'd been driving with a cracked exhaust manifold. Other than being mildly annoying and robbing some of our power, it wasn't really a problem until it was time to get the YJ smog-checked again. Obviously, the powers that be would just turn us away with the cracked manifold, so it was high time to seek out a replacement.

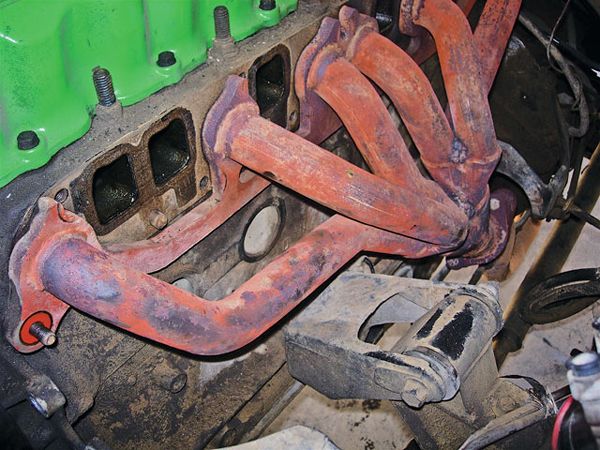
A call to Quadratec put us in touch with the good folks over at Edelbrock. The folks at Edelbrock proceeded to tell us about their new Ti-Tech coated header for the Jeep 4.0L engine, which debuted in the 2005 Edelbrock catalog. The new Ti-Tech coating system is far superior to traditional ceramic style coatings, as it is stable at temperatures up to 1,600 degrees. In fact, at high temps it will actually flex, making the coating harder and more abrasion-resistant. If that's not enough, the header itself is a piece of art. The Tri-Y design header is a direct bolt-in. It uses 1.5-inch-diameter, mandrel-bent 409 stainless steel primaries, a 1/2-inch-thick laser-cut port flange, and a 1/4-inch-thick laser-cut collector flange. The header also features a limited lifetime warranty from Edelbrock and retails for $350.

As stated by Edelbrock, this is a direct bolt-in piece that went in with no trouble at all in about four hours. After finishing the install, the YJ fired right up and the Jeep sounded great. It no longer sounds like an angry lawnmower, and it feels stronger now that it is breathing properly, while passing smog with no problems whatsoever.

PhotosView Slideshow The Edelbrock Ti-Tech Coated Jeep 4.0L header comes with everything you need to install it. The kit includes the header, a new intake/exhaust manifold gasket, a new donut gasket for the downpipe, new hardware for the downpipe, and a set of very complete and detailed instructions. The first step in the installation is to remove everything that is connected to the intake manifold with the power-steering pump being the first thing. Loosen and remove the fan belt, then unbolt the power-steering-pump bracket from the intake manifold. You can leave one bolt in the block and just lower it out of the way to give you the room you need to work. With the power-steering pump out of the way, remove the wires and vacuum lines. A good tip is to use masking tape and a notepad. We marked all of the plug wires and vacuum lines with numbers on masking tape, and then wrote down where they went on the notepad. Disconnect the throttle cables from the throttle body. Then, using a towel, depress the Schrader valve on the fuel rail to bleed the pressure from the fuel lines. Once you have all the wires and vacuum lines removed, unbolt the manifold. Start with the bolts underneath the intake manifold. A couple of extensions and a socket U-joint are very helpful here. Once the bottom bolts are all removed (there are four) have a friend support the intake manifold while you remove the remaining bolts. Then remove the intake manifold from the engine. Remove the bolts connecting the old header to the downpipe. Remove the old header and the old gasket. With the gasket removed, take a scraper and remove any residue left behind. Be sure you don't let anything fall into the intake ports. Next, install the supplied gasket on the studs protruding from the engine block. Then slide the new header into place and support it with the two outer nuts and the center bolt, per the instructions. Coat the bolts with antiseize before you reinstall them. Per the supplied instructions, thread the lower bolts in about two turns before you reinstall the intake manifold. Use two of the top bolts to hold the intake manifold in position while you loosely install the remaining bolts. Then, following the instructions, torque the bolts in order to 25 lb-ft. After that, go ahead and install the supplied bolts to reconnect the new header to the downpipe. Once that's done, grab your notepad and reconnect all of the wires and vacuum lines to the intake manifold. Reconnect the throttle cables, reattach the power-steering pump and bracket, and reinstall the fan belt. Give everything a once-over to make sure everything is tight and reconnected as it should be. Then, fire it up. Listen for any exhaust leaks. Let the engine come up to operating temperature, then go drive it, listening for any rattles or exhaust leaks as you go.