Round Spring Swap - Jeep Suspension Upgrade - Jp Magazine

Pete Trasborg Brand Manager, Jp

It was either going to be one of the best modifications we’d ever done to this Jeep or one of the worst. There was no middle ground here. We really like the front coil, rear leaf spring architecture of the XJ Cherokee suspension. The front coils flex like mad off-road and provide a great ride on- and off-road. Out back the rear leaf springs’ inherent internal friction means we can disconnect the front sway bar and still feel stable on side hills. And, our custom junkyard packs flexed really well for leaf springs and provided an overload leaf that allowed us to haul parts in the back.

round Spring Swap braced Rear Jeep Axle Photo 46137408

As capable as our ’98 Cherokee was, it still wasn’t as good as a TJ, LJ, or JK. It wasn’t quite as comfortable on-road, and we just couldn’t keep up with the Joneses off-road either. But, it was armored, locked, and all the bells and whistles still worked. It basically came down to whether we wanted to put a bit more cash into our trusty Cherokee or start looking for another platform to build.

This isn’t our first rodeo. One of the reasons we custom-built our junkyard leaf pack was because all the off-the-shelf lift springs we’ve run over the years were too stiff for our tastes. So, we built the pack with a combination of Cherokee, Comanche, YJ Wrangler, and Toyota leaf springs to get us about 31⁄2 inches of lift. The next step up from there would be custom aftermarket leaf springs. But they can cost up to $1,000 and the rear of the Jeep would still come around on us on loose or rutted roads and we’d lose our cargo-carrying capacity.

JPMP 130300 COIL 02 HR Photo 41967674 
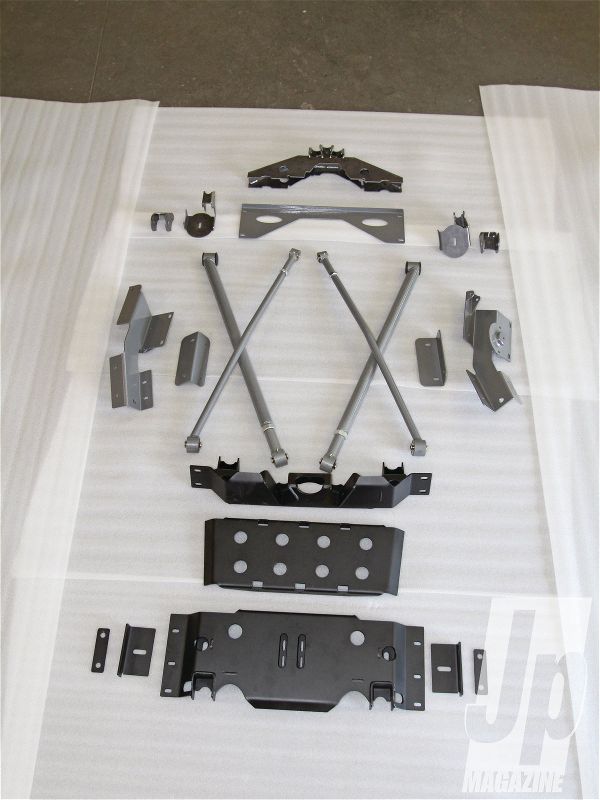
We had T&T put the kit on our Jeep for the insider’s tips and tricks and (to be honest) the install seemed a real bear to pull off in the driveway. In reality, it was easier to put this kit on our Cherokee than basically every TJ long-arm conversion we’ve done. Don’t fear doing this one at home. Shown is the rear dual-triangulated kit that we put on our Jeep. All the parts above the dashed line can be had for around $1,500 depending on what options you go with. The part below the line is the belly skidplate that we already had; it’s shown here so you can see how the new parts match up with the old.

Like many of your Jeeps, this one has been modified slowly over the years as the factory parts die or as circumstances required. One of the first modifications we made to this Jeep was a set of T&T Customs chassis stiffeners. We knew this Jeep was going to see a lot of off-road miles and we wanted to try and keep the Unitbody together. Then when it came time to take it to Moab we added T&T’s Bellypan to protect our AW4 and NP242 from the slickrock. Later, when our factory front control arms and bushings were twisted and dry rotted, we added T&T’s long Y-link arms. Our Dana 44 rear axle was bought used for $300 with T&T’s truss already on it. So when the time came to improve on leaf springs we started looking at T&T’s rear coil conversion.

The problem was, as sold, the coil conversion provides 51⁄2 inches of lift, and we wanted to stay at 31⁄2 inches. It also deletes the rear sway bar and we were kind of leery about wheeling (specifically side-hilling) with coils at all corners and no sway bars. After talking with the company, we figured out that we could stay low by using used LJ coils and used JK Rubicon shocks, both of which we already had. So, all told it was going to be just under $1,500 in parts to coil-convert the rear of our Cherokee.

round Spring Swap jeep Cherokee Wheeling Photo 41967713 This was the last wheeling trip for our faithful Cherokee before we put it under the knife and ditched our trusty rear leaf springs. At this point we still didn’t know if we were going to love the change or hate the change, so we fought a driver’s door that didn’t really want to open in order to get out and snap a few pictures of it crossed up for posterity. Tune in next time for our ride and abuse evaluation.

Even though we’d ridden in a Cherokee with the T&T rear coil conversion, it was a short ride. Living with something is a lot different than just riding in it for a short time, but we knew that leaf springs weren’t going to give us what we wanted out of this Jeep. And, if anyone is going to give you an honest opinion on how a suspension works it is going to be us. So, in an effort to improve our Jeep and give you guys an honest review, we went ahead and took the plunge. For more on how it works, check out the story “Hit It Big” in this issue.

PhotosView Slideshow This is our rear brake line. We dropped the end at the Unitbody and raised the end at the axle, but obviously it wasn’t enough. We aren’t sure how long we had used our rear brake line as a limiting strap, but we are amazed it held out so long. The new coils provide even more droop than this, so fortunately T&T had longer braided stainless steel lines on the shelf and this little problem didn’t slow down the install. Cherokees use a combination of studs and bolts to retain the factory transmission crossmember. The factory part is 1⁄8-inch-thick. The T&T belly skid is 3⁄16-inch-thick and uses more than just the factory mounting holes. The factory studs are held in with thread locker and can be difficult to remove but welding the nut to the stud makes removal easy. Even though the studs have been in there for 15 years, the heat from welding loosened them up enough that they came right out with just a wrench. As it turned out, we were part glad and part annoyed that T&T pulled our belly pan off to fix the stud situation. Glad because we found our tranny mount was shot and we were able to replace it. Annoyed because this is our third tranny mount in five years. We would just put a polyurethane mount in here, but we’ve already got aftermarket motor mounts and a poly mount here would mean lots more vibration. Maybe we’ll just stop beating this Jeep so hard so the mounts live longer. Yeah, as if. No two Jeeps are exactly the same. Variations in weight and axletube diameters make a big difference in how high your Jeep actually sits when it’s all done. Since we wanted to stay low and save some cash, we made sure we had several coil springs on-hand. The T&T kit uses rear TJ coils, but with our rear armor and rear bumper (“Hard Ass,” Aug. ’10), we knew we would need more than just regular TJ coils. LJs are heavier than TJs, so the factory coils have a higher spring rate. Shown here from left to right are: factory LJ coil, factory LJ Rubicon coil, and used Old Man Emu 3-inch-lift coil. If you aren’t a cheap ass like us, T&T offers new coils with the full kit. If you go for the new coils, they can get you really close to your desired ride height based on experience and what you tell them your Jeep is equipped with. If the ride height is off, T&T offers a one-time coil swap for the price of shipping to get you closer. At the axle side a 0-inch-lift and a 1-inch-lift coil bucket are available to further dial in your desired ride height. The rear coil conversion stiffens up the rear of the Unitbody better than Suzanne Somers’ Thighmaster. It does so by sandwiching the Unitbody with formed 3⁄16-inch-thick brackets and crossmembers in several places. The bummer is that you have to pull your rear seat and carpeting (if you still have it) to get them installed. The good part is that the brackets bolt in, and the seats and carpeting can go back like stock afterwards. We thought we were being all slick because we showed up with a T&T truss on our rear axle already. There were numerous problems in addition to the truss being installed incorrectly, but fortunately that didn’t change the quoted price for parts. Even though we thought we were saving time and money, T&T knew that the existing truss would need to come off to weld on the coil conversion truss. The coil springs mount more inboard than the leaf springs did and the upper control arms attach to the axle above the pumpkin. Once the old truss was off, it was easy to see our rear axle was bent. So before welding the new one on, T&T uses this tried-and-true hydraulic straightening technique. We had quite a bit of droop with our custom homemade leaf springs, but the coils easily gave us another 3 to 4 inches at the spring which translated to around 8 inches at the tire. In a lowrider Jeep where uptravel is limited by the body, droop is important. Even though it made the install a bit more difficult, we put this picture together so you could clearly see the difference in travel, shock and spring location, and under-axle clearance when comparing the coil conversion and the factory suspension setup. At only 31⁄2 inches of lift, a slip yoke eliminator wasn’t needed when we rolled into Wyoming. However, T&T advised us from outset that due to the additional droop we’d be binding our factory rear driveshaft or we’d have to put a limiting strap on the axle. We like our tires in contact with the ground, and our factory rear driveshaft had at least 100,000 miles on it since the last time we even thought about it. For the price, a Tom Wood’s slip-yoke eliminator and double-cardan rear driveshaft is hard to beat and meant we didn’t need a limiting strap. Early NP231s used caged roller bearings on the mainshaft. Later ones eliminated them which makes installing slip yoke eliminators in NP231s child’s play. However, our NP242 used non-caged roller bearings on the mainshaft which can make things interesting when trying to put the new shaft back in the T-case. An old-school trick is to use high-tack grease to hold the roller bearings in place (arrow). It was also discovered that our chain was stretched, but fortunately T&T had a source in town and we were able to get a new one the same day. Running an exhaust with any dual-triangulated four-link is difficult, and most people or shops just install a turndown tip on the muffler right behind the belly pan. We were never a huge fan of that because of the added interior noise and all the dust we eat on the trail that the exhaust kicks up. In a hard top Jeep, the noise can be positively deafening. T&T had that one covered, too, and had us order some 21⁄2-inch-diameter mandrel bends (PN SUM621008) and a Flowmaster Hushpower muffler (PN HSH-12518400) from Summit Racing. Between the control arms and our GenRight Off-Road 30-plus-gallon gas tank, we just couldn’t see how it would be possible to get the exhaust to exit in the factory location. Turns out it is just as much art and patience as it is experience and good welding skills. The pipe hangs down further than we’d like, but it is higher than the skidplate when viewed from the side. Also, the lower control arm immediately adjacent hangs lower than the exhaust does, but we’ll still have to be careful about getting rocks up there. All in all, it is worth it to us to have the exhaust exit in the rear.