BDS Lift for the 2011 GMC and Chevy 2500HD - Four Wheeler Magazine

Ken Brubaker Senior Editor, Four Wheeler

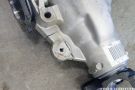
The 2011 GM 2500HD pickups are a vastly different animal compared to the 2010 models. A casual glance at the exterior won't tell you much, but take a gander underneath and the changes will leave you mesmerized. The frames are all-new, and the front frame structure is 125 percent stiffer. The front suspension is still an independent torsion-bar setup, but it's completely redesigned with forged steel upper control arms and machined cast-iron lower control arms. The steering is also redesigned with a new larger steering gear, linkages, and new power steering pumps for both gas and diesel applications. Out back, the truck uses a new, larger asymmetrical leaf-spring design. The leaves are three inches wide, which is an increase of 20 percent. When combined with the enhanced powertrain systems, the 2500HD pickups boast greater towing and payload capacity as well as improved ride and handling characteristics.

129 1104 Bds Lift For The 2011 Gmc And Chevy 2500hd before Photo Photo 36006186 Before

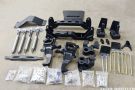
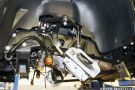
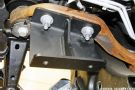
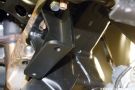
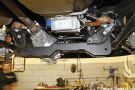
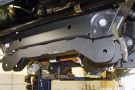
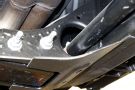
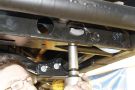
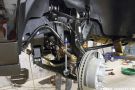
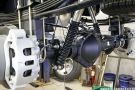
BDS Suspension, hailing from Coldwater, Michigan, was the first aftermarket manufacturer to get a kit for this vehicle to market. Their High Clearance kit lifts the truck 6 1/2 inches and allows fitment of up to 37x12.50 tires. The kit features some unique items like torsion bar mounts that integrate with the lower A-arms. This system eliminates the need for lowering the torsion bars. The kit also includes ductile iron CNC-machined steering knuckles that are made in the U.S.; differential and front impact skidplates that protect and also lock the new crossmembers together for strength; and new stainless-steel front brake lines.

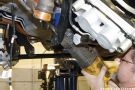
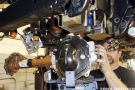
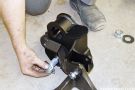
We recently spent a day at Attitude Performance in Arlington Heights, Illinois, watching owner Matt Dinelli install one of the first kits under a customer's brand spankin' new rig. It was fascinating to see how BDS approached lifting the new 2500HD. Here are some highlights of the install.

Bottom Line
We really like the fact that this kit focuses on high-clearance componentry, and when you gaze underneath the rig, there's nothing dangling or protruding. This is due in part to the A-arm-mounted torsion bar brackets and the high-arched crossmembers. Installation of the kit was as expected, and was nothing out of the ordinary for an IFS rig. Ride and handling are reported to be outstanding, and there are no weird squeaks or rattles coming from the underside.

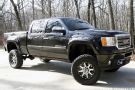
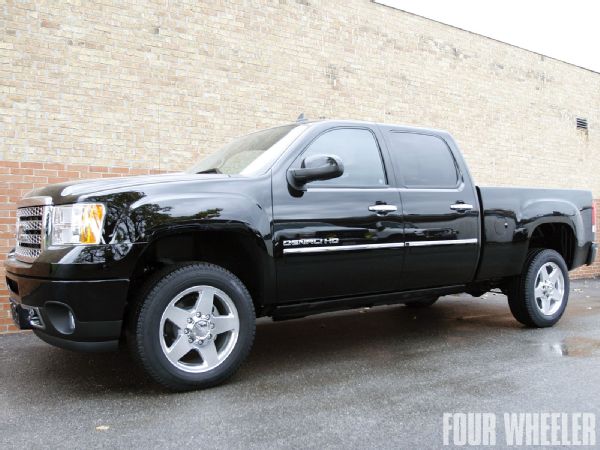
The owner of this rig chose to replace the factory LT265/60R20 (32.5-inch-diameter) Goodyear Wrangler SR-A tires with 35x12.50-20 Nitto Trail Grappler tires on 20x9-inch KMC Addict wheels. (It's also worth noting that the 2011 2500HD uses an 8x180mm bolt pattern, which is different than its predecessor) This combination improved the front valance-to-ground measurement from 10.5 inches to 18.25 inches (a 74-percent increase) and the rear hitch-to-ground measurement from 18 inches to 24 inches (a 33-percent increase). Approach angle jumped from 22.3 degrees to 38.7 degrees (a 74-percent increase).

Overall, we were pleased with the outcome of this install. Not only will the truck perform better off-highway, it looks far more balanced with the increase in altitude and larger tires.

PhotosView Slideshow After Here are the components of the BDS 6 1/2-inch lift. Installation of the kit requires an array of standard hand tools, plus items like a T30 Torx bit, torsion bar tool, and a reciprocating saw. A number of factory items have to be removed before installation of the kit can begin on the front of the vehicle. Major items that need to be removed include the front plastic splash guard, factory bellypan, sway bar end links, brake calipers, brake rotors, CV axles, steering knuckles, shocks, lower control arms, driveshaft, rear crossmember, and front differential. Trimming of the lower rear driver-side control arm pocket is required to make room for the lowered front differential. Detailed instructions are included with the kit, and they show exactly how much, and where, the material needs to be removed. As you can see here, a reciprocating saw made short work of it. The area was then deburred and painted to resist corrosion. Likewise, the American Axle 9.25-inch front differential housing must also be trimmed to provide frame clearance. The BDS instructions include a paper template for guidance. In these images you can see what the housing looked like before and after the trimming. This is the new center diff bracket with bushing installed. It attaches to the differential housing using factory hardware. Front differential drop is accomplished in part by a pair of new, longer differential brackets. This is the passenger-side bracket, which attaches to existing studs on the passenger-side factory bracket. On the driver-side, the differential drop bracket fastens at the two front original differential mounting holes with new hardware. The front differential assembly is then moved into position and fastened to the new brackets using the provided hardware. Next up, the new rear crossmember is mounted in the rear lower control arm pockets with the hardware that held the factory crossmember. This crossmember serves a dual purpose. One of its duties is to act as a mounting point for the new center differential bracket installed earlier. The bracket attaches to the crossmember via a 9/16x4-inch bolt. The crossmember's other duty is to serve as a rear mounting point for the lower A-arms. The front lower control arm pockets are used to mount the new front crossmember. This crossmember provides the front mounting points for the lower A-arms. It is held in place by the hardware that held the factory front crossmember. This is one of the torsion bar brackets that are included with the kit. These brackets are the reason why the torsion bars stay tucked up close to the vehicle. A bracket fastens to each of the lower A-arms and raises the torsion bars front mounting position. They fasten in two places on each control arm. They also serve as the lower mounting position for each shock. With these installed, the lower A-arms can be reinstalled on the truck. Before we installed the driver-side lower A-arm, we took this photo to illustrate why the driver-side control arm pocket had to be trimmed to make room for the front differential. Without trimming, it's clear that the front differential would not have fit.
Next up, the differential skidplate, crossmember support brace, and front skidplate/splashguard are installed with the supplied hardware.
Moving along, the new knuckles are installed. Onto each knuckle goes the factory hub O-ring, brake dust shield (slightly trimmed for brake caliper clearance), and hub assembly, among other things.
At this point, the torsion bars are reinstalled. As a point of reference, the torsion bars are much larger in diameter than the previous generation of GM 3/4-ton truck. Here you can see one of the new torsion bar keys next to a previous generation key.
Another interesting change to the 2011 2500HD is that the torsion bars travel through a frame crossmember. The way BDS designs this suspension system, the torsion bar stays in the factory position and travels through this crossmember. The new torsion bar keys unload, load, and function just as the previous generation. However, it needs to be noted that the 2011 GM 2500HD design requires a new special tool for unloading and loading. Here you can see the completed frontend.  Note the new sway bar end links, gas shocks, and brake lines. Out back, the truck gets a height increase via 5-inch lift blocks. These blocks have built-in bumpstops. Longer U-bolts, a brake line relocation bracket, and E-brake relocation bracket are also included. Our upgraded gas shocks bolted right on, but if installing the BDS 5500 Series shocks the passenger-side bumpstop pad will need to be trimmed due to the larger diameter of the shock body. Instructions for the trimming are included.