Expert Jeep Lift Advice For Beginners - Jp Magazine

Pete Trasborg Brand Manager, Jp

We get a lot of questions revolving around driveline vibration, death wobble, worn U-joints, tire fitment, shock length, and so forth. If you are new to lifting Jeeps, these are all questions that you should be asking as there are a lot of hidden costs and potential issues in any modification to the stock suspension.

2006 Jeep Wrangler Unlimited installation Photo 27627527

It doesn't matter if you are installing the most complete lift kit on the market or piecing your lift together from your friends' hand-me-downs, no Jeep or lift install is immune from potential problems that might crop up along the way.

We can't hold your hand and guide you through your specific lift kit on your specific Jeep, but we can give you the knowledge you need in order to ask educated questions and know what to look for when the time comes for your Jeep to get lifted.

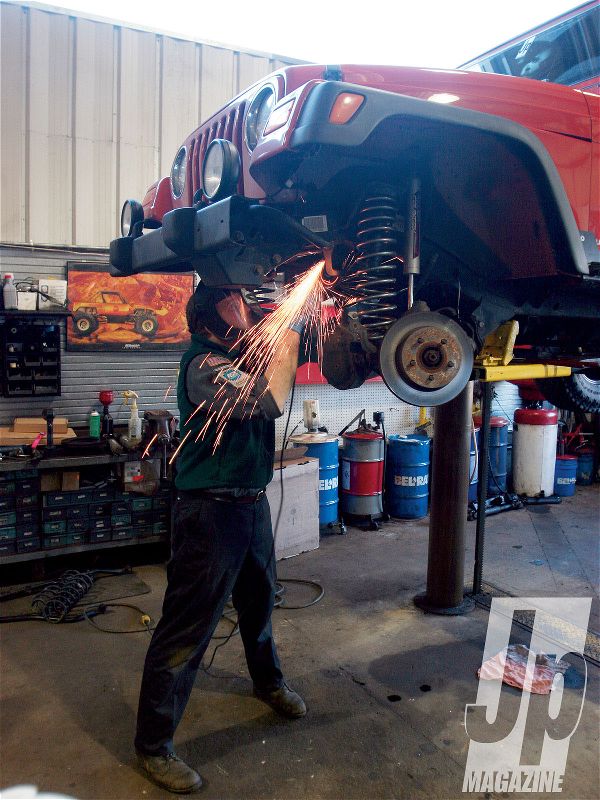
For this story we are installing the new 21/2-inch X-series Rough Country Suspension lift kit on a '06 Wrangler Unlimited. The LJ is a great choice for this story, as the '97-'06 Wrangler is one of the most popular Jeeps with our readers, and many of the things we mention here apply to other Jeeps.

In the middle of a snowed-in winter, we took the LJ to OK4WD in Stewartsville, New Jersey, to pick up some expert tips and to make sure that the install was as painless as possible.

Mail Order Meats
There's a lot to be said for not having to go to three different places to get the tires and wheels you want at a decent price. With as many projects as we build, carting tires all over can get old. It's nice to use a place that has decent pricing and ships the tires mounted and balanced right to your door.

We went to Discount Tire for a set of 33x12.50R15 Goodyear Duratracs mounted on 15x8 MB Motoring V-drive rims with a black machined face. This Jeep sees mild trail duties and lots of daily driving, so the Duratracs were a no-brainer. They share the MT/R's carcass, but are a bit less aggressive and have tons of siping making them good for snow and ice. They are the most aggressive all-terrain tire we've seen from Goodyear, and after 5,000 miles and four snow wheeling trips, we are quite happy with them. We wanted an aluminum wheel that was heavy duty, looked good, and didn't require constant polishing. Two months into one of the snowiest winters in recent history, these wheels are no worse for wear from the road salt, and the few rocks we smacked them into didn't crack them or throw them off balance.

2006 Jeep Wrangler Unlimited wheel Photo 29015830

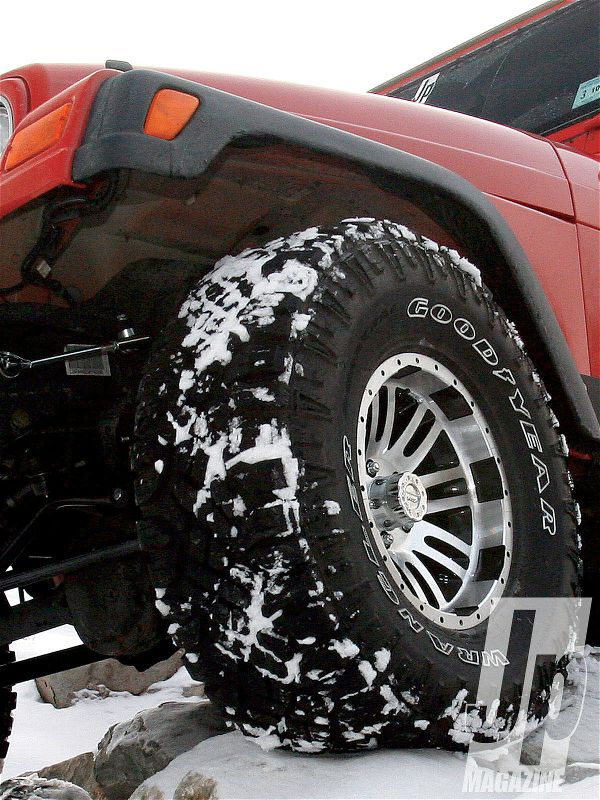
The tires showed up within a week to our New Jersey location, protected by cardboard and without any damage from the UPS monsters. Many newer aluminum wheels feature lug nut holes that are too small for our impact sockets or lug wrenches, and it drives us to distraction. These are no different. The big difference is that Discount Tire provided new lug nuts, new locking lug nuts, and a thin-wall adapter socket so that we were able to put the tires on with our lug wrench. Overall, we are happy with the price, and thrilled with the content and customer service. We'd definitely recommend Discount Tire in the future.

PhotosView Slideshow The X-series kit is very complete and includes springs, upper and lower adjustable control arms with X-flex joints, adjustable track bars, front sway-bar disconnects, and shocks. Rough Country also suggests a 11/4-inch body lift to clear the 33-inch tires we were shooting for and a transfer case drop kit (not pictured). Always lay everything out and assemble the adjustable parts, if needed. Check the parts you actually have against the parts the instructions say you should have before spinning wrenches, because there is nothing worse than being halfway through a lift and discovering you are missing a critical part.
The adjustable control arms are stout units. The flex joints have a 21/2-inch diameter body with 11/4-inch diameter threads. The upper arms are made of 13/4-inch diameter, 0.312-wall DOM tubing and the upper control arms are 11/4-inch diameter solid round stock. It is important to have the arms adjusted the same length from left to right; starting at the stock length or within 1/4-inch of stock will get you in the ballpark for a 21/2-inch lift. Make sure to grease the bushings before putting the arms in. Not all control arms have Zerk fittings, and sometimes you can't easily get to those that do. We wanted the Jeep to be a low as possible with the 33-inch tires, but we didn't want the tires eating the flares or getting cut on sheetmetal. Rough Country suggested a body lift, but instead we went to Daystar for some 2-inch extended bumpstops (KJ09101). They replace the stock bumpstops and have a stiffer durometer rating than the stock rubber bumpstops, so they should keep the tires out of the fenders when we are wheeling. PhotosView Slideshow Always check brake-line clearance. Check front and rear brake lines at full droop and fully-articulated. We staged this photo; in reality, we were okay with the stock brake lines at our lift height, but if they were any higher, or if this was a four-cylinder Jeep, we would have had to use brake line drop brackets or extended brake lines. It's better to check the brake lines during and immediately after the install to avoid possibly stretching them out and losing braking capability. If you go with extended brake lines, make sure they stay away from all moving parts (shocks, springs, and especially tires). You can use a small spring or bungee cord to keep them safe. If you are like us and push the tire size limits, once the control arms, springs, extended bumpstops and shocks are on the Jeep, bolt up the tires and check for clearance. We have some slight interference on the front when at full-stuff and turning, and slight contact with the flare at the rear. We could install the body lift or space the bumpstops down a bit more if it becomes an issue when we are actually on the trail; for now, we'll leave it. You can perform this same check at home with a good floor jack, but be sure to chock the wheels first.
Any time you remove the control arms, and especially the track bars, it is very likely you will have issues lining up the bolt holes. You could use a come-along or a Hi-lift jack, but our favorite method for realigning the axle in the frame is to use a ratcheting tie-down strap. Just like the control arms, if you are putting an adjustable track bar in, adjust it to be close to the stock track bar. We went about 3/8-inch longer than stock, but higher lifts will require more length to keep the axle square under the Jeep. If you can afford it, we suggest adjustable track bars whenever possible.
PhotosView Slideshow We've said it before. We think that the Currie Enterprises CurrectLync is the best bolt-on steering upgrade for the TJ/XJ/LJ. There is a huge increase in strength over the stock parts with a 11/4-inch diameter forged alloy drag link and 11/4-inch solid alloy steel tie rod and it is actually the same price as Moog replacement parts. ... ...Currie adds 4 degrees of angle into the tie rod mounts of the CurrectLync to alleviate binding in lifted applications. As such, the company doesn't recommend this kit for Jeeps with 2 inches or less of lift because of the possibility of the tie rod ends binding in the other direction. One of the keys to avoiding bumpsteer is to keep the drag link and track bar parallel. In an off-the-shelf lift kit such as this one, this should be taken into consideration in the design phase. However, lesser lift kits or pieced-together lifts might not have the two parallel, so hold a straight edge up to check it. The included sway bar disconnects need to be adjusted so that they are the same length as well. We adjusted ours to be 21/2 inches longer than the stock end-links. If you are installing one of these X-series kits, be sure to use some thread locking compound on the top bolt to keep it from backing out.
PhotosView Slideshow In a TJ, the rear driveshaft angle is a killer. With 21/2 inches of lift there should be no problems, but it doesn't hurt to check. With a CV driveshaft, you want to have the input yoke of the axle pointing at the output yoke of the T-case. With a regular driveshaft, the goal is to split the difference and try to get both yokes at similar angles to the ground. The rear driveshaft is the most important, since you will be driving at higher speeds in 2WD than 4WD.
Up front, your toe also changes when you lift the Jeep. The pitman arm is further away from the knuckles than it was stock, so you will need to lengthen the drag link, and in this case, the tie rod as well. On Jeeps where the tie rod only goes from steering knuckle to steering knuckle (CJs, FSJs, JKs, etc.), you only have to adjust the drag link. On most Jeeps made in the last 20 years, however, you need to adjust both. You can do this at home with a tape measure by measuring from one tire to the other. You want the front measurement to be about 1/8-inch less than the rear measurement, giving 1/8-inch toe-in.
Up front, you want to make the driveshaft angle correct, but the caster is much more important for day-to-day drivability. The more lift you throw at the Jeep, the more you change the caster. Positive caster is when the upper ball joint is behind the lower and negative caster is when the lower is behind the upper. You want to adjust it for about 5 degrees of positive caster, which helps the steering wheel return to center and minimize wandering. If you've already got death wobble, however, sometimes less caster is better.
PhotosView Slideshow We threw the Jeep up on OK4WD's alignment rack to check how we'd done. We got pretty close (ignore the values here, we were messing around trying to get the toe-in/toe-out picture). Camber on a Jeep isn't easily adjusted. You could get offset ball joints, but by and large we don't even look at it if we are doing an alignment at home. If it doesn't look bent, it probably isn't. The only other thing that a professional shop can adjust is the thrust angle, which basically tells you that your axles are parallel to each other. If you adjusted all the arms equally and your frame is straight, you will nail this one. You can double check by measuring from the front axle to the rear axle on both sides. Both measurements should be the same. If you somehow get this wrong, you will wear tires out more quickly.
Once you've got everything aligned and your angles straight, it's time to flex the Jeep just enough to check for clearances, brake line length, shock length, and so forth. This is about the only thing an RTI ramp is good for. We thought the rear shocks were going to be too long, but they worked great with our extended bumpstops-the shock's bumpstops hit at the same time the frame-mounted ones did. We got about 4 more inches of vertical travel overall than we had before with our budget boost, and the ride quality is far superior.
We also opted to not use the t-case drop kit, since we were running minimal lift, and we had the added rear driveline of the LJ. But we discovered the hard way that on an automatic-equipped LJ with the optional skidplate, the driveshaft doesn't clear the support bar for the front skid. We learned from OK4WD that even a stock LJ with the sway bars disconnected can have this problem. We threw the spacers in to check for clearance and found they were taller than needed. So, we cut them in half and reinstalled. That gave us the clearance we needed, but the first time out wheeling, we hit the skid on the rocks (big surprise). We decided that transmission fluid in the pan was more important than dragging a skidplate so for the time being it is staying.