Most hard-core Jeepers know about the Black Diamond XCL (Xtreme Coil Link), a Warn-engineered kit that redefined rockcrawling in 1996. Black Diamond created this production coil-conversion kitso that YJ and later-model CJ owners (and inexperienced shops) didn't have to fumble through a custom longer-travel suspension project.
Superlift acquired Black Diamond and spent the past five years R&D-ing a successor to the XCL (which is still available). Two priorities emerged: simplifying installation and creating a kit that was more street and trail friendly. Controlling weight transfer-especially at pavement speeds-is what sets the X2 apart
The X2 kit differs from XCL in four main areas. The X2's long-arm front suspension is four-link (compared to XCL's three-link), and the rear is leaf-spring-over-axle (SOA) as opposed to the previous triangulated four-link with coilovers.
For YJ applications, the X2 kit includes progressive-rate front coilovers and axle bracketry for the front link arms. Single-spring coilovers (optional for TJ applications) got the nod because of quieter operation than dual-coil designs. The coils are coupled to 10-inch-travel monotube gas shocks with remote reservoirs.
To address the factory stability issues under torque load, both YJ and TJ systems use rear SOA leaves that are designed specifically for the kit. The packs have nine thin, shot-peened leaves with tapered ends, antifriction pads, military-wrap main leaves with OE-type rubber bushings and bolt-type spring clips. Their U-bolt plates have integral bumpstop extensions, and boomerang-style shackles clear the bumper during suspension travel. Black Diamond SS rear monotube shocks by Bilstein provide damping and enough length to accommodate additional suspension travel.
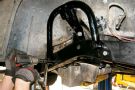
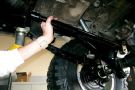
Up front, the X2 uses Superlift Rockrunner link arms, which have threaded ends that won't bind, unlike Heim-style joints. The arms are made from 0.188-inch-wall DOM tubing (1.5-inch OD uppers, 2.0-inch OD lowers), and they're contoured to allow full lock-to-lock steering and maximum ground clearance. The longer the arm, the less the operating angles during suspension cycling, so more movement is possible before the arms bind within their mounts.
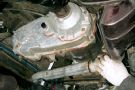
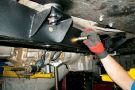
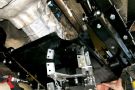
These extended arms attach to the frame at the X2's skidpan assembly. Two side rails serve as rear mounts for the link arms. The rails also support the 3/16-inch-thick inner pan, which functions as a transmission crossmember.
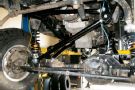
Steering correction is also addressed. The kit includes a dropped pitman arm, an adjustable track bar with bracket, and a lateral brace. These components are compatible with the OE under-knuckle tie-rod or a "flipped" high-steer arrangement.
The X2's marquee upgrade is Superlift's Torque Fork traction bar. Similar in design to the XCL's three-link front arms, the Torque Fork uses two shackles to control spring wrap throughout suspension cycling.
Other options are extended Rockrunner link-arm ends for up to 3 inches of wheelbase stretch as well as the eXtreme Clearance flat skidpan, which requires floorboard modifications. Front-axle weld-on link-arm brackets are available that essentially emulate the OE TJ arrangement are available for popular frontend swaps, as are spring pads for common rear axle swaps.
The X2 installation also provided an opportunity to try Pro Comp's new Xtreme MTs. Since the X2 fits up to 37-inch-tall tires, we chose the 37x12.50-17, one of a handful of fitments available at press time. A trade-off is a D load range-stiff for a short-wheelbase Jeep.
One compromise with production alloy 17s is limited widths and backspacings. Since this YJ is a daily-driver, we stuck to aluminum wheels to minimize rolling mass. Pro Comp series 1023 got the nod because the 17x9 size has 4.5 inches of backspacing.
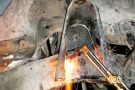
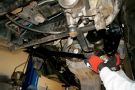
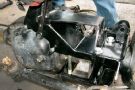
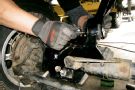
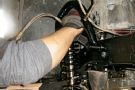
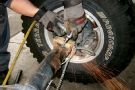
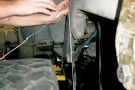
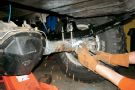
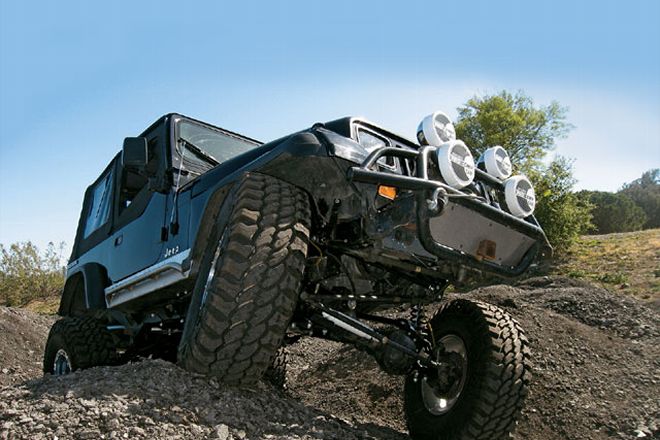
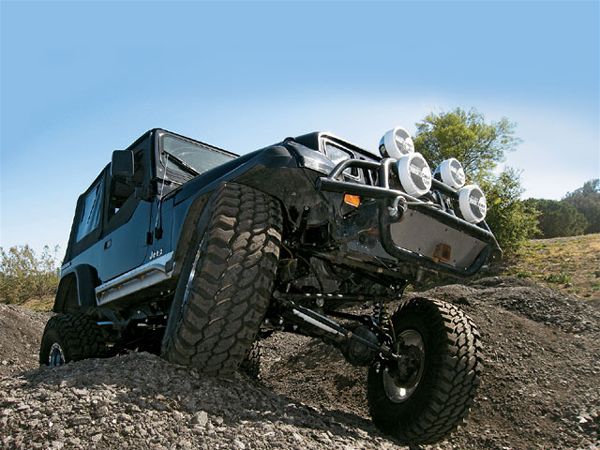
For mechanically skilled Jeep owners, the photos here show highlights of a YJ job, the most involved X2 installation. (Superlift highly recommends professional installation.) YJs require axle and shock brackets that replicate the OE TJ approach. Also, the '88 YJ used here had a Ford 8.8 rearend and a Vortec V-8 swap. Installation highlights:
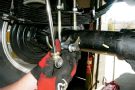
* Although the job could conceivably be done at home using floor jacks and jackstands, a hydraulic lift is invaluable for lifting the Jeep on and off the axles. Even with a hydraulic lift, this installation/instruction-sheet session at 4Wheel Parts took the better part of three full work days.
* Using a plasma cutter produces more precise cuts than an acetylene torch or reciprocating saw, minimizing the grinder work.
* Errant cuts into the frame should be patched by welding on plates.
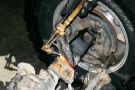
* Black Diamond front axle kits for Dana 44 and Dana 60 applications use weld-on brackets.
* A transfer-punch kit helps center the numerous holes that are drilled through the frame.
* Always check inside the frame for wires and lines before drilling through from the outside.
* After drilling pilot holes, a stepped uni-bit hogs through the frame faster than using a series of single-size drill bits.
* The unibit creates tight tolerances for the frame sleeves. Losing a sleeve inside the frame can result in a time-consuming fishing expedition.
* Button-up details include leveling the front end with the coilover adjusters, re-aiming the headlights, recalibrating the speedometer, retorquing all fasteners, greasing all zerks, bleeding the brakes, routing and securing brake hoses and breather tubes, rerouting the exhaust around the link arms, obtaining a longer rear driveshaft, and an alignment job that includes setting the caster in addition to the toe.
* If retaining the OE NP231J transfer case, a slip-yoke eliminator (SYE) kit is required. A "super short" kit provides more than 2 additional driveshaft inches but requires an electrical speed-sensor setup.
Although the X2 appears to have slightly less overall rear travel than some four-coil 6-inch long-arm TJ kits, the leaves control lateral weight transfer better than coils. This allows the X2's frontend to "stick" when a rear tire comes off the ground. Our test YJ had front and rear ARB Air Lockers, so any two tires simultaneously in contact with the ground were able to claw the Jeep out of ruts that swallowed a TJ with a 6-inch long-arm kit and dual Air Lockers.
Road ride is a bit stiffer than stock, particularly with the new D-load-range Pro Comp Xtreme M/Ts running 22 psi on the street. A competent alignment job that dials in caster is crucial for eliminating wander, and the optional steering stabilizer absorbs some road shake. Also, the Torque Fork works as intended-off-the-line launch is smooth, even under enthusiastic V-8 acceleration.
The X2 appears to achieve Superlift's goals. The kit isn't cheap (no long-arm systems are), and installation is a multi-day proposition. However, the result is a Wrangler that can keep up with many trailered trail rigs, outwheel some, and handle predictably enough to be driven home on the highway.