As we head down the backstretch on our engine break-in stand build, we know that all the hours of hard work to design and build it will soon be worth it, as we fire up and break in a Floyd Hand-built 462.
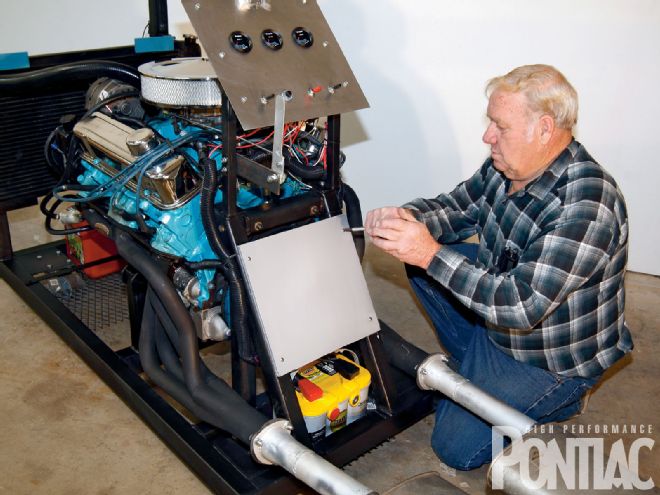
 Floyd Hand is attaching the flexplate shield. Note the exhaust is exiting toward the rear of the stand in this instance. There are many choices for where the exhaust can exit to best suit your needs. For instance, if you are using stock manifolds, Ram Air manifolds (not long branch) or shorty headers, you can install them backward as is done on some dynos, so the exhaust can exit up front to the outside of the stand using some bent pipes to connect to the mufflers. Or if you prefer to have the exhaust exit at the back but want to spread the pipes off of the headers further apart, a combination of pre-bent flanged 45- or 90-degree pipes can be installed.
Why should you consider building or buying this stand? According to Steve DuSold of DuSold Enterprises, "In the restoration market today, it's common for shops to either suggest builders that have proven track records or to subcontract out engine builds per the customer's specifications.
"Nevertheless, even if an engine was professionally built and then broken in, unless it's installed relatively quickly, it will need to be serviced and potentially run on a dyno or an engine break-in stand again. This is because when an engine sits for a length of time, even if it is rotated over and primed on a regular basis, the seals may deteriorate and start to leak. Using this heavy-duty break-in stand, which is designed specifically for a classic Pontiac V-8, but can then be adapted to support multiple engine makes, gives our customers the piece of mind in knowing that their engine is running right before it's installed."
The engine break-in stand outlined here can be constructed for less money than a commercial stand and is heavier-duty. It can be built by you from scratch, using this three-part article as a guide, purchased in a weldable pre-cut kit from DuSold, or purchased already welded from DuSold. (See sidebar "Three Ways to Get It Built.")
Now, let's wrap up the build.
Conclusion
For hobbyists who would like to build their own break-in stand, there is no getting around the fact that this stand will take a considerable amount of time and the proper tools to complete. According to Steve DuSold, "We looked at various designs and we feel that this one is very well suited for heavy engines like Pontiacs. Sure, it took some heavy lifting and patience to design and build, but it was worth it. In fact, the break-in stand is so heavy-duty, we recommend that only a commercial facility order a kit with the thicker wall 3-gauge, 2x2 square tubing."
It can be an exciting project for a car club or the hobbyists who are ready to take the next step and improve or hone their machining and/or welding skills. Since the stand is offered in three different kit forms, you can pick the configuration that best suits the skills you have. Take your time, be patient, and before you know it chances are you'll quickly become the most popular guy amongst your Pontiac buddies.
Special thanks to DuSold Enterprises, Bob Cook, Floyd Hand, and Marty Parker, all of whom went well beyond the call of duty, dedicating many hours and needed knowledge and parts to aid in the preparation of this series of stories.
3 Ways To Get It Built
The engine break-in stand is designed so that hobbyists can source their own materials and build their own stand with help from friends. The cost for the basic materials and hardware, not counting the electrical, cooling, and fuel system components, should be about $375 from a steel supplier. Visit highperformancepontiac.com for a comprehensive materials list. Others may prefer to purchase a basic materials kit, a pre-cut kit, or a fully welded kit to best suit their time and resources.
For those of you with access to a welder, a pre-cut kit is a great option, as the cutting and machining is very labor intensive without access to a machine shop or machine-shop equipment. For those of you without the equipment or a welder, a complete welded kit can also be purchased. All kits use 11-gauge, 2x2 square tubing rather than the 3-gauge used in the story (3-gauge is an option), and do not include wheels, gauges, fan, or ancillary components.
Option 1, Basic Materials-PN Pon-EBS1, retail $399 plus shipping. The basic metal supplies to cut and weld your own engine break-in stand will be packaged and labeled so you can refer back to the articles and cut and weld the stand and dashboard. Option 2, Pre-Cut Kit-PN Pon-EBS2, retail $799 plus shipping. The basic metal supplies included in Option 1 are pre-cut and drilled (tapped if necessary) so you will only need to weld the various structures together and source your nuts, bolts, and ancillary items, and cut the dashboard for your choice of gauges and switches. Option 3, Complete Welded-PN Pon-EBS3, retail $1,399 plus shipping. The pre-cut kit will be welded and assembled and includes bolts for the engine crossbar, motor mount brackets, and removable dashboard.
The kit can be shipped via truck freight or other customer-specified delivery methods. A full list of options and prices is available online at www.dusoldenterprises.com. Prices shown here were accurate as of press time but may change due to metal market price fluctuations.
Part III: Tools & Supplies
4-foot x 8-foot x 0.75-inch expanded metal grating
Battery terminals
Gas can
1-foot vinyl baseboard gasket
3M general trim adhesive
Measuring tools (tape measure, caliper(s), square(s))
Drill bits
Welder
Wrench and sockets (standard and metric)
Cutting, grinding, and filing tools
Marking pen, scribe
Dead blow or sledge hammer
C-clamp
Engine hoist
4-foot, 1-inch x 3/16-inch flat steel
2-foot x 2-foot of 11-gauge steel (13 1/2 x 13 x 0.1250)
#10x3/4-inch-long, self-tapping screws, quantity (3)
#10 x 1-inch-long, self-tapping screws, quantity (4)
Flexible tubing (3/8 to 1-inch, varying lengths)
Tie-wraps
Electronic multimeter
Screwdriver
SEM Trim Black paint
Throttle assembly (optional, see text for details)