![Basic Tubing Tutorial - [DIY corner]](https://www.speedyauto.cc/howto/UploadFiles_1022/201603/2016030709374198.jpg)
Last month, we covered the basics of tube bending using various tools, from the standard entry-level benders all the way up to the fancy specialized ones. Any of you who went out and tried your hand will probably attest to the difficulty in getting the hang of it, but with a little practice, anyone can become a self-taught tube bending pro. This month, let's take a look at the other sometimes dreaded task: tube flaring.
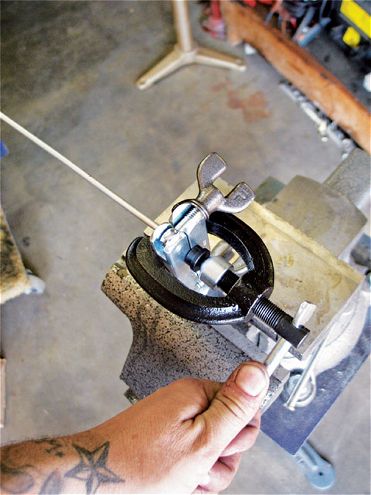
If you're like me, flaring tubing isn't one of your favorite things to do in the garage-or maybe it is. In the past, I'd always have a heck of time making even halfway decent flares. The particular tools could be mostly to blame, but I'm pretty sure it had a lot to do with my inexperience with the process, as even the best tools can perform poorly if not used properly. But, as we learned with the bending procedures, the better the tool's quality, the better the outcome, which makes perfect sense for the most part. However, that's not to say you need to go and get the best money can buy if you're only going to be doing occasional flares. Experimenting with various flaring tools, I found that while the expensive ones do work great, the average-priced ones produced results nearly as good-and even one of the cheap ones, too! Amount of usage, skill level, and personal preference will determine what you ultimately end up with.
Every classic truck that I know of currently on the road has brake lines. Similarly, they also have fuel system plumbing, although that can be comprised of AN fittings, which don't apply here. In other words, if you're asking yourself, "What does tube flaring have to do with me?" just consider the possibility of having to repair a damaged or worn line some day. Since I'm currently in the beginning stages of a frame-off project, I knew there'd be days filled with bending and flaring chores, which was the main inspiration for learning more.
For most applications, you'll deal with 45-degree double flares (other types, such as bubble flares, Metric ISO flares, and single flares will not apply). Tube flaring facilitates a seal between a threaded nut and the inverted-flare seat (either another fitting or a destination point such as the master cylinder). If you have any prior experience with flaring, then you're fully aware of the messy consequences of a poorly flared line: it leaks. Because the tubing is actually being squashed once the fitting is tightened, the best seal occurs initially; removal of said fitting will only promote wear and fatigue, so it's best not to lock that nut down till you're sure everything is A OK. Just as important to the sealing is the shape of the flare itself, so before you even insert a piece of tubing into your flaring tool, make sure that the end is cut even and the tube's ID is perfectly round. From there, get comfortable with your tooling of choice and flare away!