Wes and I are occasionally verbally beaten by those wishing we’d showcase more off-brand classic pickups in both color features and tech stories. We’re told that there are plenty of Studes, Dodges, and Internationals out there and we should be giving ’em their due.
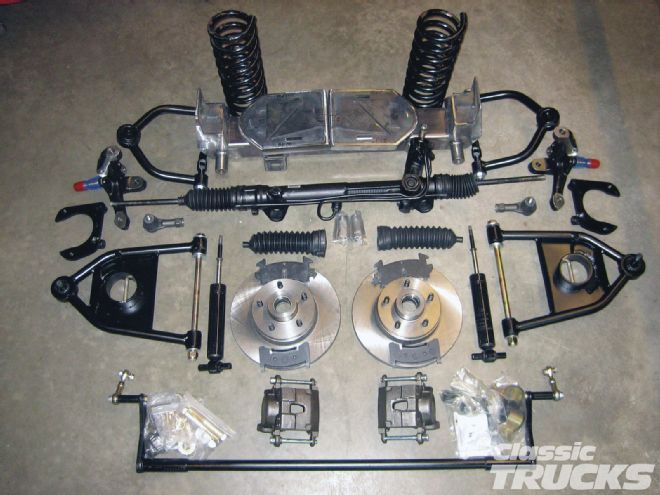 The Engineered Hot Rods IFS hub-to-hub kit, as received by Dan, included the crossmember; shock tower hats with support gussets; 1-inch sway bar and mounts; Ford power rack-and-pinion with extensions/boots; Ford 5 on 4½-inch hubs with 11-inch rotors; GM single-piston calipers and mounting brackets; stock-height spindles; upper and lower control arms with ball joints, springs and shocks; tie-rod ends; and all necessary hardware. As with any install, we begin by inventorying the kit’s components to make sure everything needed has indeed been shipped (don’t forget the steel plate needed to box the original framerails). Once everything is accounted for, the actual work can begin.
To this we earnestly reply that we would if we could, but it’s rare that we run across many examples and we’re attentive to ’em when we do. That said, I recently received, out of the blue, a bunch of info and images from a CLASSIC TRUCKS reader by the name of Dan Lorimer, chronicling the installation of an aftermarket IFS assembly in a 1950 International Harvester L-120 pickup.
That’s right, I said International and aftermarket IFS in the same sentence! You see, it just so happens that Dan ran across an old friend of mine who’s an extremely talented suspension fabricator who specializes in designing and building suspension systems for, shall we say, most of the less-than-popular make and model trucks and cars out there.
Tom Pierce, the owner and brain trust behind Engineered Hot Rods LLC, in Chino Valley, Arizona, is a close personal friend and one who’s been designing and building classic truck and street rod chassis and suspension systems for well on 25 years. He’s produced high-quality components for I.H., Dodge, Studebaker, Hudson, Jeep, and Willys trucks as well as Chevy and Ford trucks (and street rods) in his family run manufacturing facility.
All of EHR’s fabricated components are made right here in the good ol’ USA, and having built a cool little Model A sedan on one of his custom street rod chassis myself, I can state with confidence my extreme satisfaction in his designs and workmanship, too. It’s great to have a manufacturer here in the West that pays attention to off brands since the eastern part of the country has enjoyed the benefit for quite a few years. But I digress, the focus here is to let readers who prefer the less-common classic pickup nameplates know that there are sources of quality rodstoration products out there, so follow along while we give you an example of this International aftermarket upgrade. CT
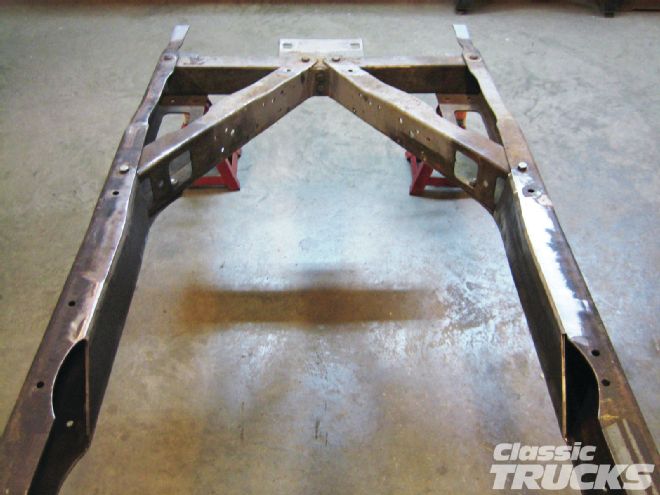 The initial portion of the IFS conversion of course requires the removal of the International’s original suspension, but beforehand, Dan located the front axle centerline and scribed the top of the framerails so the new crossmember would be located correctly and the front wheels would be correctly centered in the front wheel openings upon completion. Once the frame is scribed and devoid of the old components it’s time to make sure the frame is both level and square. In the case of this ’50 International, there are some original frame rivets that can be used to determine this. At the forward end, the two rivets holding the front crossmember to the side framerails are good datum points. On the aft end, the two rivets holding the crossmember (over the rear axle) are the other good datum points. The diagonal distance between the points was measured to confirm the frame was square. If the measurements differed by more than 1⁄16-inch, necessary action should be taken to improve the square. A come-along from corner to corner could be used to achieve this.
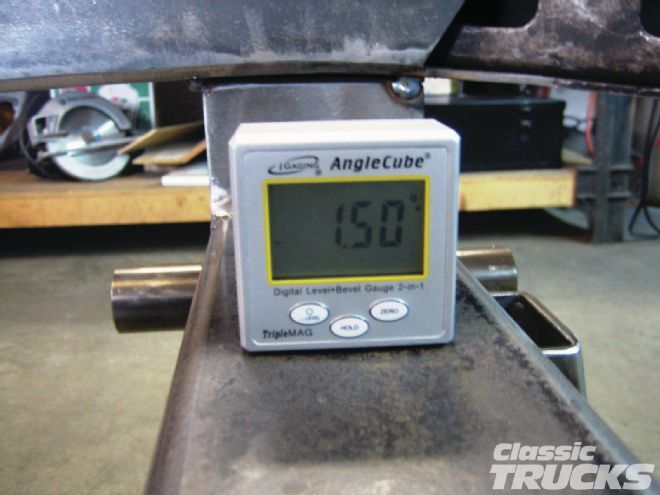 Once sure the framerails are still level (and the angle gauge reads 0.0) the angle gauge is then relocated from the framerail top to the top surface of the new crossmember. With the crossmember steps snug to the bottoms of the framerails (and the angle gauge still showing 0.0) the rear edge of the crossmember is then lowered until the angle gauge reads a 1.5-degree angle toward the rear of the chassis. (The forward edge of the crossmember member should be firmly in contact with the frame and only the rear edge lowered to achieve the 1.5-degree reading.) The crossmember is then held in that position (shims may be necessary). Next, the centerline of the crossmember and the axle centerline are checked again to ensure they were still lined up and the distance from the lower control arm holes to the opposite frame side are measured to ensure they’re of equal distance on each side. The crossmember is then securely tack welded to the frame and the measurements and alignments checked yet again. Once satisfied, the assembly can then be finish-welded, moving from side to side to prevent overheating the frame.
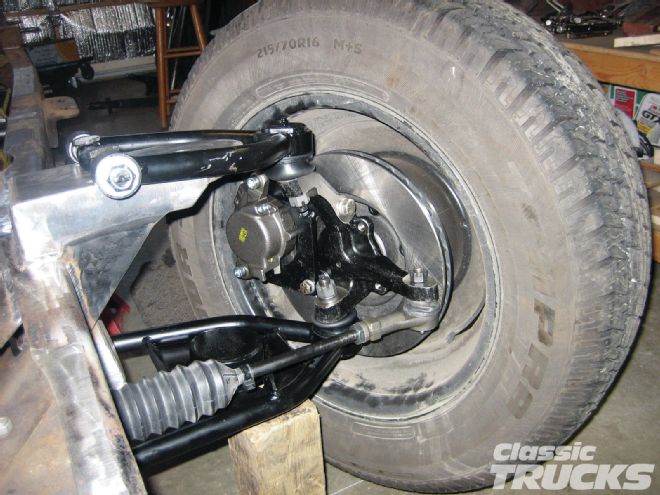
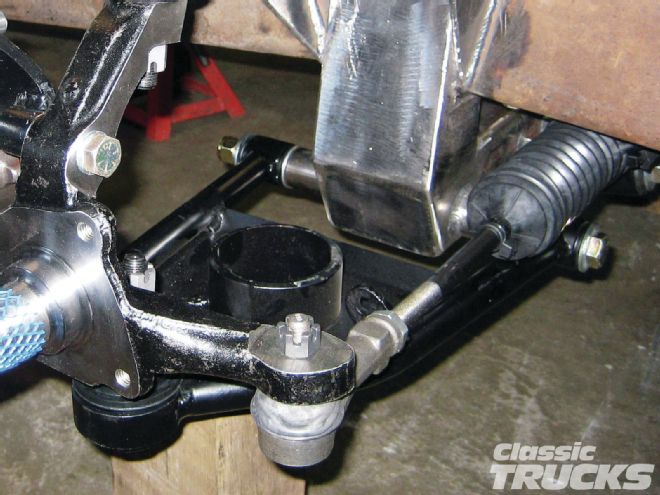 The tie-rod ends were installed next using the supplied locking nuts and bolted to the steering arms on the new spindles.
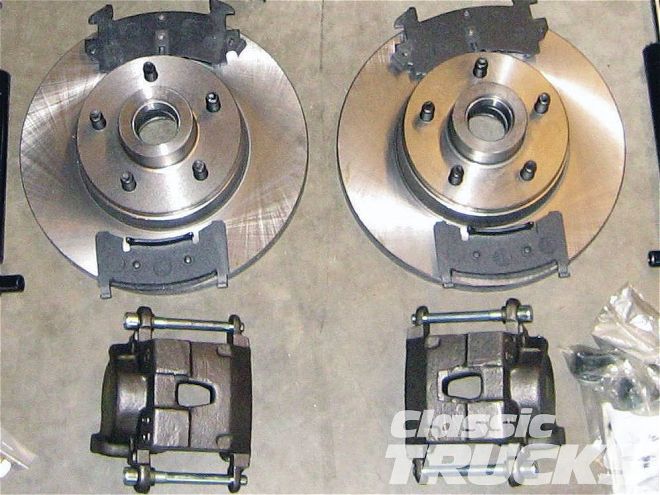 At this point the preliminary installation is nearly complete. Next up is the installation of the new disc brake rotor assemblies. The rotors are supplied with new bearings and races that match the new spindles. The bearings will need to be packed using high-heat-resistant wheel bearing grease and new grease seals installed as well.