Braking News
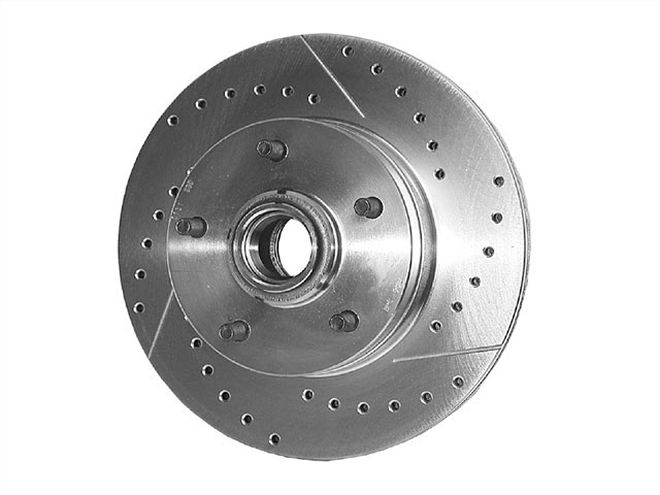
Q.Is it safe to drill my own brake rotors? Given the price difference between stock and drilled rotors, I'm considering using a pattern and drilling them on my drill press and then counter-sinking the holes. Problems?
Thanks, and I'll look for your answer in Street Rodder.
Bob Hargreaves
Via the Internet
A.Quite a few years ago I asked one of the foremost manufacturers of headers why he no longer offered the Try-Y design that worked so well on small-block Chevrolets. He replied that since most of the drag cars in magazines had equal-length, four-tube, g-race-style headers, he "couldn't give Try-Y headers away." Despite the fact that Tri-Ys made more low and midrange torque and were probably a better choice for street use, hot rodders saw the four-tube style on race cars, so that's what most of them wanted." Basically it was the "if it makes a race car go fast, I want it on my street rod" theory. The same holds true for drilled rotors.
Race cars used drilled rotors because under severe braking conditions the friction pads can get so hot that a gas is created. That gas creates a sort of "cushion" between the pads and rotors and, as a result, braking efficiency is reduced dramatically; holes in the rotor merely give the gas an escape path.
While there isn't a street rod on the planet that will ever encounter this problem, they became the things to have once drilled and slotted rotors began showing up on a few high-profile magazine cars. As a result, many of the brake system component manufacturers and suppliers responded to the demand. So, do street rods really need drilled rotors? No, they don't. Holes, slots, your initials-they are all cosmetic rather than performance enhancements. On the other hand, none of that stuff hurts anything either, so if you like the look, go for it.
That being said, if you opt for drilled rotors, don't do it yourself. Buy those that have holes put in them during manufacture. Drilling rotors later is an invitation for cracks, and cracks will impact braking, although not for the better, and they don't look good either.
More Braking News
Q.I have a '29 Ford coupe with a 454 Chevy. I'm having troubles with the brakes on it. I originally built it with manual brakes but recently upgraded to power brakes. That's when my problems started; the front brakes lock up after only a few pedal strokes. I've replaced the master cylinder, power booster, and combination valve. I also added residual pressure valves but still have the same problem. I've bled the system with a vacuum pump and the old buddy assisted method with the same results. Any help you can provide is greatly appreciated. Rick SmithVia the Internet
A.The next time the brakes lock you'll probably find that opening the bleeders on the calipers will release the hydraulic pressure in the system and the brakes will unlock. There are a number of reasons for the system to retain pressure and the brakes not release, but since the problem started after the power booster installation, we should start there. Here are a few things to consider:
Is the master cylinder compatible with the power booster (did they come from the same source)? Make sure the pushrod from the booster is adjusted correctly and allows the pistons in the master cylinder to fully retract when the brake pedal is released.
Are you using a disc brake master cylinder? A manual brake master cylinder will have a built-in residual pressure valve that will hold too much pressure in the line when the pedal is released and cause disc brakes to drag.
Check to see that the brake pedal returns properly; it may be necessary to add a return spring.
You mention a combination valve and that you installed a residual pressure valve. Most combination valves have a residual valve built in so an additional residual pressure valve would be redundant. In fact you may not need one at all. You didn't mention where the master cylinder is mounted, but you don't need one at all if it's on the firewall. If the master cylinder is under the floor you won't need more than a 2lb residual valve. If you've installed a 10lb valve, that's more than likely the problem.
Make sure the ports are plumbed correctly if you've installed a combination disc/drum master cylinder. If you've connected the drum brake port to the disc brake lines, the built-in residual pressure valve is causing the problem.
Finally, make sure there is sufficient clearance between the brake lines/master cylinder/booster and the exhaust system. Excessive heat can cause the hydraulic fluid to expand and the brakes to drag.
Hopefully one of the things we've pointed out will cure the problem. Let us know what you discover, especially if it's something we've overlooked, so the information can be passed along to other rodders.
No Such Thing
Q.I have what will sound like a silly question for an experienced rodder, but here goes: I have a 1948 Ford sedan. I installed a stock-length, 4-inch dropped axle-so I would not need to split the bones-and a POSIES spring, dropped steering arms. Now it wanders a bit, and I know the caster needs to be 5-7 degrees, but the frontend shop says I have 3 degrees. Instead of notching the front of the wishbones (which I'm not capable of), what if I was to unbolt the round cover that houses the ball of the wishbone, drill out the rivets in the frame so I can take out the upper housing, space it down about an inch, and put the whole thing back together, which would drop the ball part of the bones down. That sounds too easy not to have been done before; also, if that was done or something like it, will a 1-inch change make much difference in the caster or not? There does not seem to be any alignment shops around here that has a clue.
Chris Swank
Paso Robles, CA
A.That's not a silly question at all; besides, you've already figured out the answer.
Spacing the ball down far enough to give the desired caster is an easy solution to your problem. One inch may be enough; you'll have to experiment with that to get the proper amount of caster.
While lowering the end of the radius rod is certainly one way to solve your problem, keep in mind that there is a possibility of the car high-centering if the wishbone socket is dropped too far. Since that ball is roughly in the center of the vehicle, if the car is low and that ball hangs down too far, it may drag going in and out of driveways, over speed bumps, and other obstacles.
While fabricating the piece you need is an option, Chassis Engineering in Iowa offers spacers under PN AS-2083. Retail price is $52.35. You can contact them at (319) 643-2645, or visit www.chassisengineeringinc.com.
We're Here To Help
Q.I want to copy the floor you put in the Model A pickup a while back. It looked like planks, but I seem to remember it was actually one piece of plywood. I also want to use the same battery box and tie-down strips.
How did you attach the stainless strips to the floor? I don't want to use wood screws. Also, where did the tie-downs and the battery box come from? I want to copy those too!
Unfortunately I loaned the issue of SRM that that story was in to a friend and he has misplaced it, so I need your help with all this.
Shane Williams
Via the Internet
A.We're here for you, Shane. We'd guess Dr. Phil would say your friend is no friend at all and that only a real butthead would borrow something as valuable as STREET RODDER and not return it. He'd probably go on to suggest that this guy should buy his own magazines. Of course Oprah would have a more sensitive reply and point out that gift subscriptions for friends are always appropriate.
With those issues resolved, we can tell you the bed floor was indeed a solid sheet of marine-grade plywood. On the bottom side it was painted with several coats of gray floor and deck enamel; on top we used a walnut filler/stain and then applied several coats of marine spar varnish.
The stainless strips in the bed came from C.W. Moss and were secured with stainless button-head screws. Rather than conventional nuts we used the furniture style that locks into the wood. Those cool aluminum strips and tie-down hardware came from Mac's Custom Tie-Downs. For extra strength, the screws holding the tie-down strips were threaded into the steel framework of the bed rather than just the plywood. The ends of the plywood were dressed with 3/4-inch aluminum angle from the local hardware store.