Our buddy’s ’68 Valiant track car had the need for some more speed so we decided to step him up with a 427-inch small-block. Our goal was a 500/500 engine, that is 500 lb-ft of torque and 500 horsepower. We went with a lot of cubic inches because we’re looking for a big fat torque curve, which will work on the street as well as at the track. The short-block construction was covered in detail in the October 2010 issue of Mopar Muscle. This month we finish up the top of the motor and get it installed.
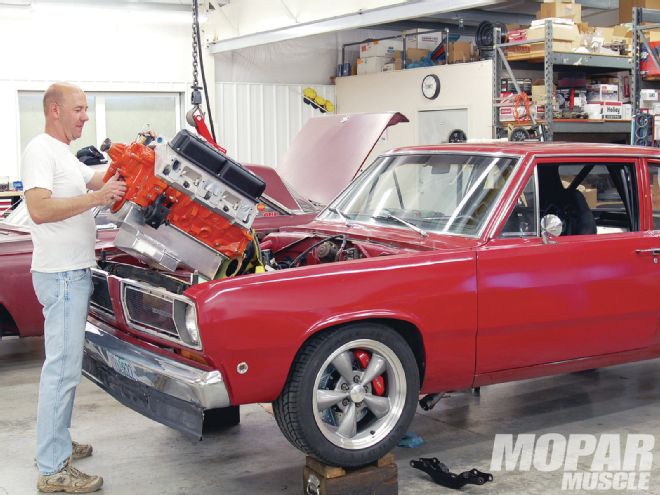
 Our buddy Tim has a big smile on his face as he drops the 427 into his ’68 Valiant. A close examination of the car shows 13-inch Baer brakes, a big air dam, racing seats, and a rollcage. This car is ready for the power!
Our Mopar Performance P5007552AB engine block was bored to 4.060 inches by Gray’s Automotive and then filled with a 4.125-inch stroke crankshaft from K1 Technologies. The connecting rods, also from K1, are 6.200 inches long, with a small-journal2.00 inches. The pistons are forged units from JE with deep dishes to keep the compression down to a pump-gas friendly 10.5:1. The bob-weight for this rotating assembly was only 1,780 grams, so we figured the engine was going to spin the needle on the tach just fine. The October issue went into detail on a number of little problems that we encountered, so keep that article on hand if you’re planning to build one of these engines.
With 427 inches to feed, and a goal of 500 horsepower, we knew that we needed a set of cylinder heads with good airflow. We wanted aluminum heads in order to save 50 pounds of weight up front, but our budget ruled out the more exotic W-series cylinder heads. In the end, we picked a set of closed-chamber Performer RPM cylinder heads from Edelbrock. The Edelbrock heads are a replacement type cylinder head with stock port locations. These heads use standard 59-degree valvetrain components to keep the cost down. The use of standard valvetrain parts does limit the size of valvespring that fits, but we didn’t anticipate a lot of valve lift for our application so that was OK.
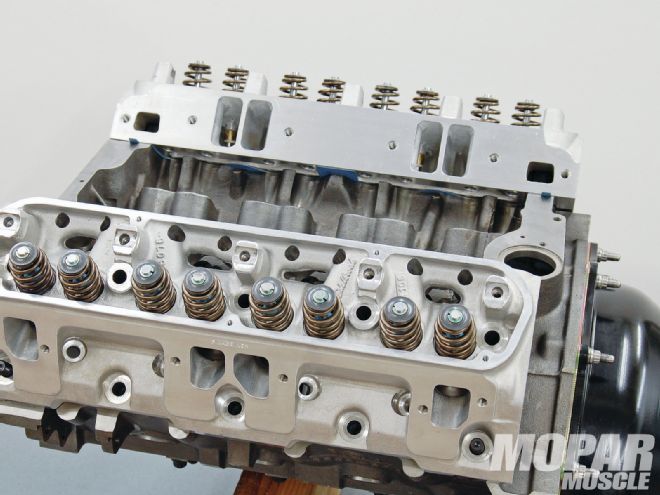 Cylinder heads are the Edelbrock Performer RPM aluminum heads, part number 60779. The heads were prepped by Hughes Engines and had larger 2.08 intake valves installed...
In order to meet our power goals we did need to have the heads fully ported. After some research into the subject, we decided to go with the Stage III porting from Hughes Engines. The Stage III option is a full CNC porting package, which also includes new 2.080-inch intake valves. The guys at Hughes went through our heads completely, machining the ports and combustion chambers and then surfacing the heads. They also performed a high-quality valve job and pressure tested the heads after the CNC machine work was complete. Peak flow numbers for the Stage III package are right at 300 cfm on the intake and 200 cfm on the exhaust. Numbers like that are more than enough flow capacity to achieve our power goal of 500/500 so we felt confident of our target. We didn’t flow these heads ourselves after porting, but flow sheets for the Stage III porting service are available on the Hughes Engines website.
As discussed in the October article, our original plan was to go with a hydraulic roller camshaft. We wanted to go this way to reduce the maintenance level and to keep things nice and quiet on the street. However, we could not find a set of hydraulic roller lifters that would fit the R3 engine block so we had to switch to solid roller lifters. We decided to keep our hydraulic roller camshaft after the engineers at Comp Cams told us that we could run solid roller lifters on it if the lash was set really tight. The camshaft that Comp specified for us is a custom grind using their new XFI lobes. The grind number is CRS 3017B/3037B HR113. Duration at .050-inch is 236 on both the intake and exhaust, while lobe lift is .363 intake and .358 exhaust. The camshaft is mild for 427 inches, but once again, we were looking for a Viper type power curve with the torque peak around 4,000 rpm.
The rest of the valvetrain consists of Comp’s solid roller lifters, Smith Brothers pushrods, and Comp’s beehive valvesprings. We have been using the beehive valvesprings on virtually every engine that we build with excellent results. The springs we selected have a short enough installed height to fit the Edelbrock heads, but they still have enough pressure to work with the solid-roller lifters. We test fitted three different rocker arm designs before deciding to go with the 1.50 ratio units from Comp Cams.
The Valiant that the engine is going into uses a flat hood with no scoop so our options were limited in terms of intakes that will fit. The 360 engine previously in the car had used a Performer RPM Airgap intake, but with the larger 427 engine we felt it was time to move to a single plane. Of the several choices available, we felt the Victor 340 would best fit the needs of this motor. The plenum and runners in the Victor 340 are a little on the small side for a 427-inch engine, so we sent the intake to the small-block experts at Shady Dell Speed Shop. Ryan at SDSS hand ported our intake and performed some blending work in the plenum area.
Our carburetor choice of a 650 Double Pumper might seem a little small to people used to big drag racing engines, but this engine is going into a track car with 2.94 rear end gears. The NASCAR guys make a lot of power with a 750 main body, so using a 650 main body on our engine didn’t seem out of line to us. We went to Bo Laws (BLP) because they are one of the premier carb builders in the country with expertise in the area of circle track and road racing. BLP built us one of their Weekend Warrior carbs with special road race floats and fully adjustable billet metering plates.
We were able to get the engine onto the dyno at Gray’s Automotive for a few pulls before installing it in the car. We always prefer to dyno test an engine whenever possible just to get a baseline on the tune-up as well as to see what the power band looks like. Our headers, oil pan, and water pump were different for the dyno testing than what we ended up using in the car, but the power differences should be minor. We were able to make a number of dyno pulls during our session and only had to make some minor adjustments to jetting and to the ignition. The MSD E-Curve distributor is great to work with on the dyno as it allows us to change the ignition curve by turning a dial. We started off with the distributor locked with 35 degrees of advance, and then tried a few different curves to see how the engine responded. The BLP carb was dialed in very well right out of the box so all we needed was one jet change to get the A/F ratio where we wanted it. Our best pull of the day showed 519 horsepower at 5,800 rpm and 506 lb/ft of torque at 4,100 rpm. We were looking for a 500/500 engine and we exceeded that goal with a little to spare.
Throughout the project we’ve been using the third generation Viper as a benchmark. Those Viper engines were 505 cubic inches and they were rated at 500 horsepower at 5,600 rpm and 525 lb/ft at 4,200 rpm. Given that, the power output of this 427 is right in line with the published Viper numbers. Published numbers don’t always line up with reality, so we are planning to get the Valiant onto a chassis dyno with a Viper in the near future so we can compare the two cars on the same dyno. This Valiant weighs 3,150 pounds ready to race, which is about 200 pounds lighter than a third-gen Viper, so the power to weight ratio is going to slightly favor the Valiant.
Once the dyno testing was complete we moved forward with some necessary upgrades to the drivetrain including a new clutch, a rebuilt transmission, and a new aluminum driveshaft. In anticipation of the 150-mph top speed, we installed a 13-inch disc brake kit from Baer with six piston calipers as well as a rear disc brake kit from Doctor Diff. With the chassis upgrades complete, the car was sent out the door for some quick shakedown runs around town.
The engine idles smoothly at 900 rpm due to the low overlap camshaft and the small carburetor, but the airflow capacity of the heads and intake allows it to pull hard past 6,000 rpm. Even with 2.94 gears in the rear, the car went sideways anytime we stomped on the gas. After a few break-in miles on the street, the car headed out to Portland International for a track day. We had a few teething problems at the track with the oiling system so the session ended early, but in the few laps that Tim was out there, he was able to push the car up to about 150 mph on the back straight. The engine was making enough power to push the car hard down the straights, and the brakes were good enough that he could delay his braking points a little further than last season.
Next steps now are to refine the oiling system and to tune the chassis a bit more. This drivetrain with the aluminum heads, lightweight clutch, and aluminum transmission is about 100 pounds lighter than the previous drivetrain. Taking 100 pounds off the nose of the car means that the suspension needs to be tweaked a bit to get the car back into balance. We already have a bunch more parts on order so stay tuned for an update in an upcoming issue. mm
About the Author: Andy Finkbeiner is the author of How to Build Max-Performance Mopar Big Blocks published by CarTech. Andy also owns AR Engineering, a company that specializes in designing and manufacturing parts for Mopar muscle cars.