
For many hot rodders the very thought of electronic fuel injection brings with it visions of a wiring harness the size of your forearm, computers, and all kinds of adapters to make it compatible with your existing engine. It wasn't that long ago that anyone planning on running EFI had to almost build the car with that in mind; retro-fits were difficult.
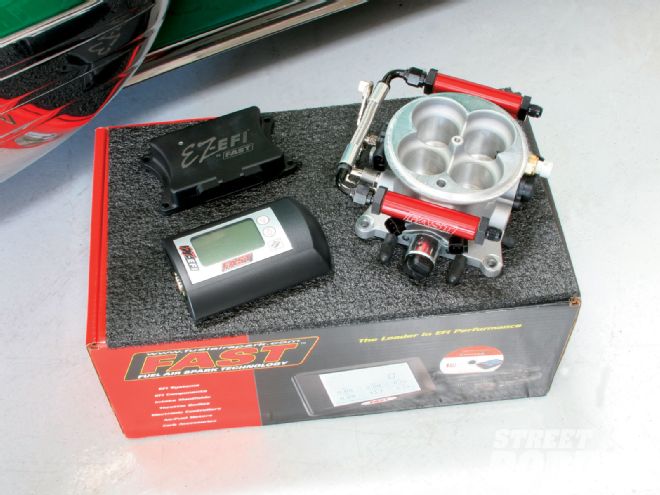 This is the basic conversion kit from FAST EZ-EFI. A throttle body, ECU, a wiring harness, a wideband oxygen sensor, a temperature sensor, rpm module, and a handheld interface unit. It is compact, well thought out, and easy to install.
Well, all that has changed and as more and more street rodders become comfortable with computer-controlled engines the demand for a simple EFI upgrade continues to grow. After driving late-model cars with modern fuel injection systems, driving your street rod with a carburetor can feel a bit archaic. Let's face it, the carburetor is headed the way of the Oldsmobile.
Like so many things, this all started with a little bench racing about the FAST throttle body conversion and the simplicity of replacing a carburetor with modern fuel injection. Our good friends at Fuel Air Spark Technology (FAST) laid down the gauntlet: "Bring us a car on your '10 Road Tour with a single four-barrel and we'll convert the car to fuel injection in time for the car to leave on the next leg of the trip." Hmm, pretty bold challenge and one that sounded quite interesting.
 After two huge fans were blowing on the motor for about an hour, we had a team of four FAST/COMP Cams technicians working on the car at one time.
As it turns out, the perfect car for the conversion was none other than last year's Road Tour '52 Chevrolet. Sporting a well-used Smeding small-block Chevy and four-barrel carb underhood, our own Publisher Tim Foss (along with sons Jeremy and Ryder) agreed to pilot the old Stovebolt on two legs of the '10 Road Tour. The plan was to meet at the COMP Cams FAST complex in Memphis on Tuesday, convert the car to fuel inject that afternoon (yes, one afternoon), and then motor onto the NSRA Street Rod Nationals the following morning.
 With the air filter off, it was a simple job to remove the carburetor. Unplug the electric choke, disconnect the Lokar linkage and kickdown, and remove the four bolts from the intake, and the carb was on the bench.
Coming from the opposite direction, heading west on I-40 in my own '57 Ranch Wagon, I arrived several hours before the Road Tour, which worked out well because ironically I had to repair a leaking needle and seat on the front carburetor that was flooding the mighty Y-block.
About the time the wagon was put back together, Foss and family rolled into COMP Cams/FAST with the rest of the '10 Road Tour. Now the fact that he appeared to be suffering a heat stroke from sitting on the side of the interstate for two hours in 100-plus degree heat (due to an overturned and burning tractor trailer) is a whole other story. Careful gasoline consumption records indicated the '52 Chevy had managed an average of 11.86 mpg, not much to brag about there since it was almost entirely highway driving. The Chevy was rolled inside and two large fans placed in front of it to cool the motor down so work could begin. While the engine was being cooled we took a look at the system about to be installed.
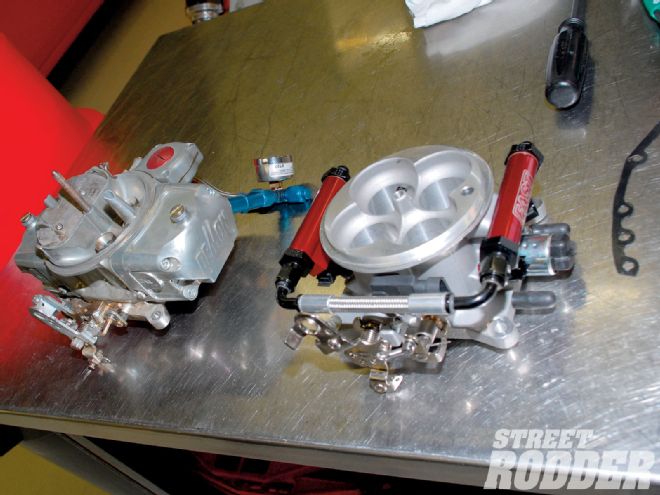 This side-by-side COMParison shows the new EZ-EFI is actually smaller than the four-barrel carburetor.
The FAST EZ-EFI throttle body kit is a self-tuning fuel-injection system. The kit includes the throttle body fuel injection unit, an ECU (electronic control unit), a wiring harness, a handheld unit that interfaces with the ECU, rpm module, and several other sensors. The kit includes everything required to control the fuel injection; the existing car must supply 43 psi of fuel to the unit and a good source of 12V power.
The lift at COMP Cams is a very cool deal, basically a drive-on lift with a walk-around platform. This allowed two technicians to be busy removing the air filter, carburetor, and existing fuel lines up top, while down below two other techs were busy installing the oxygen sensor and plumbing in the new fuel pump.
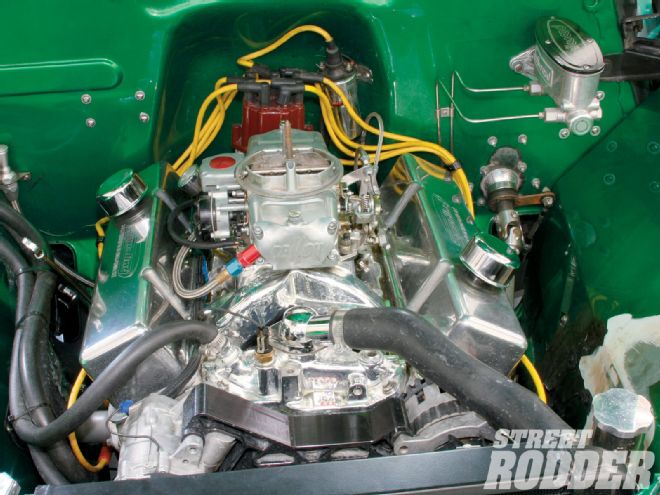
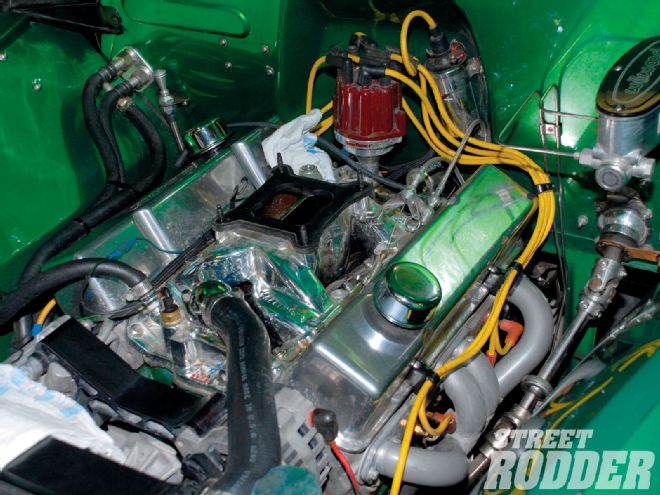
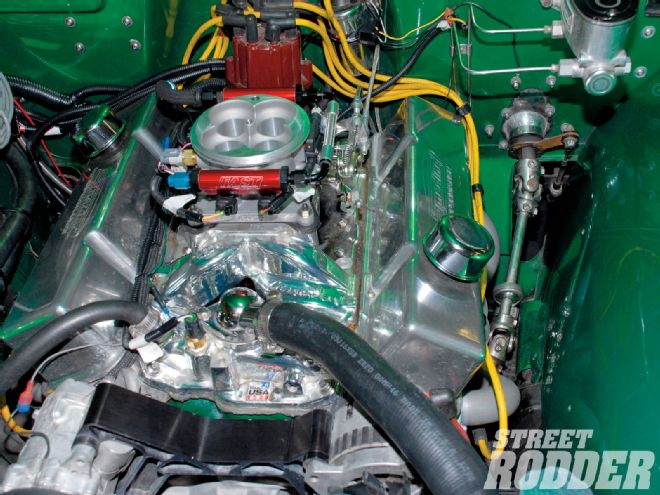
 Looking like many engines found under the hood of thousands of street rods, the Smeding-built small-block Chevy engine has seen plenty of miles under the Demon carburetor. Now it was time for modern fuel injection.
The threaded oxygen sensor fitting is included in the kit and a hole must be drilled in the exhaust pipe upstream from the catalytic converter and reasonably close to the engine. The fitting is then welded into the exhaust system and the oxygen sensor is threaded in place.
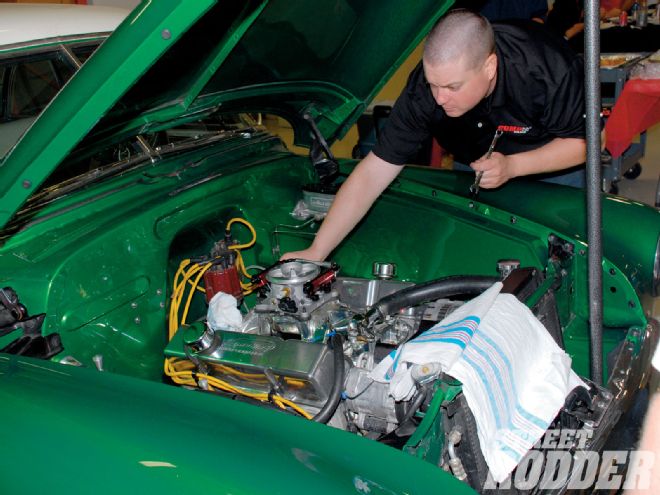
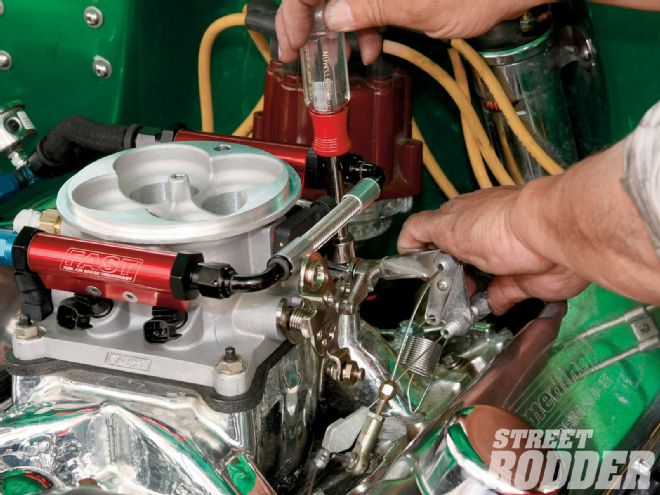
Meanwhile, up top, the carburetor was removed and the FAST throttle body bolted in place with a fresh gasket between it and the intake manifold. The throttle return spring and existing throttle linkage is connected to the new throttle body. The FAST throttle body is a well-designed piece that includes four injectors, the throttle position switch, air temperature sensor, MAP sensor (manifold absolute pressure), and an idle motor, all in one very tidy package that is similar in size to the four-barrel carburetor you just removed.
 With the temperature sensor in, a new gasket was slipped on top of the intake manifold.
Next the coolant is drained from the motor and the coolant temperature sensor is threaded into a coolant port on the intake manifold or other suitable location. Meanwhile the techs down under are plumbing in the feed and return lines for fuel. We must admit things were made easier for them here because our '52 already had a port in the tank for the return line. There are any number of ways to achieve this and FAST offers complete kits for fuel supply and return with the EZ-EFI fuel pump kit. If you are dealing with a vintage fuel tank the good people at Tanks Inc. can often supply the needed pieces for either in-tank fuel pumps, external fuel pumps, regulators, and return options. This fuel injection system required 43 psi of fuel to properly feed the injectors so engine-mounted pumps will not get it done, nor will wimpy neoprene fuel lines, and a return line is a must.
 The carburetor linkage is now adapted to the EZ-EFI. This is generally very close to a bolt-on for most applications, but it will vary from car to car.
The high-pressure fuel lines were routed forward to the engine bay and the connections were made to the throttle body. The FAST fuel pressure regulator will keep pressure down to 43 pounds. Wiring was routed from the fuse panel to the FAST electric fuel pump using the EZ-EFI fuel pump relay harness. This completed our fuel delivery and return line work. You can also wire the fuel pump in directly from the fuel pump relay on your main wiring system if it is so equipped, but either way a relay will be needed to handle the load.
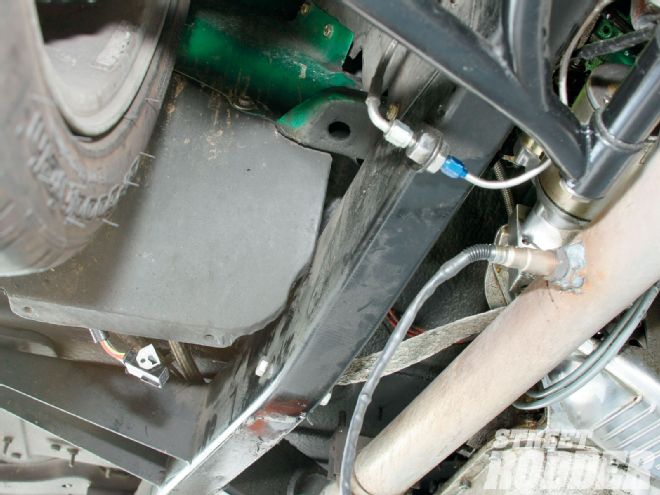 Speaking of working under the car, a hole was drilled in the exhaust pipe upstream of any catalytic converters and reasonably close to the engine. Then a threaded bung was welded in place and finally the supplied wideband oxygen sensor was threaded into place.
Next the ECU is located and mounted. This unit is water tight so it can be mounted either under the hood or inside the car. When mounting the ECU, keep the cable plug pointing down to prevent any moisture from running into the plug. Also be certain to keep the ECU as far as possible from electrically "noisy" components, such as ignition boxes, coils, and distributors as these components can cause problems with the ECU.
The best location for the ECU seems to be on side of the firewall, engine side, or interior in a location where you can see the face of the unit and the LED trouble light. Remember you will be routing a communication cable for the handheld interface so keeping the ECU close to the passenger components will make routing that temporary communication cable much easier. Finally, be certain the supplied cable will reach the ECU prior to drilling any mounting holes. Our unit found a home on the passenger inner fender panel.
 The entire linkage arrangement was reinstalled to the intake manifold and with minor adjustments it all worked with no major modifications. Once again, be certain that TV cable is adjusted correctly and note the pin mount has now been transferred to the EZ-EFI.
Before the wiring harness is plugged into the ECU all the other connections are made to the various sensors and a constant, clean 12V power source is required. It is recommended that both the positive and negative wire be connected directly to the battery. This eliminates the potential low-voltage problems that can raise havoc with electrical components. Choose the options desired during the wiring process as the ECU can handle an idle increase when the A/C is turned on, electric fan controls, and fuel pump control. Wire in the accessories you want the ECU to control. This may sound a bit complicated but it is really very straight forward with a great direction booklet and clearly labeled wires. Next is a 12V power source that is hot in both the crank and the on/run position. This is connected to the 12V switched wire in the harness, once again, simple enough.
With the wiring complete, plug the harness into the CPU, turn on the ignition, and the fuel pump should run for a few seconds while pressurizing the lines. Check the lines for any leaks before proceeding. Our team of experts at FAST managed to do all of this in just a few hours, an impressive display of skill and teamwork.
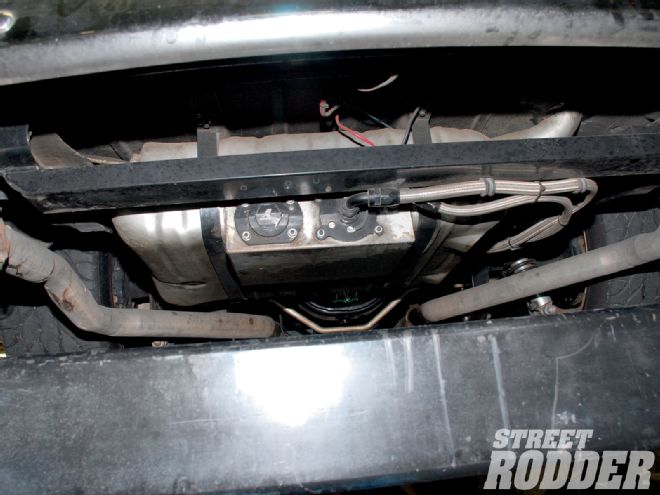 When the '52 was originally built, Woody's Hot Rodz installed this neat pump port in the tank. The fuel pressure was then regulated inline for the carburetor, but that is about to change.
And now came the big moment, would it actually work? The communication cable was connected from the ECU to the handheld device along with a good 12V power source that is hot during both crank and on/run positions of the ignition switch.
On first crank the motor fired up, stumbled, and shut down. On the second try it fired up and continued to run. Inside the car, FAST techs worked with the handheld unit to instruct the ECU on everything from engine size in cubic inches to the desired idle speed. We won't go into the entire tuning process here, but suffice it to say this is all achieved with a very simple menu system that asks you questions. The Setup Wizard mode gets the basics dialed in and you are ready to run, but there are other optional settings, such as the rev limiter and a target air/fuel ratio among others that can be adjusted. This system can be dialed in with no computer skills; if you can read, you can dial this system in.
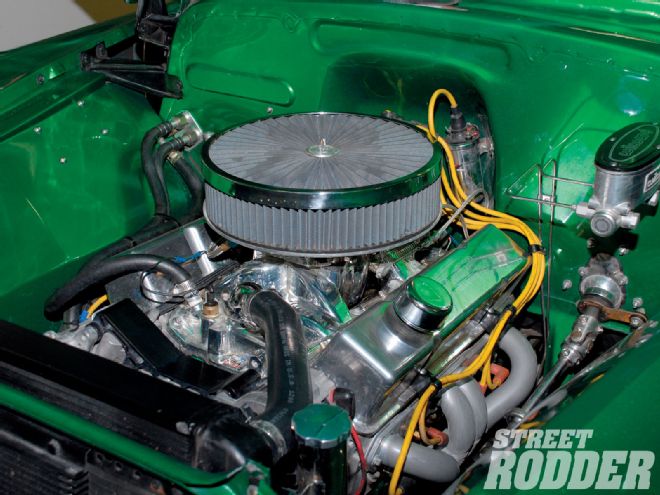
As darkness fell outside, Foss and family jumped back in the old Chevy and drove to the motel. The following day's six-hour drive went off without a hitch and Foss reported better driveability, easy starting, and using only a "butt dyno" as a better power curve. So the FAST challenge was met and it appears they were right, we could drive in on a carburetor and out on EFI in an afternoon. The big news was the jump in fuel mileage with an average mileage of 16.38 with the FAST EZ-EFI, an increase of almost 5 mpg over the carburetor, or roughly a 40 percent increase in mileage.
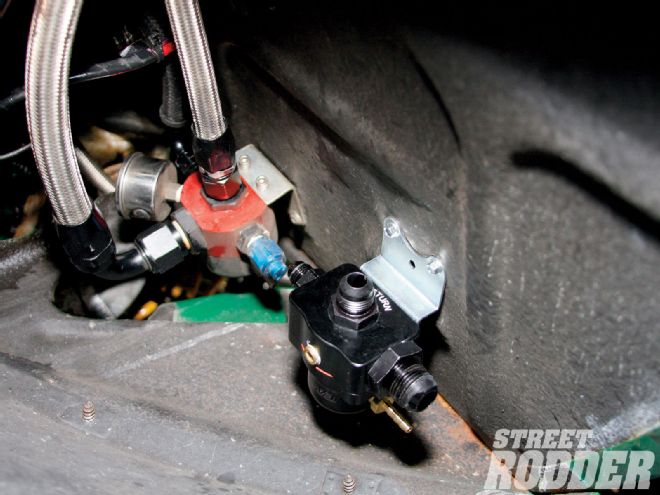 The red Aeromotive fuel pressure regulator in the background was used to regulate fuel pressure for the old carburetor, the black unit in the foreground is from FAST and it will be used to provide a constant 43 psi of fuel pressure. The braided lines are rated for well past 43 pounds so we simply swapped the lines. If you are running low-pressure neoprene hoses you will have to install high-pressure fuel lines.
Foss did notice that the last tank of gas didn't net quite as good mileage as earlier fill-ups, netting just 15.96 mpg but he wrote that off due to traffic at the fairgrounds. Editor Tim Bernsau took the reins of the '52 Chevy in Louisville and would use the car to get to Bonneville for Speed Week and then back home to California. As Bernsau drove west he observed a noticeable decrease in both mileage and power, with one stint dropping down to 13.86 mpg. After a bit of investigating he discovered a very restricted fuel filter element. While he was at Bonneville a new element was installed and both power and fuel economy returned to prior levels and even got a bit better with an average gas mileage of 16.97 after changing out the fuel filter. Back home in California all parties agreed the conversion was a big improvement to the car.
Elapsed time on the total installation was around six hours, pretty impressive stuff. Now we are not about to suggest that you will be able to install a kit like this in six hours, but it seems entirely reasonable to be able to do the complete conversion in a weekend. Likewise this is not intended to be a complete step-by-step guide for your installation, that job is handled perfectly by the detailed, easy-to-read, 32-page instruction and set up manual supplied with each kit. These instructions are so good they do everything but hand you the tools. But we do hope that after seeing how simple this conversion really is that we may have calmed your EFI fears. And with our real-world road test results maybe we have you thinking about upgrading your own motor to modern fuel injection, after all it's FAST and EZ-EFI.
 You'll notice a coil of gray wire in the left-hand corner of this photo, which is the communication cable that goes to the handheld interface. The handheld interface also requires its own 12V power source that is hot in both the on and run ignition switch positions.