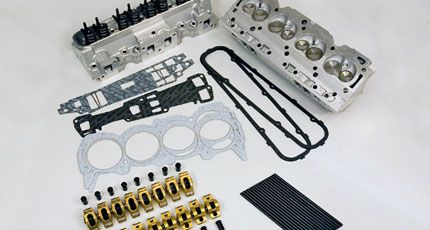
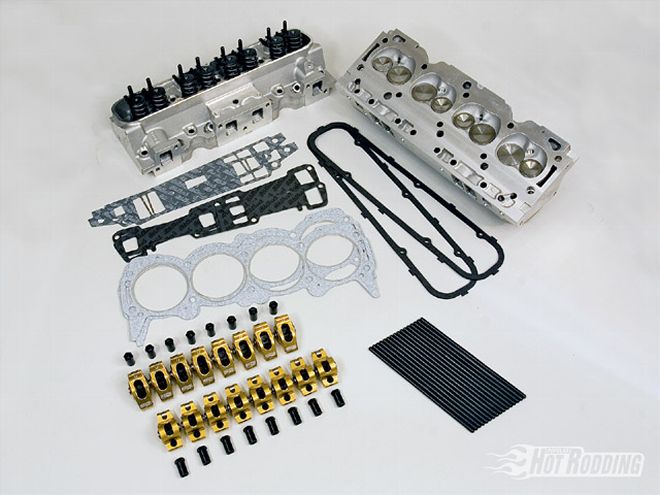
 Edelbrock's Performer RPM cylinder heads for Buicks can be ordered fully assembled ($947.95 each; Summit pricing), as shown here. Edelbrock also offers a gasket set (which is a great deal as all the gaskets went right on and worked great). We also ordered a set of 3/8-inch-diameter, 9.650-inch-long pushrods from Comp Cams, and their 3/8-inch stud, 1.6:1 roller rockers.
One of the key enablers to building a different engine for your street/strip car is finding a cylinder head that flows plenty of air and fuel, and is widely available. Fans of the big-inch Buick V-8s (mostly the 455) have found the cylinder head issue a tough hurdle to get over...until now. Edelbrock has introduced an aluminum Buick V-8 Performer RPM cylinder head that melds the best design elements of mainstream performance cylinder heads into a Buick cylinder head envelope. Engine builders have commented to us about how this cylinder head bolts on with a minimum of changes to the engine and makes great power, so we decided to learn about installing these new performance heads, and experience the power first hand. To do so, we went to the Buick specialists at White Racing and Marine, in Warren, Michigan, to follow along as they installed and integrated the Edelbrock Buick Performer RPM heads onto an existing street/strip Buick V-8. When the install was over, White Racing picked up 50 hp to the rear wheels on their chassis dyno with the Buick Performer RPM cylinder heads.
New Performance
The Buick Edelbrock Performer RPM cylinder heads are really what Buick enthusiasts have been waiting for: readily available, solid performing cylinder heads. The number of Buick cast-iron heads available has dwindled dramatically, and many of those heads that are still around have issues, like cracks and rust. And since there was never an aluminum production cylinder head, the Edelbrock head offers an added bonus of reducing the weight over the nose of the vehicle, versus the production cast-iron heads, by 56 pounds!
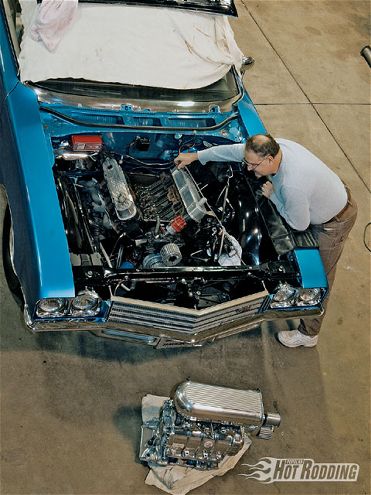 To do the Buick teardown, refer to a good service manual and ask a buddy or two to help out. Doing a head swap requires the front accessory drive, fuel, coolant, exhaust, and intake systems to be removed from the vehicle. Make sure to mark everything as you remove it. Also, a good idea is to take digital photos to make the install easier. Drain the coolant out of the block by removing the lower block plugs to avoid coolant drooling into the cylinders when you remove the heads.
These Edelbrock Performer RPM heads are designed for street/strip high-performance use on '67-81 400-, 430-, and 455ci Buick V-8 engines (you need at least a 4.040-inch bore diameter to use these heads). They work well between 1,500 and 6,500 rpm, which should be great for the vehicle being upgraded in this story. Many would classify our guinea pig car as a Saturday-night special, with its Dyers blower, loose B&M converter, and DOT-legal Mickey Thompsons.
Like some of the other Performer RPM heads from Edelbrock, the Buick version uses 3/8-inch stud-mounted Chevy small-block rockers. (We ordered a set of 1.6:1 ratio rockers from Comp Cams, and they worked great.)
By designing these heads to use one of the most common and proven valvetrain designs, Edelbrock has minimized the valvetrain costs (and eliminated the need to use the expensive shaft-mount rocker systems) while providing optimal performance and durability. The Performer RPM heads come with special Edelbrock pushrod guideplates that are set up for 3/8-inch-diameter pushrods. Edelbrock recommends ordering pushrods that are 9.650 inches long; we ordered this length pushrod from Comp Cams (which is an off-the-shelf item for them) and they provided optimal valvetrain geometry on the 455 Buick being upgraded here.
The Buick Performer RPM heads feature a 68cc wedge-style combustion chamber, 2.125-/1.750-inch intake/exhaust stainless steel, one-piece, swirl-polished valves with undercut stems for increased flow. The Performer RPM heads also have performance-enhanced intake and exhaust ports (215cc and 130cc, respectively) that line up with the mounting locations for the production intake and exhaust systems. The heads feature an enhanced 5/8-inch-thick deck surface to be able to handle impressive power without any sealing issues.
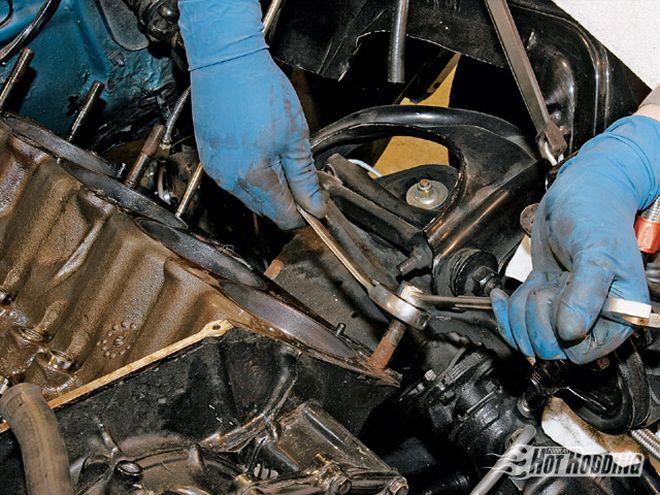 The heads might require a little pry to free them from the engine block--but if it is any more than a light push, recheck that you have all the head fasteners out before really prying hard on anything. Next, remove the head studs (shown), which need to be removed to properly clean the deck surface of gasket material. This is done by tightening two nuts together and applying torque to the lower nut. All studs should have their threads cleaned of thread sealer and the threads chased to make sure they thread back in clean.
Edelbrock does offer an aluminum Performer RPM intake manifold and carburetor system that works well with these heads, but the Buick engine being upgraded for this story has a hand-built blower intake (hey, if you're going to be different in your engine package, you might as well go all the way, right?), so this engine will stick with the intake/blower system it has been running.
The spark plug location is also in the stock location on the Buick Performer RPM heads, but uses a 14mm thread pitch, -inch reach, 5/8-inch hex, and a gasketed-seat spark plug. White Racing recommends an Autolite 3924 spark plug, gapped to 0.032 inch on the Performer RPM heads.
You can purchase the Buick Performer RPM heads assembled with valves, valvesprings, retainers, and guide plates for 3/8-inch pushrods, or as a machined casting. We ordered the heads fully assembled for this engine because the existing valvesprings were worn out and would have needed to be replaced anyway.
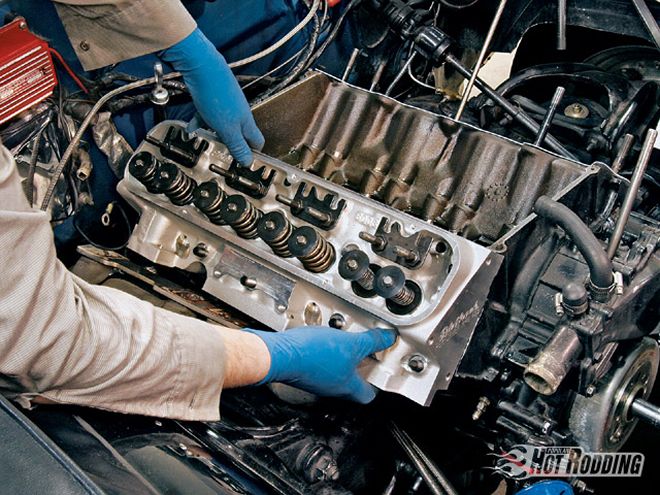
The installation process that White Racing performed included inspecting and prepping the new cylinder heads, doing a mock install with some Comp Cams checking valvesprings installed on one cylinder to check valve-to-piston clearance and valvetrain geometry, checking that all the cylinder head studs were properly installed (an Edelbrock-recommended procedure for these engines) and then installing the heads.
In the end, the upgrade netted a peak-to-peak increase of 48 hp (and up to 57 hp at one point in the power curve), which is pretty much about everything one could ask for when making a cylinder head upgrade.
STUFF YOU'LL NEED DESCRIPTION: SOURCE: PART NO. QTY.: Cylinder heads Edelbrock 60049 2 Gasket kit Edelbrock 7369 1 Pushrods (9.650-inch) Comp Cams 7658-16 1 set Adjustable 1.6:1 rockers Comp Cams 19002-16 1 set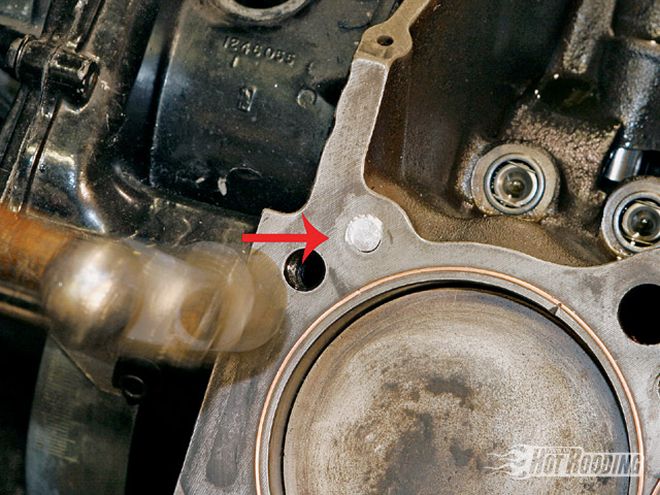 The really early big Buick V-8s had a pressurized oil feed hole for their shaft rocker system that came up through the deck of the block near the front of the engine. The Edelbrock heads use a small-block Chevy-style valvetrain that feeds oil through the pushrods to the top of the engine, so the oil-feed hole needs to be blocked off on early Buicks. White Racing plugged this oil feed hole with a 0.35-inch aluminum plug.
WEIGHT COMPARISON Edelbrock aluminum: 33.3 lbs Stock Buick cast iron: 61.0 lbs Total weight savings: 56 lbs
The really early big Buick V-8s had a pressurized oil feed hole for their shaft rocker system that came up through the deck of the block near the front of the engine. The Edelbrock heads use a small-block Chevy-style valvetrain that feeds oil through the pushrods to the top of the engine, so the oil-feed hole needs to be blocked off on early Buicks. White Racing plugged this oil feed hole with a 0.35-inch aluminum plug.
WEIGHT COMPARISON Edelbrock aluminum: 33.3 lbs Stock Buick cast iron: 61.0 lbs Total weight savings: 56 lbs
On The Dyno
This supercharged 461ci Buick is not built to go racing, but it is built to look and sound like it is built to go racing...while still being somewhat docile enough to drive around town. With that said, this engine combination produces good power, but getting the dyno to record those numbers was difficult, as this engine is backed by a 5,500rpm stall converter that would not fully hook up until about 5,700 rpm, so the chassis dyno results capture a very narrow portion of the engine's rpm band. They do, however, give a good snapshot of the gains that came from the Edelbrock Performer RPM heads, and leave us looking forward to letting this engine sing at wide open throttle (WOT) on a warm summer Saturday night.
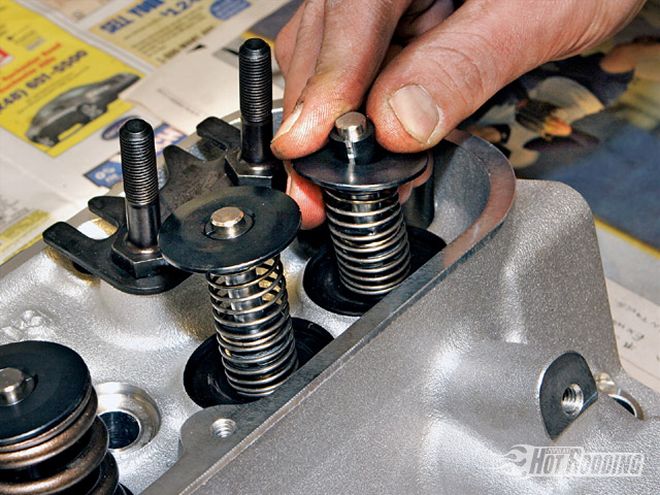 To install the Comp Cams checking valvesprings, White Racing uses a portable valvespring compressor. These light-pressure springs allow the checking of the valvetrain geometry, pushrod clearance, and valve-to-piston clearance. These checking valvesprings will be removed before the cylinder head is final-installed on the engine.
CHASSIS DYNO RESULTS StockHeads: EdelbrockHeads: RPM TQ HP TQ HP 5,400 253 261 280 287 5,500 259 271 297 311 5,{{{600}}} 298 318 321 345 5,700 318 345 355 385 5,800 336 371 388 428 5,{{{900}}} 350 390 390 436 6,000 332 386 385 438 6,{{{100}}} 372 431
To install the Comp Cams checking valvesprings, White Racing uses a portable valvespring compressor. These light-pressure springs allow the checking of the valvetrain geometry, pushrod clearance, and valve-to-piston clearance. These checking valvesprings will be removed before the cylinder head is final-installed on the engine.
CHASSIS DYNO RESULTS StockHeads: EdelbrockHeads: RPM TQ HP TQ HP 5,400 253 261 280 287 5,500 259 271 297 311 5,{{{600}}} 298 318 321 345 5,700 318 345 355 385 5,800 336 371 388 428 5,{{{900}}} 350 390 390 436 6,000 332 386 385 438 6,{{{100}}} 372 431
How To Swap Buick Heads
The father-son team of Dan and Chris White at White Racing go throughan exhaustive checklist when installing a set of Buick cylinder heads.Here are the majority of the steps they perform:
* Check for debris, and machine away burrs or casting flash
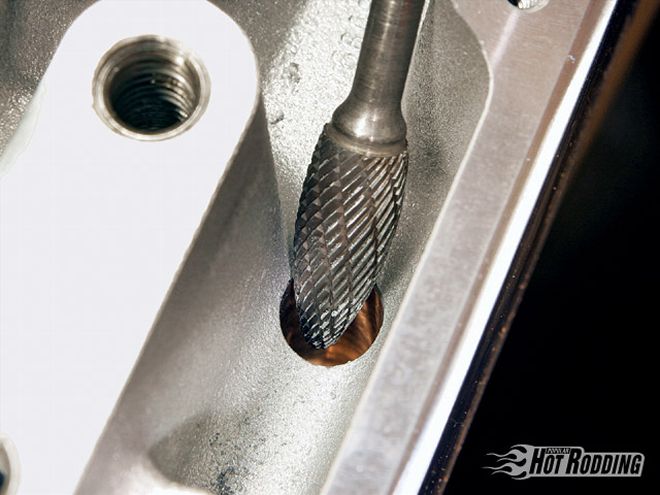
* Inspect for and fix any rough casting transitions in ports (the Edelbrock heads are CNC-machine port matched, so this was already done on the Performer RPM heads)
* Clean parts thoroughly with lacquer thinner and clean rag
* Check installation clearances
* Install checking valvesprings on one intake and exhaust valve
* Measure valvespring rate for valve-closed and max-open height
* Measure chamber volume to determine static combustion ratio
* Mock assembled cylinder head on block with head gasket and two head fasteners
* Measure valve-to-piston clearance
* Rotate crankshaft until piston is at 5 degrees after TDC
* Push down on valve until it touches piston head. Measure retainer height from the base of the valvespring seat (ex: 1.020 inch)
* Let the valve sit in its closed position and measure the height of the retainer (ex: 1.900 inch)
* Determine maximum intake valve lift by multiplying the intake lobe lift height (on your cam card) by the rocker ratio (0.312 inch x 1.6 = 0.499 inches of lift)
* Make sure there is at least 0.030 inches of retainer-to-valve seal clearance at this height
* Subtract the max valve-lift number (ex: .499 inch) from the closed valve height (ex: 1.900 - 0.499 = 1.401 inch) to get the max lift height
* Now subtract the valve-to-piston touch height from the max valve lift height to determine if you have enough clearance
* The difference in the max lift and piston-to-valve contact height should be at least 0.090 inch. If it isn't, pistons with valve reliefs will need to be installed in the engine, or the valve lift needs to be reduced.
* For the exhaust valve, rotate the crankshaft to position the piston 10 degrees before TDC and repeat the test on the exhaust valve using the process described above for the intake valve
* Install pushrods/rockers/adjuster nuts to check that the pushrod has clearance in the head's pushrod hole
* Check valvetrain geometry (that the rocker tip stays on the center of the valve tip)
* Determine the ideal pushrod length, and recheck pushrod clearance to the head
* Check that the rocker has clearance around the valvespring retainer
* Mock up the exhaust and intake manifolds with the gaskets to make sure they fit
* Install the valvecover with a gasket to check the clearance between the valvecover and the rockers
* Remove the head from engine, and inspect the block to determine the vintage
 White Racing then mocked up the Performer RPM cylinder head on the engine and tightened two head stud nuts (with the head gasket in place) to begin the checking procedure.
* '69 and earlier Buick blocks had an oil passage near the front that will need to be plugged with a 0.350-inch-diameter aluminum plug when using the Edelbrock heads
* Remove the rockers and checking valvesprings, and install the Edelbrock valvesprings, retainers, and locks
* Inspect the existing valvetrain (camshaft lobes, distributor drive, lifters)
* Install the head gasket with it covering the coolant holes (it can be installed two ways)
* Make sure studs or fasteners screw into the block hand tight, then apply thread sealer on the threads and final install
* Install the head on the block, and install fasteners
* Torque down the head fasteners in radial sequence from the center outward, making three or four passes until the top row of bolts are torqued to 110 lb-ft, and the bottom row to 110 lb-ft
* Install the pushrods with a dab of engine assembly lube on the tips
* Install the rockers with some engine assembly lube on the cup of the rocker
* Disassemble the rocker lock nuts/Allen screws, wipe some Moly on the threads, and reassemble
* Hand thread the rocker lock nuts on the rocker studs
* Starting at the number one cylinder, set the valvetrain preload on each valve
* Drain the old oil out of the engine
* Add some new engine oil, pour it over the lifters, cam, rockers, pushrods, and valves when adding (add an engine oil supplement for starting a brand-new engine)
* Install the exhaust gaskets and headers
* Using an engine oil pump pre-oiler, spin the oil pump until the engine has oil pressure
* Rotate the crank in 90 degree increments for 720 degrees until you see oil at all 16 rockers
* Install the intake manifold with gaskets and sealer
* Install the remaining engine components until the engine is assembled
* Install the distributor set at 30 degrees static advance (set engine at 30 BTDC and set the distributor in place with the rotor pointing at the number one cylinder post)
* Fill the coolant system with a 50/50 coolant/water mix
* Leave the radiator cap off for startup to top off the coolant system before it gets hot
* Start the engine, bring it to 3,000 rpm, top off the cooling system, and install the radiator cap
* Set the timing using a timing light to 30 degrees BTDC with the engine running
* Shut off when the engine is up to temperature