In today's musclecar market where six-digit selling prices are commonplace, a numbers-matching drivetrain can equate to thousands of dollars. Because of such value, hobbyists oftentimes go to great lengths to salvage a vehicle's original components. No one knows this better than Steve Schappaugh of Lincoln, Nebraska.
He brought an SD-455-powered '73 Trans Am to us for tuning and, like countless other vehicles we've tuned before, the process included removing its distributor for recalibration. Reinstallation didn't, however, play out as planned.
Unbeknownst to us, the intermediate shaft that drives the oil pump didn't engage the distributor tang, which caused a chain reaction that ultimately forced the distributor upward, pushing it partially out of the block upon initial start-up.
The Incident
A few anxious moments passed as we gathered our thoughts and extracted the distributor from the engine for closer inspection. That's when we discovered the unthinkable-the loop cast into the block that otherwise retains the intermediate shaft had broken away, seemingly ruining the original Super-Duty block.
Painstakingly, we recounted each step during the otherwise routine procedure, searching for any possible cause that could result in the situation at hand. No matter how many ways we worked it over in theory, the only way to determine the actual cause, inspect for collateral damage, and attempt to save the numbers-matching block, was to remove the engine from the vehicle for complete teardown.
We expected to find the broken portion of the block lying somewhere within the engine or oil pan during disassembly, and hoped that it could be reattached in some manner. There wasn't any trace of it, however, indicating that the block's damage occurred previously in the engine's life, and wasn't the result of an oversight on our part.
With a newfound sense of relief, we quickly determined that since the block wasn't able to retain the intermediate shaft, it fell over and came to rest on the crankshaft's rearmost counter-weight when we removed the distributor. But because it completely cleared the distributor gear during distributor reinstallation, there wasn't any indication that the shaft was misaligned. It was then immediately thrust upward by the crankshaft while cranking over.
The Repair
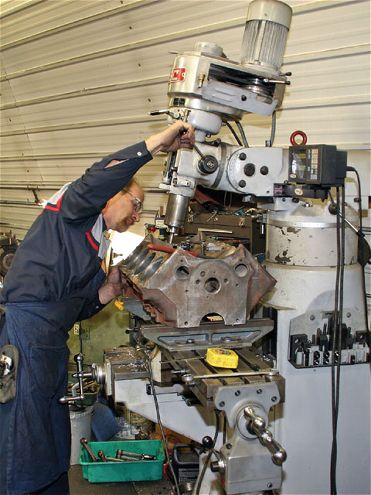
No matter the cause, the Super-Duty block clearly needed repair, and veteran machinist Chuck Willard, of Willard Auto Machine in Omaha, Nebraska, was enlisted for assessment. Willard determined that little damage had occurred this time, but he found unmistakable evidence of at least one previous engine failure that was catastrophic, and felt that it likely caused the loop's failure. He was confident that the block was easily repairable, though.
"That area of the block isn't under much stress, and the loop's only purpose is to maintain intermediate shaft alignment while the distributor is out," he says. "Since the broken portion of the block wasn't available, we could have attached a small piece of shaped iron restoring the loop's function, but I felt a step-bushing, restoring the actual shape, was best in this instance."
Willard placed the Super-Duty block onto the mill and spot-faced it internally, creating a depression for a bushing to sit in. He then enlarged the inside diameter of what remained of the loop, and machined from nodular iron a piece that closely resembled the loop's original dimensions.
When inserting the bushing into the block, Willard says his options for retention were limited. "Welding isn't a good choice when making repairs of this type. Not only is the area tough to access, the preheating that's required to properly weld cast iron can sometimes create other issues, so we machined the block and bushing for an interference fit, and added a coating of industrial-strength epoxy to ensure that the bushing stays in place. It should be a permanent fix."
The Fresh SD-455 On The Dyno
With the Super-Duty engine completely apart, Schappaugh took the opportunity to freshen it up and measure its output on the dyno. The block had been bored 0.030 inch during a previous rebuild, and Willard said it needed only minor boring and honing. It now measures 4.185 inches. The nodular iron crankshaft's stroke remains at 4.21 inches, and total displacement measures just over 463 ci.
A set of forged-aluminum JE pistons ride on the original forged-steel Super-Duty connecting rods, and the pistons and crankshaft's polished journals were treated to new rings and bearings. The No. 16 Super-Duty cylinder heads were milled minimally, and received a complete valve job, but are otherwise untouched. A Comp Cams No. 041 replacement hydraulic flat-tappet cam-shaft was subsituted for a generic replacement with unknown specs.
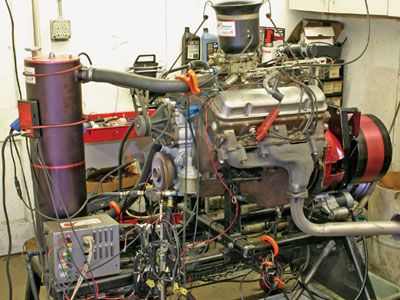
With the machining complete, and the engine reassembled, Willard placed the Super-Duty engine onto his Land & Sea DYNOmite engine dyno, and proceeded to break in the flat-tappet camshaft and perform a series of full-throttle pulls. The relatively stock Super-Duty 455 cranked out a maximum of 405 hp and 478 lb-ft breathing through its original intake and exhaust manifolds, and 2.25-inch compression-bent head pipes.
Conclusion
What began as a simple task ultimately turned into a major ordeal for Schappaugh. It might seem that since the engine ran suitably prior to this, we could have simply reassembled it without repair. Rather than run the risk of the incident reoccurring in the future, he chose to properly repair the block while the opportunity was present.
Though this particular story ended happily, it's just one example of the many situations hobbyists encounter when dealing with vintage vehicles. When matching-numbers isn't a concern, it might be easier to simply start with another block, but that wasn't necessarily an option in this case. Our story exemplifies the ingenuity that's required when attempting to salvage high-dollar original components, and we happened to throw in a Super-Duty 455 rebuild to boot!
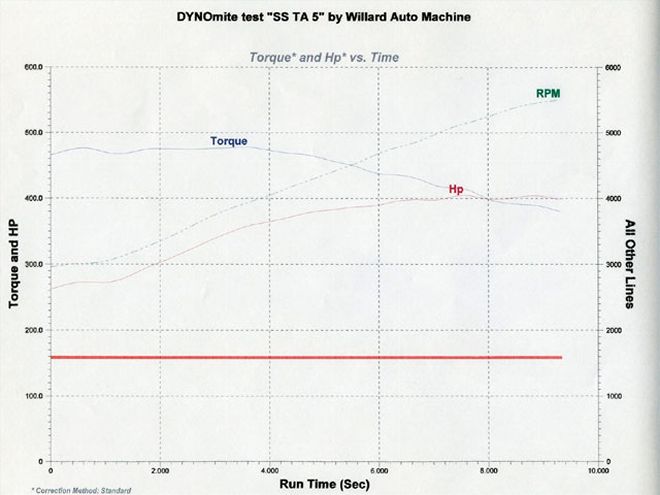 The relatively stock SD-455 cranked out 405 hp at 5,100 rpm, and 478 lb-ft of torque at 3,900 rpm. Average horsepower and torque between 3,000 and 5,500 was 360 and 448, respectively. You can bet that's enough to put a smile on any driver's face!
Dyno ResultsRPMHorsepowerTorque3,0002724663,{{{100}}}2774673,{{{200}}}2894723,{{{300}}}3014753,4003074753,5003194753,{{{600}}}3264753,7003344753,8003444763,{{{900}}}3554784,0003614764,1003684704,2003754674,3003804634,4003824564,5003864514,6003884434,7003914364,8003964354,9003984275,0003994175,100{{{405}}}4145,2004024015,3004003925,4004023915,500398380Average360448
Engine Buildup Worksheet SD-455EngineEngine Displacement463.3 ciHorsepower{{{405}}} at 5,{{{100}}} rpmTorque478 at 3,{{{900}}} rpmBore/Stroke4.185x4.21Bore/Stroke Ratio0.994Rod/Stroke Ratio1.574
Bottom EndBlock DescriptionXD-code No. 491132 Super DutyYear'73PreparationBored 0.035 inDeck HeightZeroCrankshaftNo. 9799103 nodular-iron, 4.21-in strokePreparationMain journals turned 0.020 in, rod journals turned 0.030 in, fully polishedBalancerStock {{{Pontiac}}}RodsOriginal Super-Duty, forged steel, 6.625-in lengthPreparationResized and bushed for full-floating wristpinsBearingsClevite 77 No. MS667P-20 main journal, Clevite 77 No. CB758P-30 rod journal PistonsJE SRP No. 149721Piston-To-Deck Height0.003-in positivePiston PinsJE full-floatingPiston RingsJE No. J100F8-41855 plasma-molyFastenersOriginal PontiacBalancedYes
Oiling SystemWindage TrayNoCrank ScraperNoOil PanOriginalOil PumpMelling M54F
HeadsCasting NumberNo. 16 Super-Duty 455ChamberOpenHead ModsNoneCombustion Chamber VolumeApprox 105 ccFlow At 28 InchesApprox {{{240}}}/180 cfm at 0.550 in Compression Ratio9.0:1ValvesOriginal Super-Duty 2.11/1.77-inAnglesMulti-angle with 45-degree seatsRetainersOriginalKeepersOriginalValve GuidesReplacement cast-ironValve SealsPositiveRocker StudsARP 7⁄16-inRocker ArmsStamped steel, 1.65:1PushrodsOriginal
CamBrandComp Cams No. 51-116-3TypeHydraulic flat tappet Duration At 0.050230/{{{240}}}-degLift0.516/0.516 with 1.65 rockers Centerline110-degLobe Separation Angle114-degLiftersComp Cams No. 852-16Valve SpringsOriginal Super-DutyInstall Height1.{{{80}}}-inSeat Pressure125 psiOpen Pressure328 psiTiming ChainCloyes No. 3043, double roller
InductionCarbRochester Quadrajet 17054910Size800 cfmModsNonePrimary Jets0.076 Primary Metering Rods0.049Secondary Metering RodsBV 0.297-inFuel PumpOriginal Delco canister-styleFuel LineOriginalIntake ManifoldNo. 494405 Super-Duty cast-iron dual-plane
IgnitionDistributorNo. 1112205 Super-Duty, conventionalContact Point SetStock replacementCoilOriginal Delco oil-filled canister WiresStock replacement 7mmTotal Timing36-degInitial Advance12-degMechanical Advance24-deg by 3,000 rpmVacuum Advance16-degSpark PlugsNGK UR5 gapped at 0.040 in
ExhaustManifoldsNos. 490802 and 490803 original Super-Duty cast-ironPrimary Diameter1.625-inCollector2.25-in
GasketsBrandFel-Pro
WeatherAir Temp63 degreesBaro29.24Humidity43 percentCorrection Factor1.035
The relatively stock SD-455 cranked out 405 hp at 5,100 rpm, and 478 lb-ft of torque at 3,900 rpm. Average horsepower and torque between 3,000 and 5,500 was 360 and 448, respectively. You can bet that's enough to put a smile on any driver's face!
Dyno ResultsRPMHorsepowerTorque3,0002724663,{{{100}}}2774673,{{{200}}}2894723,{{{300}}}3014753,4003074753,5003194753,{{{600}}}3264753,7003344753,8003444763,{{{900}}}3554784,0003614764,1003684704,2003754674,3003804634,4003824564,5003864514,6003884434,7003914364,8003964354,9003984275,0003994175,100{{{405}}}4145,2004024015,3004003925,4004023915,500398380Average360448
Engine Buildup Worksheet SD-455EngineEngine Displacement463.3 ciHorsepower{{{405}}} at 5,{{{100}}} rpmTorque478 at 3,{{{900}}} rpmBore/Stroke4.185x4.21Bore/Stroke Ratio0.994Rod/Stroke Ratio1.574
Bottom EndBlock DescriptionXD-code No. 491132 Super DutyYear'73PreparationBored 0.035 inDeck HeightZeroCrankshaftNo. 9799103 nodular-iron, 4.21-in strokePreparationMain journals turned 0.020 in, rod journals turned 0.030 in, fully polishedBalancerStock {{{Pontiac}}}RodsOriginal Super-Duty, forged steel, 6.625-in lengthPreparationResized and bushed for full-floating wristpinsBearingsClevite 77 No. MS667P-20 main journal, Clevite 77 No. CB758P-30 rod journal PistonsJE SRP No. 149721Piston-To-Deck Height0.003-in positivePiston PinsJE full-floatingPiston RingsJE No. J100F8-41855 plasma-molyFastenersOriginal PontiacBalancedYes
Oiling SystemWindage TrayNoCrank ScraperNoOil PanOriginalOil PumpMelling M54F
HeadsCasting NumberNo. 16 Super-Duty 455ChamberOpenHead ModsNoneCombustion Chamber VolumeApprox 105 ccFlow At 28 InchesApprox {{{240}}}/180 cfm at 0.550 in Compression Ratio9.0:1ValvesOriginal Super-Duty 2.11/1.77-inAnglesMulti-angle with 45-degree seatsRetainersOriginalKeepersOriginalValve GuidesReplacement cast-ironValve SealsPositiveRocker StudsARP 7⁄16-inRocker ArmsStamped steel, 1.65:1PushrodsOriginal
CamBrandComp Cams No. 51-116-3TypeHydraulic flat tappet Duration At 0.050230/{{{240}}}-degLift0.516/0.516 with 1.65 rockers Centerline110-degLobe Separation Angle114-degLiftersComp Cams No. 852-16Valve SpringsOriginal Super-DutyInstall Height1.{{{80}}}-inSeat Pressure125 psiOpen Pressure328 psiTiming ChainCloyes No. 3043, double roller
InductionCarbRochester Quadrajet 17054910Size800 cfmModsNonePrimary Jets0.076 Primary Metering Rods0.049Secondary Metering RodsBV 0.297-inFuel PumpOriginal Delco canister-styleFuel LineOriginalIntake ManifoldNo. 494405 Super-Duty cast-iron dual-plane
IgnitionDistributorNo. 1112205 Super-Duty, conventionalContact Point SetStock replacementCoilOriginal Delco oil-filled canister WiresStock replacement 7mmTotal Timing36-degInitial Advance12-degMechanical Advance24-deg by 3,000 rpmVacuum Advance16-degSpark PlugsNGK UR5 gapped at 0.040 in
ExhaustManifoldsNos. 490802 and 490803 original Super-Duty cast-ironPrimary Diameter1.625-inCollector2.25-in
GasketsBrandFel-Pro
WeatherAir Temp63 degreesBaro29.24Humidity43 percentCorrection Factor1.035