Anyone who's built or driven a race car or fast street car can relate to this scenario. With the car built and tuned for racing, the excitement of driving it is nearly overwhelming. The car launches and pulls harder than anything you've driven, at least for several races. Once you get used to the quickness of your new car or more powerful engine, you hone your reaction times and dialing skills until you and the car become a competitive racing package. then it happens. The car that used to be a thrill to race now seems like it's on a leisurely drive to the store. Did the car slow down? No, the driver just caught up with it so the adrenalin rush is gone. The hard launch is expected now rather than surprising, and going 140 mph in the quarter just doesn't seem fast enough. It seems that no matter how fast we make our cars, we always want more. This scenario is what led us to our latest engine project.
Friend and co-racer Jeff Manning had built his '91 Daytona to run low 9s, but after a few years of successful racing he needed to go faster. When another racer offered a set of slightly used Brodix B-1/BS cylinder heads at a great price, Jeff couldn't resist. Sure, the heads needed freshening, and the purchase meant an appropriately matched short-block would need to be built, but in the name of speed Jeff decided to start the project.
One of the great things about this engine build is that it involves very few exotic parts. We started with a 440 block from a '67 Chrysler New Yorker that was parted out due to rust issues. We've found with the right preparation, a stock 440 block will handle up to about 800 hp in a light car with good reliability. Remember that with traction being equal, a heavier car does put a bigger load on the engine and will find any weak link; if your car is upwards of 3,200 pounds, an aftermarket block may be necessary to safely make this kind of power. Our engine is going into a tube chassis '91 Daytona, which weighs in at around 2,600 pounds in race trim, so we feel we'll be safe making up to 800 hp with our 38-year-old factory block. Another nice feature of a used block is the hundreds of heat cycles the block has been through in its life actually serve to stress relieve the block, making it less prone to cracking or fatigue. Of course, the best feature of a factory block is the cost and availability. We bought the entire car this block came from for $400, then sold the interior, rearend, and the rest of the stuff we didn't need for $250; then sold the remaining hulk to the scrap yard for $45, which left us with a 60,000-mile engine and transmission for the whopping sum of $105. Now we can spend a significant amount of money to machine block and still keep our budget well under the cost of an aftermarket unit.
When using a factory block to build a race motor, quality machining is mandatory. We sent our block to Automotive Performance Engines in Auburndale, Florida, to have it cleaned, bored, and honed because experience has taught us they perform a quality job at a reasonable cost. When we say reasonable, remember you get what you pay for. It requires quality equipment operated by a proficient machinist and time to accurately perform machine shop operations. Take any of the three out of the equation and quality will suffer. Automotive Performance Engines is not the cheapest machine shop in town, but they have good equipment and people who know how to use it. They also charge a fair labor rate and take the time to perform operations properly, netting a quality part that will survive the abuse we'll give it. One way to weed out the shops that are not Mopar-friendly is to ask if they have torque plates for the Chrysler engine you're building. If they don't, chances are they don't do much work on Mopar iron so you may want to look elsewhere. On the other hand, just because a shop does have Mopar-specific equipment doesn't mean they do the best work, so always check the parts yourself when they are returned from the shop to ensure accuracy.
We checked our block for this build and found it to be in great shape, needing only to be cleaned, clearanced for our 4.15-inch stroke crank, bored and honed for our pistons, and new cam bearings and freeze plugs installed before we could begin our assembly. When we purchased the car this block came from, we got the engine started and running before pulling the car apart. We always recommend this if it's not too much trouble; it lets you know the condition of the engine, as well as saving you the cost of having the block pressure tested for leaks. If the engine runs and comes to temperature without leaking coolant or contaminating the oil with coolant, it's usually safe to assume the block isn't cracked and can be used for a build. If you can't run it before tearing it down, however, we always recommend having it pressure tested or magnetic-particle inspected before using it for a build. Since all we really need from this engine is the block and main caps, we completely removed all the engine's components and accessories and stripped the block of its cam bearings, oil galley plugs, and freeze plugs before taking it in to be machined. We always try to take the pistons we'll be using to the machinist so the block can be bored to the proper clearance. This way the machinist can physically measure the piston and bore the block accordingly. Kevin at Automotive Performance Engines bored and finish-honed our block using torque plates to the .005-inch clearance required to utilize our Ross-forged racing pistons. We also recommend having the main caps in place and torqued when the block is bored and honed as the block could distort slightly with the main caps removed, causing minor inaccuracies in the cylinder bore.
Since our Brodix heads were purchased used and had been run for several seasons without being freshened, we had Automotive Performance Engines clean and check them. The heads were surfaced and several valve guides were replaced before our new Competition Cams valvesprings were installed and checked for use with our .730 lift solid roller camshaft, also a Comp unit. Our camshaft was chosen to make great power between 5,500 and 7,500 rpm where our engine will be run most often, and where the B-1/BS heads will work the best on this size engine. While we were spending money at the machine shop, we had our rotating assembly balanced as well. Unlike inline or opposing engines, V-style motors require the crankshaft bob weights be a specific value matched to the weight of the piston and rod assemblies. The pistons and rods are balanced first (to the weight of the least heavy units), then they are weighed with their corresponding rings and bearings so the bob weight value can be determined. This is a time-consuming process and will cost a couple hundred bucks, but the results will be worth it. Balancing an engine's rotating assembly not only ensures smooth operation and increased power, but will increase bearing life as well, keeping you at the track racing instead of in the shop changing engine bearings.
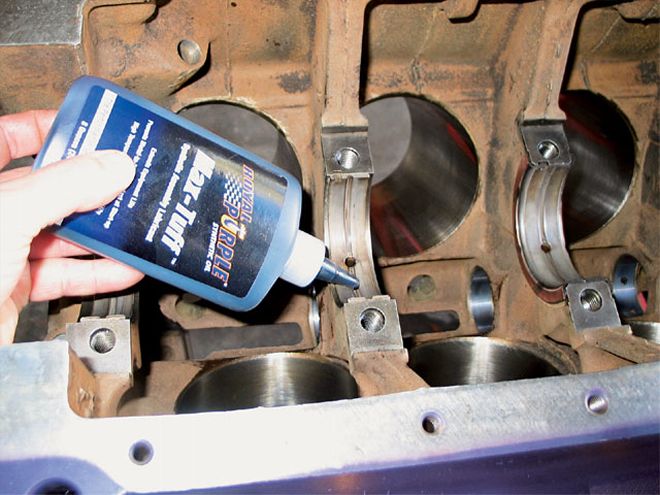 Prior to final assembly of the crank and main bearings, we recommend using a quality assembly lubricant, such as Royal Purple's Max Tuff synthetic assembly lubricant. This step ensures bearings are properly lubed during initial start-up. We prime our engine's oil system as well, but we think of assembly lube as good insurance.
With our freshly machined block back from the shop, it was time to go to work. The bottom of each cylinder wall was ground away with a die grinder about 1/8-inch to provide clearance for our Eagle 4.15 stroke crank and H-beam connecting rods. We always thoroughly clean our parts with soap and water before we begin an engine build. we performed that task prior to painting the block and installing our cam bearings, freeze plugs, and oil galley plugs. Next, our Speed Pro piston rings were file fitted to each cylinder, and our main and rod bearing oil clearances were checked before assembling the short-block. We utilized Cevite race-style rod bearings as they are suited to our full radius crankshaft. For main bearings, we chose Federal-Mogul 31/44 groove units. The groove in a main bearing is not there to supply more oil to the main bearing, but to give additional oil to the rod bearing. The 31/44 groove units give the benefit of additional oil to the rods, while providing the maximum load bearing capacity at the center of the bottom main bearing shell where the crankshaft applies the most load. To handle oiling duties, we chose a new Melling high-volume pump combined with a Milodon 7-quart, low-profile pan and internal pickup that we bought at a swap meet. The pan was in good shape, but we had to repair a couple of the welds on the windage tray. Always carefully inspect used parts and repair them prior to installation. You can save money by utilizing used parts, but be careful, it only takes one bad part in the wrong place to grenade your new motor. Finally, a Chenoweth Racing Enterprises main girdle kit with ARP studs was used to tighten up the bottom end, and Fel-Pro gaskets were put in place to keep everything sealed.
After installing our B-1 bracket bomber into the Daytona, we headed for the Lakeland Drag Strip to do some testing. After setting our initial timing and jetting our 1050 Holley Dominator with 95 jets front and rear, we made some passes. It was apparent this engine had significantly more power than the previous engine because the car had the propensity to pick up the front wheels and ride the wheelie bars some 150 feet down the track, making it a handful to drive. Some suspension changes are definitely in order. We did manage a couple of full, although wild, passes to post a best eighth-mile e.t. of 5.71 seconds on a pass that was anything but straight. Speed in the eighth was well over 122 mph, which is a clear indication we're making some serious horsepower. With suspension changes and further tuning, this combination should land us in the low-5.6-second range in the eighth-mile, which factors to solid 8.80s in the quarter. Not bad for a bunch of used parts in a '67 New Yorker block!
By utilizing a good combination of factory parts, along with used items that were picked up from swap meets and other racers, we achieved our goal of building a powerful bracket racing engine while staying within a realistic budget. All told, we have spent less than $8,000 in parts and machine shop labor to build an engine that has in the neighborhood of 750 reliable horsepower. Of course, we spent a lot of time wrenching on this engine ourselves, and those hours aren't factored into the cost of this build, but it does go to show with the right combination of new and used parts the goal of economical horsepower is achievable.
What can you build with parts from eBay or your local swap meet? it depends on your level of expertise and the deals you strike for parts, but with some good used parts and a well thought-out combination, anything is possible.