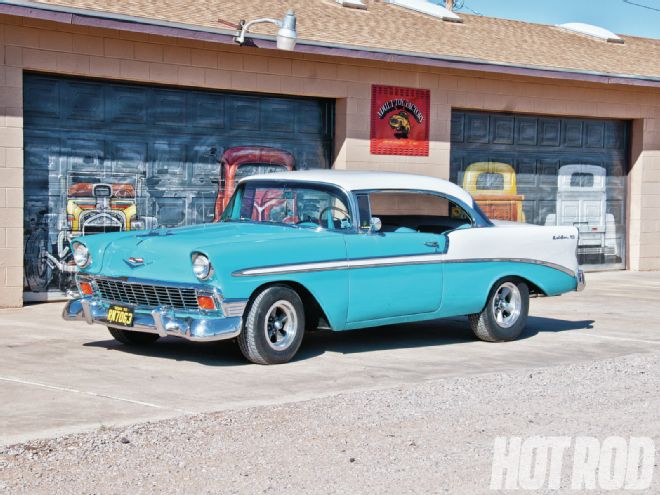
The Combo
Dale Berry spent 10 years rebuilding his ’56 Chevy Bel Air, replacing everything in the process. The car’s 0.030-over 327 has a mild cam and a 500-cfm Edelbrock Performer carb. A TH350 automatic transfers the torque back to a 3.08:1-geared rearend. Modern upgrades include a Vintage Air air conditioning (A/C) system, power disc brakes, and a 100-amp, one-wire alternator.
The Problem
As Dale describes it, “About four years ago, the car was rewired by a friend who ran a shop that did wiring and is no longer in business.” Dale didn’t notice any electrical problems until recently, when he began driving the car at night. Dale explains that with the lights on, the instrument panel and rear tail and brake lights “start to blink when stopped at a traffic light for about two minutes with my foot on the brake pedal. It doesn’t occur immediately, which is why it takes a traffic light, not just a short stop at, for example, a stop sign. It doesn’t occur under sustained braking, either. The headlights don’t flicker and none of the other front lights have the problem.” Dale tried improving the grounds at all four corners, soldering all wire connections and replacing the light switch with a brand-new one. None of that helped.
So we sent the El Paso, Texas–based car to the Adult Toy Factory. Located about an hour out of town in Las Cruces, New Mexico (or “Lost Causes,” as owner Bob Nall calls it), the Toy boys do ground-up street-rod and muscle-car builds and also sell mail-order parts. Nall assigned the fix to Ron Clapper, a former GM electrical technician and local Goodguys Rod and Custom Association rep.
The Diagnosis
Clapper began by turning on the lights and applying constant brake-pedal pressure to get some heat in the circuit. After several minutes, he was able to replicate the problem. Clapper says, “The blinking was not erratic. There was a smooth transition between on and off, but it wasn’t a perfectly consistent, steady-state beat like a turn signal, either.” Yet, the headlights and front parking lights burned brightly.
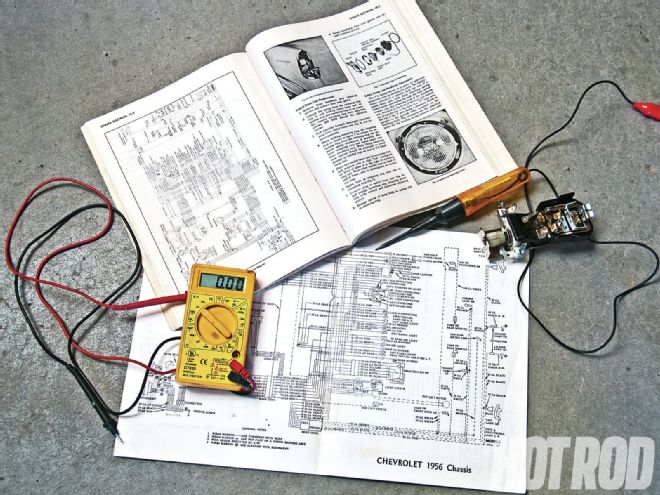 A volt/ohm meter, a test light, and wiring diagrams are critical for electrical diagnostics. Although a digital meter is shown here, an old-school, analog-type meter with a needle is more effective than a low-priced digital unit for diagnosing an intermittent electrical problem, as needle movement is more apparent to the eye than a rapidly changing digital readout.
Pesky, intermittent electrical gremlins are hard to nail down. System integrity needs to be checked logically, one step at a time, using common sense, basic diagnostic tools like a multimeter, a wiring schematic for the car in question, and part substitution if known-good spare parts are available.
Complicating the issue on Berry’s ’56 was the kludged wiring harness. Although the car was said to have been rewired, Clapper reports the upgrade consisted merely of replacing some (not all) of the original wires and piggybacking more electrical loads on top of a marginal stock harness, including an electric fan, the aftermarket A/C unit, additional gauges, and a stereo system.
Clapper first checked the integrity of basic components such as the battery, alternator, overall wire condition, fuse box, and grounds. Despite the marginal harness, Clapper saw no major electrical-system problems requiring immediate attention. With the basics OK, he zeroed in on the circuit causing the problem. On the ’56, that would be everything related to internal and external lighting, because the whole lighting system ultimately shares a common switch and several downstream splices and wires.
The Fix: Turn Signals
The first rabbit was an apparent problem at the turn-signal switch in the steering column. “By jiggling the turn-signal switch, we could get the lights to blink,” Clapper says. “The owner had replaced this switch, but it’s easy to pinch or tear a wire when doing so. We noticed that one wire in the column seemed slightly flat. We thought we were on to something.” Temporarily hooking up a spare steering column and turn-signal switch lying beside the car initially seemed to cure the problem, but soon the lights began to shut off again. “It seems the switch was only a problem when you physically tugged on it,” Clapper reports. “The pinched wire only controls the righthand turn signal, anyway, and Berry’s car had a problem with all the other rear lights.” Just to be safe, Clapper straightened the original, pinched wire.
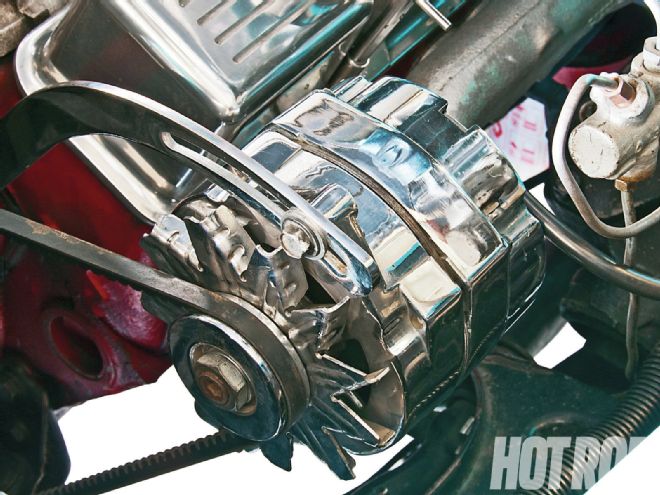 An electrical diagnosis begins by first ensuring that major electrical-system parts are performing as they should. The one-wire, 100-amp, alternator connections and pulley diameter checked out OK. Output was fine, even at low rpm (not always the case with some one-wire units).
The Fix: Flasher
At least Berry hadn’t replaced his rear tail and brake lights with popular late-model LED bulbs; because LED bulbs have lower resistance than old incandescent bulbs, they would require a corresponding LED-compatible flasher for proper operation. Still, there was a chance that Berry’s inline, conventional flasher unit had a defect that might have been contributing to the problem, so it was replaced by a known-good unit. Clapper thought he had it, but alas, the lights began blinking again after a while.
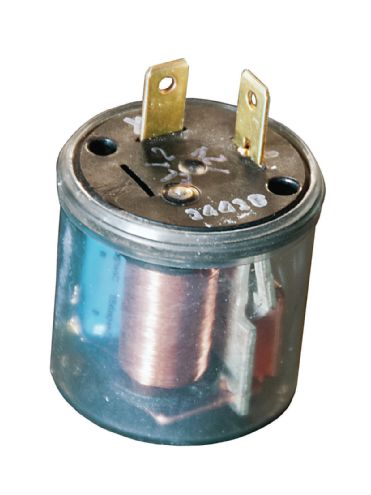 The ’56 had an EL-12 electromechanical flasher. These units won’t work right with LED lights, but Berry still had standard incandescent lights. Regardless, flasher units do wear out, so a known-good flasher was substituted—but led to no change.
The Fix: Taillights
The taillights were somewhat dim—especially under braking—yet, when fully lit, there was no appreciable voltage drop. For kicks, the Adult Toy team installed a set of Ron Francis Wiring Brite Bulbs that don’t require any changes to the wiring or flasher unit. No joy: Like Jason in those endless Friday the 13th sequels, the blinking still came back.
The Fix: Light Switch
Adult Toys knew the owner had previously replaced the main light switch. Clapper inspected the switch and found no apparent defects. Still, he replaced it with a known-good switch from the same reputable restoration parts manufacturer. Still no joy.
At this point, everyone was scratching their heads and pointing to the ancient (and original) ’56 fuse panel, the reworked wiring, and the multiple piggybacked wiring throughout the system. Lying under the dash, Clapper suddenly noticed a tiny spark near the headlight switch. Swapping out switches yet again, after several minutes the same spark recurred (now that he knew what to look for).
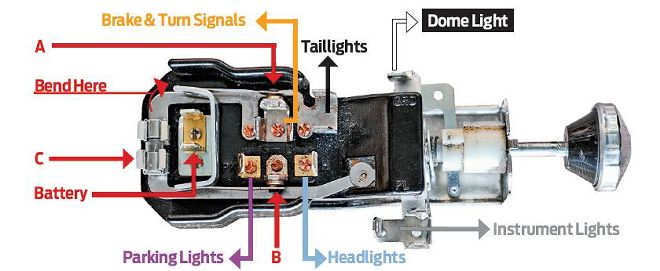 The final fix: Unlike a modern switch, a stock ’56 light switch has only one battery feed and no isolated auto-reset circuit breaker for the headlights. Instead it’s protected by two bimetallic lever arms that break contact when they expand from heat in the circuit. One arm (A) protects the stop light, turn signal, taillight, instrument-panel lighting, and interior lighting; B protects the headlights and park lights. A glass fuse (C) downstream in the lever-A circuit provides additional protection for the instrument and interior lights. Slightly bending the leg of the u-shaped bracket where lever-A attaches outward increased the force exerted by that arm’s other end against the terminal, slowing its opening and stopping the blinking.
Modern headlight switches usually have at least two feed wires: one with direct battery power for the headlights that’s protected by an internal circuit breaker within the switch, and another fuse box–protected wire for the rest of the lighting. The old-school ’56 Chevy switch has only one input and no isolated headlight circuit. Instead, main-circuit protection is marginally provided by bimetallic strips inside the switch. One strip protects all the front lights (including the headlights and park lights), while the other strip protects all the rear lights as well as the instrument-panel and interior lights. Somewhat akin to a carburetor choke’s bimetallic spring, when a bimetallic strip heats up due to an increase in resistance, it expands and breaks contact with the terminals it controls, opening the circuit until it cools back down.
Reasoning that the observed problem occurred with the rear and dash-panel lights but not any of the headlights or other front lighting, Clapper tweaked the bimetallic strip protecting the dash and rear lights so it pushed harder against its stop (again, like adjusting an electric choke for more tension to delay its pull-off). The result is that it takes more heat before the strip expands enough to break contact and open the circuit. “We felt confident that the wiring was not overheating to the extent that there could be damage,” Clapper explains. “And there was still an inline factory fuse to protect the sensitive instrument-panel lights.”
Results
After fixing the switch, Clapper looked over the car for any additional current draws or circuit issues but found nothing. He let the car idle with the lights on and brakes applied for 45 minutes. The blinking did not recur then and hasn’t since. It’s been several months now, and Berry reports all OK: “It fixed the problem—everything’s still running good!”
Ultimately, is modifying the stock switch the best solution? “No,” Clapper says. “At some point, we would like to update the entire wiring harness to ensure proper and safe operation of the electrical system. With fans, A/C, and a stereo added to the fuse panel and some wiring that’s still nearly 50 years old, it is time for a full rework. At a minimum, a ’58 Chevy switch has dual inputs plus a modern circuit breaker and could be modified to work by installing the ’56 switch’s longer plunger.”
Lessons Learned
The original Chevy wiring and electrical system was marginal even in 1956, so it’s certainly not up to the demands of modern electrical parts and accessories. As Clapper puts it, “Even though you replace some things with new wires, if the rest of the system hasn’t been upgraded, you will still have troubles.”
Need Junk Fixed?
If your car has a gremlin that just won’t quit, you could be chosen for Hot Rod to the Rescue. Email us at pitstop@HotRod.com and put “Rescue” in the subject line. Include a description of your problem, your location, and a daytime phone number.