Attention to detail separates one car from the next, like the attention to detail infused into each individual build. Many times it’s the smallest addition that makes you stop and take notice. A hot rod’s interior is a perfect place to showcase creativity and add just the right amount of personalization to make someone take notice. On a recent visit to The Hot Rod Garage in Denton, Maryland, we caught up with Ray Bartlett and his talented team as they were preparing to fabricate a custom dash panel for his new Deuce roadster. Wanting to add a hint of elegance to the ’32 Ford three-window coupe dash it was obvious a custom gauge panel and insert were in order.
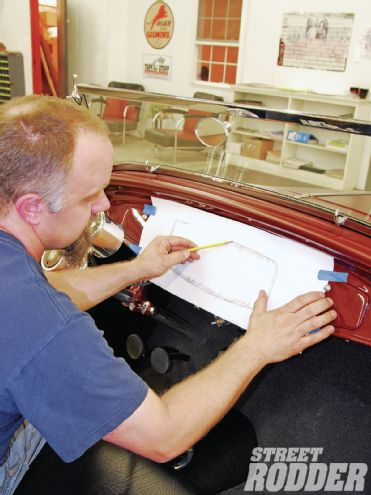
To get started, Dean Alexander began by first removing the steering wheel to allow ample access for working within the interior. Using standard white copy paper he laid a blank template across the dashboard opening and secured it in place using Scotch blue masking tape (known for its easy removal from painted surfaces). With a standard No. 2 pencil, he traced the raised bead section of the opening with the side edge of the pencil tip, creating a mirror image. After carefully removing the new tracing, he cut it out with scissors. For added rigidity in the upcoming fabrication stage, the template was traced onto a section of waterproof panel board, which was trimmed with a razor knife and checked for accuracy to the dash area. Wanting the dash panel to be a solid mounting area for gauges, switches, and indicator lights, Alexander chose a sheet of 10-gauge steel to use as a base. After tracing the template onto the steel with a scratch awl, a bandsaw was used to carefully cut out the panel while wearing eye protection. A pass over a belt sander deburred the outer edges to complete the panel base. In order to add some subtle accent to the panel, Alexander cut a 1/4-inch strip of stainless steel, which would look perfect around the outer circumference. Measured at 35 inches, this amount would allow just enough excess to trim upon completion. To prepare it for installation, he first worked its surface over with a DA sander capped with a 400-grit disc to remove any imperfections while also adding a slight bevel to its outer edge. A final run on the polishing wheel with some blue rouge added plenty of brilliance. The panel was then clamped facedown to a welding table with an 1/8-inch spacer underneath. This would allow a nicely laid 1/8-inch raised reveal to be welded to the perimeter. Using a Miller Synchrowave 250 TIG welder, Alexander tacked the bead edge in place every 3/4 inch and worked the corners with grace using a finishing hammer to keep the corners nice and tight. Once completed, he trimmed the excess using a bandsaw and welded the seam to perfection. A final pass with 400-grit and the buffing wheel added plenty of dazzle to the edge again.
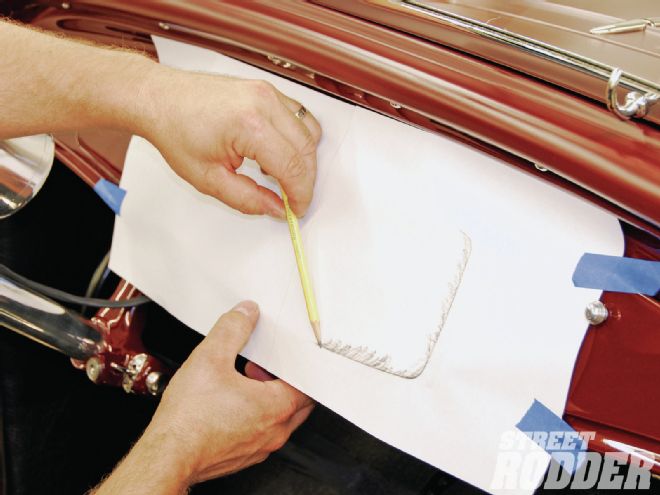 To get started, basic white copy paper was secured to the dash with Scotch blue masking tape. A pencil was then used to transfer the gauge opening’s raised bead area and create a template of the ’32 Ford three-window coupe dash.
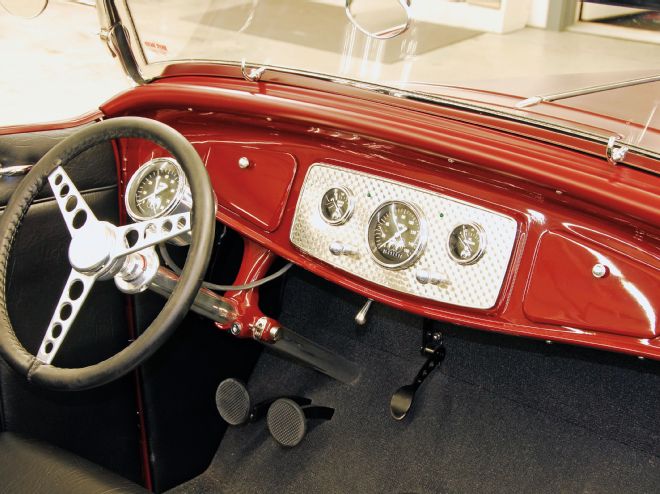
Nothing says nostalgia better than a dash insert crafted from engine-turned aluminum. Alexander used the existing dash template to mark out a section on a panel of ready-made engine-turned aluminum. Leaving the protective plastic coating intact, he cut out the insert using a bandsaw and massaged it to a perfect fit using a belt sander. Note that this takes time and can require a number of light passes over the belt sander to attain a flawless fit. Next it was time to lay out the gauges, switches, and indicator lights on the face of the panel base, starting with the speedometer to maintain perfect balance from left to right. After noting the exact location of each item and marking its true center, a spring-loaded center punch was used to prepare each for drilling. From the top side of the panel base an 1/8-inch pilot hole was drilled for each item to be installed. To protect the aluminum insert during the drilling stage, Alexander sandwiched it between the template, base panel, and a section of wood clamped to a workbench. He then re-drilled the pilot holes in their exact locations. The insert was then separated and prepared facedown first for the hole saws to be used to open marked areas for the gauges. He then flipped the panel over and used a step-drill to complete the openings for the switches. With a drill press, hole saws were used to open the exact dimensions to accommodate the gauges and switches to the steel panel base. It’s a good idea to use a bit of machine oil on this step to ease the cutting. Once completed, each hole was deburred with a half-round file and test-fitted with each component. At this time the protective coating was removed from the aluminum insert. Once assembled and installed in the dash, the completed panel added plenty of tasty traditional personality to the roadster accented by neat, limited-edition Mooneyes gauges and switches from SO-CAL Speed Shop.
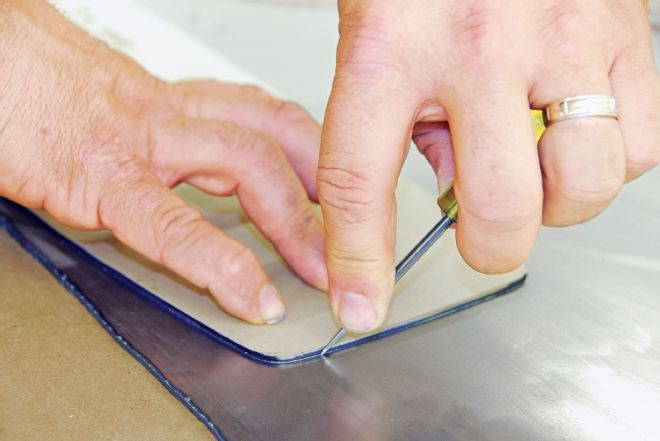 Once the template was cut out and test-fit, it was then transferred onto waterproof panel board for rigidity. Using a scratch awl, the design was etched onto the surface of a sheet of 10-guage steel.