01] We worked with custom painter Pete Santini to turn our dull Bell into a metalflake masterpiece. To start, unscrew the vents and visor. Use plastic bags or tape to keep small gaskets and screws together. Gently pry off the rubber molding at the base. If you tear this, Bell offers replacement kits.
02] Tape off the interior and threads. Wipe the entire helmet surface with a grease and wax remover.
03] Scuff the surface with Scotchbrite, focusing on indents and edges. Set up on a sturdy stand with 360-degree access. Sand lightly with 300-grit; if wet sanding, go light on the water so as not to soak the interior padding.
04] Degrease again and spray with a plastic primer (an adhesive basecoat).
05] Mix the base color. This should be your metallic, and in our case, the lightest of our paint shades, a sort of silver blue. Apply two good coats, and once dry, gently damp-sand with 1,000-grit to knock down any hard edges.
06] Tape off your design. Santini used pinstriping tape to lay out a center stripe and two side panels. Take your time here and make sure that the tape is firmly pressed to the surface. Wrinkles will allow paint seepage under the tape.
07] One trick to keeping even spacing between lines is to use thicker tape as a spacer or reference line, outline it in your pinstripe tape, and then remove the thick tape to check the design.
08] Good masking is crucial. Before you spray the main helmet color, mask off the panels, fade section, and center stripe. To get a clean mask line, lay wide tape up to and slightly over the pinstripe tape, then gently score with a razor blade—making sure not to cut through the bottom pinstripe tape—and then remove the overhanging masking tape.
09] The second color is the mid-coat, or main helmet color. We chose a bright candy-blue. When spraying candies, go easy on the pigment. Let the layers build up the color, which protects against splotchiness. Santini says he sprays candies in a varying figure-eight pattern, rather than the standard right-to-left overlap.
10] After the mid-coat is dry, unmask the panels, being careful not to pull up the pinstripe tape.
11] Remask the helmet, this time masking the area outside the panels and stripe.
12] Separately mask the fade line. You’ll pull this off before the rest of the masking, so make sure it’s easy to delineate which masking is which. We used marker on the tape to make it clear.
Hey, Cheap Guy!
Say you’ve got an old helmet, one with an about-to-expire Snell number, but now that you’ve seen the possibilities, you can’t live another day without a custom-painted helmet of your own. You can do the whole lace-paint process for less than $50 using spray cans from your local auto-parts store. Just look for transparent color. Try Dupli-Color Metalcast over a gold or silver flake. The only place you really can’t skimp is on the tape. Make sure you use a low-tack masking tape to keep from peeling off layers and a proper pinstripe tape for the graphics, or you’ll never be able to get it around the curves of your lid. It won’t be Santini-nice, but you’ll be going so fast, who will know, right?
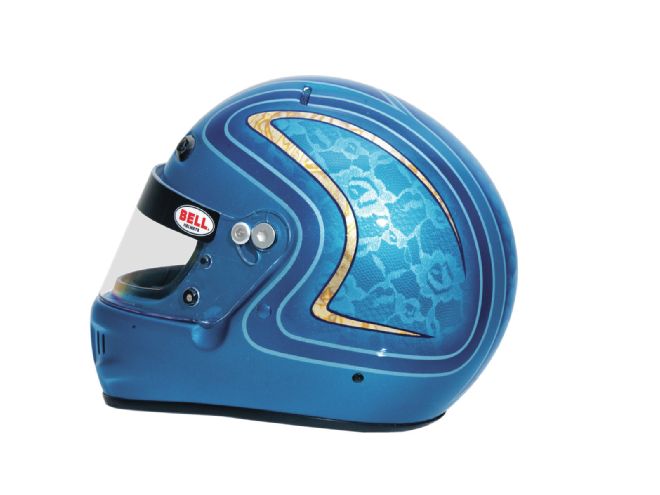
13] Stretch lace across the panels and fix in place. Do not use anyone’s wedding veil for this! Many different patterns of lace are available from fabric stores or in the women’s hosiery section of superstores like Target or Walmart. Choose a pattern small enough to repeat multiple times within the space you’ve masked off but with holes large enough to work as a stencil.
14] Mix a candy a few shades darker than your mid-coat color. We used a cobalt shade. Spray through the lace, trying to avoid spraying the paint too heavy or at an angle, to keep paint from bleeding under the material.
15] Remove the lace before the paint is completely dry to prevent sticking.
16] Lightly apply thick masking tape on either side of the center stripe.
17] We used the center stripe for another paint effect. Santini made fish scales using a cardboard template. This effect is made by allowing just the overspray to outline the shape.
18] Overspray the inner edges of the lace panels, then, using an even darker shade of candy, continue the overspray from the outer edges of your panels and stripe.
19] Waiting until the paint is completely dry will give a cleaner edge to the taped pinstripes. Remove tape by pulling straight up and back. Spray one coat of clear, and when dry, wet-sand with 600-grit.
20] Automotive artist Steve Stanford did the metallic leaf. Variegated leaf is cheaper and easier than real gold. Tape out a design and apply a water- or oil-based sizing. If you use oil, make sure it is compatible with your final clearcoat.
21] Gently cut the sheets to a size just larger than your design. When the sizing is tacky, but not wet, lay the leaf down, but do not press hard. Repair any edges by very lightly pressing additional leaf against the bare spot.
22] Once the sizing is dry, brush away excess leaf with a soft, cloth. Using a complementary color of pinstriping paint—we used a very dark navy blue—outline the leaf to give it a clean edge.
23] Apply a final clearcoat to protect the design . Reassemble the visor, vents, and rubber stripping. Use super glue for the rubber, but avoid getting it on the foam inside the helmet, because it will damage it.
24] Go racing in style.