If you think about it, there's really a pretty short list of things that truly separate mediocre cars from the ones that draw all the attention and envy at a show. Sure, extreme fabrication and customization, an outrageously powerful or exotic engine, a well-sorted suspension with a great stance, and kickass wheels will all get you noticed. But if the paint and bodywork is subpar or nonexistent, you're guaranteed to field endless queries along the lines of, "When are you going to paint it?" That's because appearances really do matter, and the car will always be seen as unfinished if it isn't sporting a slick layer of color over straight sheetmetal. That's just how it is. In our opinion, if you never do anything else to your project, paint it.
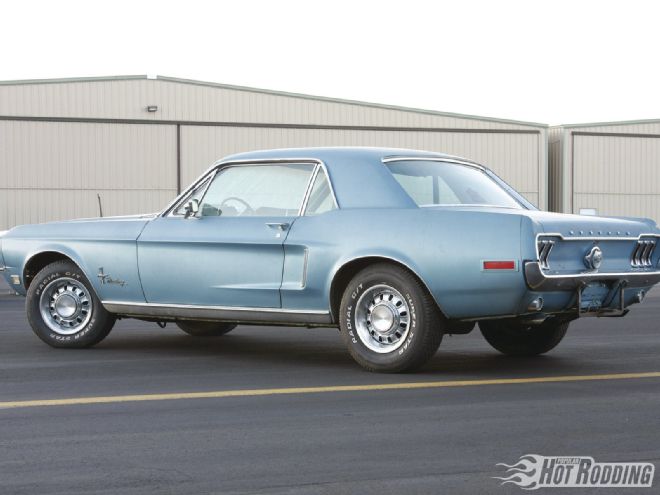 Our 1968 Ford Mustang was one of the cleanest unrestored coupes we’d ever laid eyes on. Or so we thought! It’s amazing what can be hiding beneath a couple of cheap resprays.
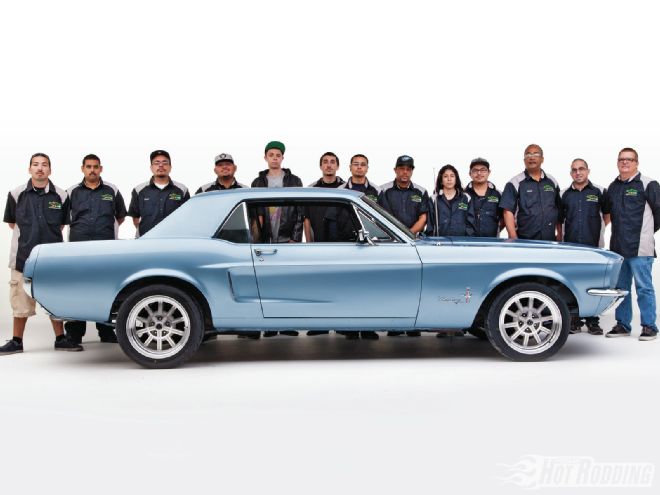
For this paint and body special, we had a unique opportunity. Typically we pick a strategy, such as low-buck DIY, or show you how the industry pros do top-level paintjobs, but this time we're going to a place where amateurs, hobbyists, and enthusiasts learn the skills to become professional: Los Angeles Trade-Tech College.
Los Angeles Trade-Tech College is a fully accredited college with an expansive curriculum with disciplines ranging from Art Trades to Fashion, Mathematics, and Sciences. Brian Ferre, an experienced custom painter and restorer, teaches students in the Automotive Collision Repair department. The classes are a combination of classroom instruction coupled with hands-on training where students learn welding procedures, body panel alignment, metal finishing/shrinking/filling techniques, body section replacement, structural sectioning practices, body damage estimating techniques, paint application, and standard body shop practices. Basically you can walk in as a total newbie and walk out with a very hirable and in-demand set of skills.
While the curriculum tends to focus on the common types of collision repair that students will see on late-model cars, Ferre also likes to show the students that there are plenty of fun, lucrative jobs to apply their skills to in the hot rodding world. That's why when Ferre got wind that we were looking around for a place to spray some color on a '68 Mustang, he suggested we let him and his top students have a crack at it. We loved the idea of working with the next generation of paint and body experts and letting them show off their skills, so we accepted.
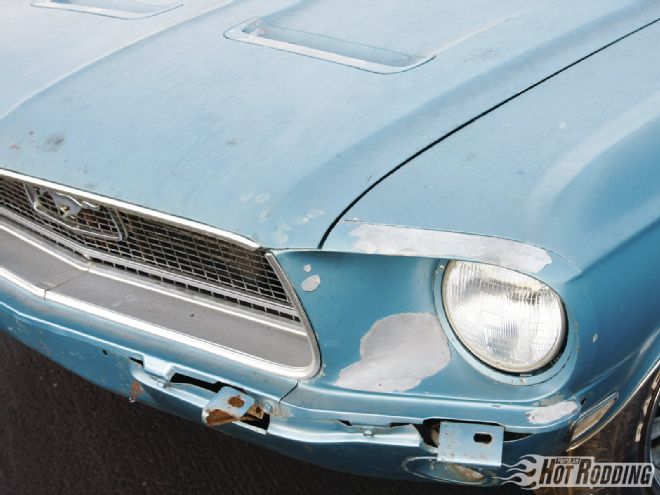 The heavily oxidized paint had also begun to peel away on the cast-aluminum headlight buckets and the cowl vent, which also indicated some adhesion issues with the base primer—a clue that scuffing may not be enough.
Disassembly & Examination Originally our plan for this Mustang started as a "scuff and shoot," with minimal bodywork, but that quickly escalated. The car appeared exceptionally clean and straight in every way, and we actually knew nearly the entire history of the car back to 1970. (It's a family heirloom.) Nevertheless, we once again learned that unless you're starting with a new body from Dynacorn, there are going to be surprises in any 45-year-old car, especially one that was regularly driven for most of those decades.
Step one in any paint and body project is assessing the paint that's already on the car and deciding what to do with it. Ideally, that's as little as possible. Unless you have rust, improperly repaired old damage, or paint that's too far gone to work with, it's usually best not to strip it to bare metal. (Interesting factoid: We were able to satisfactorily restore an old repaint using Mothers products back in our Nov. '12 issue when we did a weekend resto on our '68 Plymouth Valiant.) Bottom line, if the original factory primer and paint is in good condition, it's an excellent base on which to start. Plus, stripping to steel requires much more time, material, and money that can be better spent.
In our case, the Mustang still wore its original paint under a couple of super cheap resprays. Unfortunately, in a few spots the differing contraction of incompatible paints had resulted in cracking and flaking away of all the paint. That can make it difficult to simply sand down to the good original paint, and use glaze and filler primer to level the surface. We're never proponents of painting cars with the trim and bumpers installed, since it's guaranteed to spoil the seamlessness of the colors and invite overspray. It also provides a good opportunity to fully inspect the car, and in our case it's a good thing we did. During our disassembly phase to remove trim and other parts, Ferre spotted a few things that needed to be investigated.
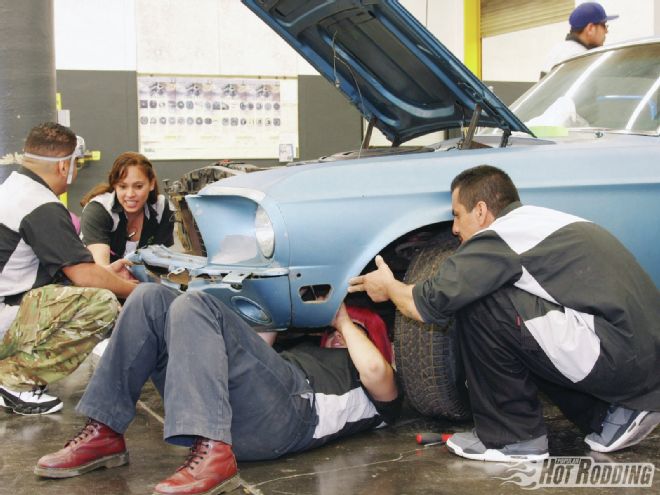 Prior to dropping the Mustang off at LATTC we removed most of the trim and emblems, but left the body intact. It’s best to prep and paint some panels separate from the car, so the students went to work right away removing the front and rear valances, headlight buckets, and fenders.
Stripping Old Paint
There are only a handful of good ways to strip a car for paint: sanding, blasting, and chemical stripping. Unless the car is completely disassembled to a shell, our preferred method is good old-fashioned sanding with a dual-action sander and by hand since it offers more control of the medium and less dust to clean out of the car. Since we knew we wanted to go to steel, Ferre had his students use 3M 40-grit paper to strip away the two cheap resprays, the original paint, and most importantly, the accumulated areas of old repairs.
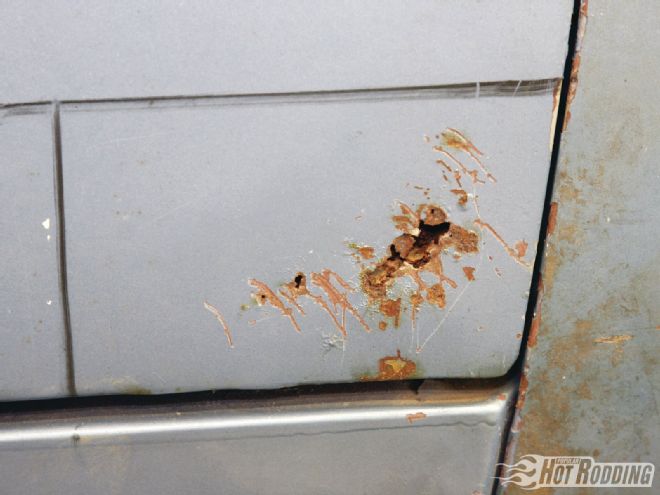 This was originally the only known spot of rust on the Mustang—a small section in the front corner of the passenger door. The black outline shows the area to be cut out and replaced.
If there is one thing to remember about old repairs, it's that they are almost always unreliable from a quality and longevity standpoint. Antiquated or sloppy repair techniques are the norm since most classic cars went through a very long period of time when they were worth very little money. That means any necessary repairs were likely performed with an eye on budget versus quality. Also, the quality of fillers and glazes has improved over the years to the point that they can now be considered permanent.
Aggressive paper on a D/A is a great way to cut down the work required to remove paint, but remember to be cautious around body lines with the D/A. It's easy to distort or dull the sharpness of the steel lines with sanding, which will just create more work with glaze to rebuild them later. Use 40-grit to get the bulk of the material off, then address the scratches in the metal with 80-grit.
Rust & Damage Repair When working with a popular and well-supported classic car like our '68 Mustang, we have a couple of options when it comes to rusted and damaged panels: do we repair, or replace? The answer may not always be so simple, though.
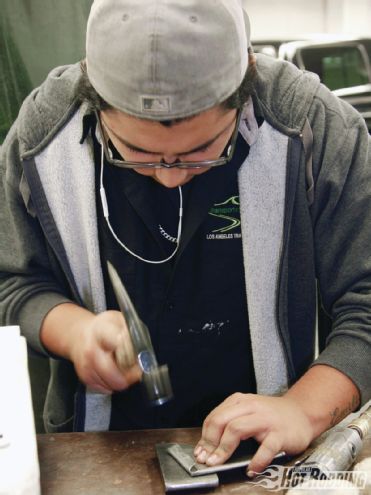 Everyone loves a challenge! Ferre had several students compete by hand-shaping patch panels for the door. The patch had to fit the cut perfectly without force, and the flanges had to wrap around to the inner side of the door with the right curvature. Each contender was nicely done!
For example, the passenger-side fender on our Mustang was an old reproduction piece that fit acceptably well, but not ideally. We still had the original fender, which had been damaged in a light impact (the quintessential fender-bender), and Ferre installed it back onto the Mustang out of curiosity. It was immediately obvious that it still fit the car perfectly from a body line and panel gap standpoint. After a thorough examination, Ferre determined that it would be worthwhile to pull and repair the original rather than make the replacement fit as well, or purchase a higher quality reproduction.
The fender did not look all that bad at first, just a light push, however to the eye of an experienced bodyman, there was a great deal of spread damage to recover, and that required a trained eye with the right tools and patience. This was a perfect challenge for one of Ferre's students, Manual Montoya. Ferre first used a slide hammer to pull the metal out from the point of impact. He then used a slapper and various hammers and dollies to rough in the shape. Montoya then spent a great deal of time hammering, forming, and sculpting the steel back to its original shape. The most challenging area was the fender flare and lip, which required a good deal of time to coax the steel back into its original form. It lost the battle though; Montoya and Ferre made it as good as new.
Once the filler discovered on the front quarter of the hood was removed, it was revealed that light damage from a minor impact on the nose many years ago had been hastily repaired, then covered with filler. While the hood looked good and showed no indication of damage from the outside (there were small hints on the inside) rather than respray it, a stud welder and slide hammer was used to pull the bent steel back into shape. The same process was used to pull numerous small dings on the top of the trunk lid.
After removing the taillights and discovering rusted areas, the taillight panel was deemed too much work to repair. Luckily, these panels are fairly simple to replace. As reported in our April issue [see "Get Your Tail In Shape!"], the panel was removed by the LATTC students by cutting away the centersection with metal shears, then drilling out the spot welds that attached the flange to the quarter-panels and trunk floor. The new piece from YearOne was slid in and tack welded into place like factory.
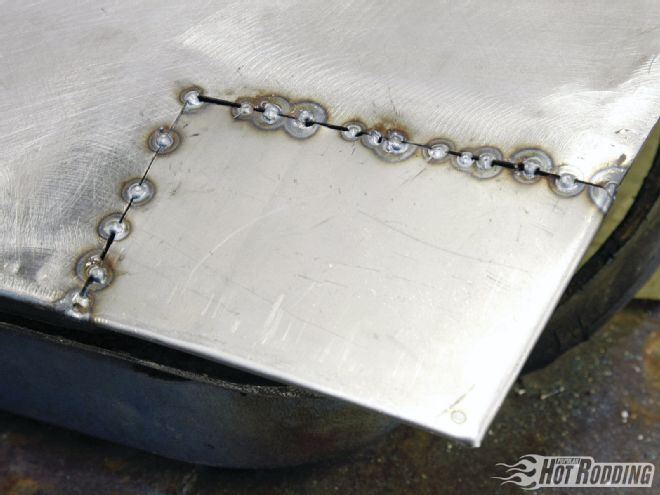 Jennifer Gonzalez’s patch was chosen as the winner, and she tacked it into place. When replacing panels like this, weld only a handful of tacks at a time and allow the metal to cool between rounds. This will minimize distortion of the metal.
Proving once again that the rust you see is often only the tip of the iceberg, a small spot of rust in the lower front section of the passenger-side door was found to extend to the bottom of the door as well. When the weatherstripping was removed, a 4-inch section of rusted-out steel was revealed. Since crafting small patch panels is a must-have talent for any aspiring paint and body experts or fabricators, after cutting out the rust areas and neutralizing the rust inside, Ferre had several of his students compete to hammer out the best fitting patch panel for the outside corner, as well as the curved piece on the bottom side.
Now is also the time to make any alterations to the body if you have any such plans. For us, there was only one thing that always bothered us about '68 Mustangs: the new-for-'68 side marker lights and quarter-panel reflectors that just don't jive with the body lines. To comply with federal regs, Ford quickly created a one-year solution since the body style was slated to change the next year. When the body is bare steel, it's an easy fix; Montoya cut out the reflector indentions in the quarter-panel, tacked in flat steel, then ground everything smooth. He also filled in the marker lights on the front fenders.
Filler & Smoothing
When wielded properly, body filler isn't something to be ashamed of. Even the very best metal repairs will require very thin layers of filler to bring the body to perfection. After each of the patches and repairs were performed on our Mustang, a layer of 3M Platinum Body Filler was spread across the area and then sanded down to level the low spots with the rest of the sheetmetal. The Platinum Filler is 3M's top-shelf filler and is used for the bulk of building up the repaired areas. It sands and finishes very nicely with a sanding block and 3M 40-grit paper to level with the surrounding metal.
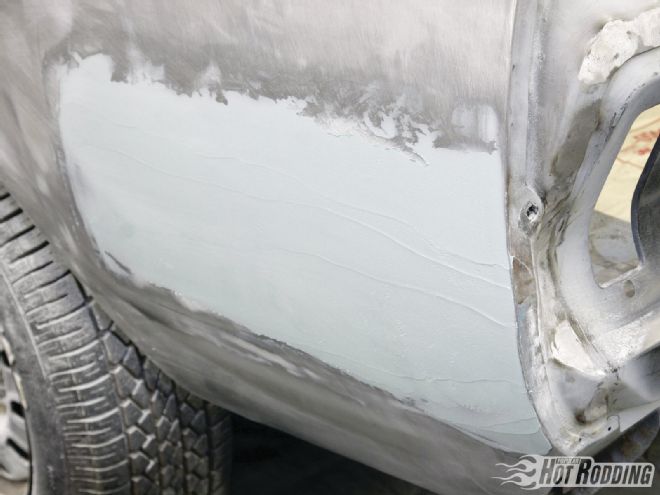 Even the very best metal-finished patches, however, will need a skim coat of filler to get it as flat as possible. When spreading any filler, much more than is needed is applied, but most will be sanded off.
After the treatment of filler to the affected areas, it was further sanded with 3M 80-grit paper after coating with 3M Dry Guide Coat, which is basically extremely fine activated carbon dust. The dust sticks into the pores of the filler primer, so as it is sanded the low spots will show up as dark. 3M Platinum Plus Finishing Glaze was used to fill very minor imperfections on steel and over the Platinum Filler when needed. After repeating the process until all spots are smooth, the complete body was sanded with 3M 150-grit to prepare the surface for priming.
Priming & Block-sanding
The initial bodywork took out much of the issues with our Mustang's body, but it's the priming and subsequent block-sanding that really make all the difference in how straight a car ends up. Since we took our Mustang project down to bare steel and aluminum, we have to start with an etching primer such as DuPont's ChromaPremier Low-VOC Etch Primer. This primer is a two-component system etching primer designed for corrosion protection and adhesion to bare steel, aluminum, and galvanized metal. It's not a stand-alone primer though; it must be followed with a Primer-Surfacer, or Primer-Sealer. Essentially, it's used just to create a uniform base for the build primer that the paint will be laid over.
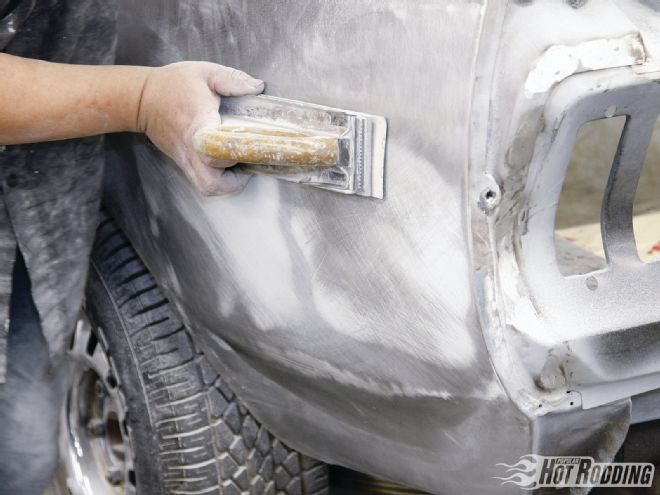 Sam Lim used a stiff sanding board with 3M 40-grit paper to take off the bulk of the filler. Note the crosshatch pattern of his sanding; it’s always a good idea to block sand in this pattern (with filler, primer, or paint) to minimize the chance of sanding lines showing up.
After allowing it to flash, we immediately followed with three coats of DuPont PremierFiller Urethane Primer Filler. Why three coats? The Filler Primer is used to fill in any heavy scratches created from sanding and also to give us something to block-sand. Much like what was done with the filler over the body repairs and modifications, long blocks are used to sand the primer to find the low spots. Very shallow areas will be equalized by the primer, but some will require a tiny touch more glaze to level them.
To find those low spots, the whole car was coated with another fine layer of 3M Dry Guide Coat. This is the time when a great set of variously shaped sanding blocks comes in handy. We've always relied on Eastwood's catalog of products for good blocks, and here we used 3M 150-grit paper on our blocks at this point.
Be cautious during this sanding as ideally we don’t want to break through to metal again. If it happens, it’s not a big deal since the block-sanding will be followed by another round of primer. In our case, we had enough small break-throughs that we spotted in etch primer to take care of the break-throughs. After that, we re-primed the whole car with filler primer and block-sanded again with 150-grit, followed by 320-grit, then 400-grit wet-sanding to relieve the scratches. Once the primer fully dried, we were ready for paint.
Jamb It!
Since the paint inside the doorjambs and underneath the hood and trunk lid was as badly weathered and resprayed as the rest of the car, we had to sand and prep them for paint as well. Thankfully, there were no issues to address in these spots, so the LATTC crew simply sanded them smooth with 3M 80-grit paper to ready them for a coat of DuPont Urethane Filler Primer.
 Spots of lead are used by the factory to fill the seams where the roof joins the A- and C-pillars. These areas almost always require a little glaze to level them if the car has been stripped to metal. Here Christopher Ruvalcaba concentrates on perfecting the transition of the A-pillar.
To properly prime and paint the doorjambs and underneath the hood and trunk lid, as well as the cowl area normally hidden by the hood, the panels ideally need to be painted separately from the rest of the car. This allows the painter to easily reach all of the sides of the panel, which would be difficult were it still attached to the car. The LATTC students removed the hood, trunk lid, and doors and placed them on dollies in the spray booth for priming. Since blocking of these areas isn’t absolutely necessary after priming, we were able to spray color and clearcoat on them after the appropriate drying time.
Spraying Color & Clear
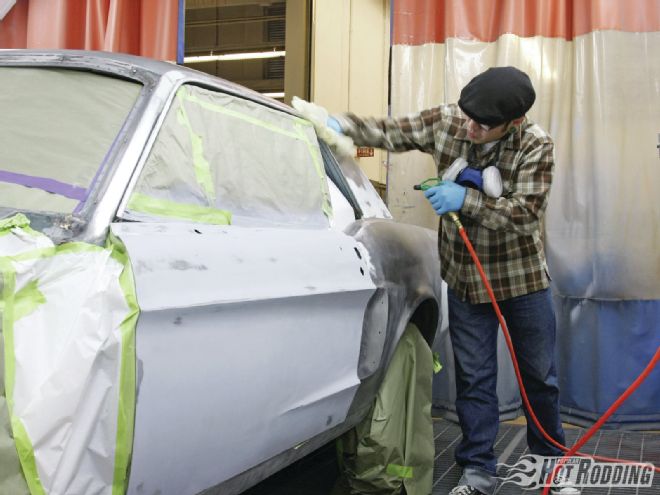
We decided to stick with our Mustang's original hue of Brittany Blue, so DuPont was kind enough to brew a new waterborne formulation of the color especially for our project. While waterborne paint carried with it a stigma for a few years, those fears have begun to subside since the technology from companies like DuPont have created waterborne paints that meet, and often exceed, the older solvent-based paints. All new cars are now sprayed with waterborne paints.
One huge advantage to DuPont's new waterborne paint is it delivers more complete coverage in fewer coats. Whereas it could easily take three to four coats for good color coverage with solvent-based paint, or a competitor's waterborne, it will only take one to two coats with DuPont's formulation. That's mostly because DuPont's water-based paints are higher solid paints, meaning they contain a high concentration of pigment. This can be a little trickier to spray if you've not used it before, as the resulting waterborne colors are a little thicker and consequently flow differently. But it does save a great deal of time and material, and it's a simple adjustment for a seasoned painter. If it's your first time, start with a spare panel to get a feel for it.
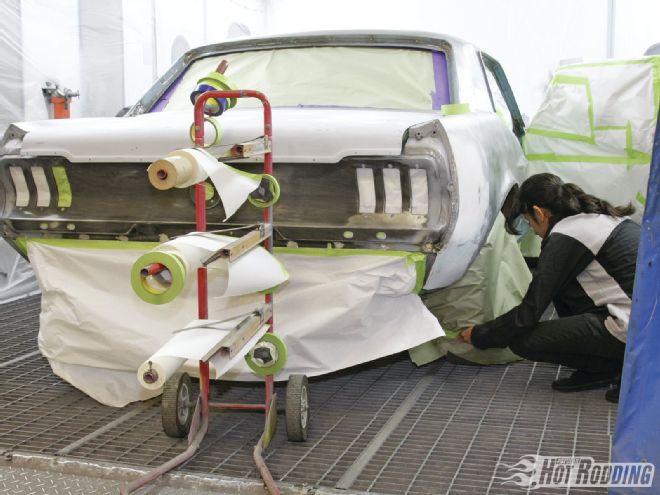 With all the initial bodywork finally finished, the Mustang was rolled into LATTC’s Spray Zone downdraft paint booth for its first layer of primer. To minimize overspray on the undercarriage and wheelwells, Gonzalez taped 3M masking paper to the inside and edges of the panels and rockers.
Waterborne paint also dries differently than solvent-based paint; it requires light airflow across the panel to allow the paint to dry fully before spraying the clearcoat. In our Spray Zone booth, the downdraft air will do the job, but otherwise CFM Guns (dryers) are required. After the recommended dry time of about 20 minutes in the Spray Zone booth with the downdraft and heat on, Ferre and the students gave the basecoat a light sanding with 3M 600-grit paper to remove any possible trash in the paint and create an ultra-smooth surface for the clearcoat. Then we were ready for clear.
Though there are some waterborne primers and clearcoats, most are traditional-style solvent based, though they will be low VOC now. As such, they flow out more like a traditional clearcoat. Ferre laid down a coat and half of clear (one fairly heavy, immediately followed by a light coat) of DuPont PremierClear LE 8700S.
We have to say, we've never seen clearcoat lay so perfectly flat, but we still plan to come back and wet sand it to perfection with help of the seasoned paint and body experts at Elite Restorations in Paramount, California, but clearcoated as-is out of the gun, it looks shockingly good. We could leave it as-is and drop jaws at any cruise night. Now that's testament to fine paint products, well sprayed!
 Though it was thoroughly blown off and wiped down with lint-free Sontara E-4143 towels and 3M A3970S surface cleaner before entering the booth, before priming Ruvalcaba went over the Mustang with light pressure from the air hose to remove any lingering dust, followed by a drag with an extra-sticky 3M E-4140 tack cloth.
What You’ll Need:DuPont Paint Supplies PN: Qty.: Description: Unit cost: A-3970S 3 Surface Klean, aerosol $9.25 22880S 3 ChromaPremier, Low VOC EtchPrimer (quart) $37.53 22806S 1 ChromaPremier, Etch Primer Activator/Reducer (quart) $38.92 LE 3404S 1 PremierFiller, Urethane Primer Filler (gallon) $205.70 LE 1185S 1 ChromaSystem, Primer Activator/Reducer (quart) $95.50 LE 3440S 1 ChromaPremier Primer Sealer (gallon) $210.90 Custom 1 CroMax Pro Waterborne Paint (gallon) $479.00 LE 8700S 1 PremierClear clearcoat (gallon) $235.95 E-4586 1 Sontara Primary Tack Cloth $13.42 E-4143 1 Sontara SPS Solvent Wash & Dry Cloths $22.32 E-4141 1 Sontara SPS Final Tack Cloth $7.56
3M Materials PN: Qty.: Description: Unit cost: 01171 2 Platinum Plus Body Filler $42.99 31180 2 Platinum Plus Finishing Glaze $25.79 051131-05860 1 Dry Guide Coat $54.09
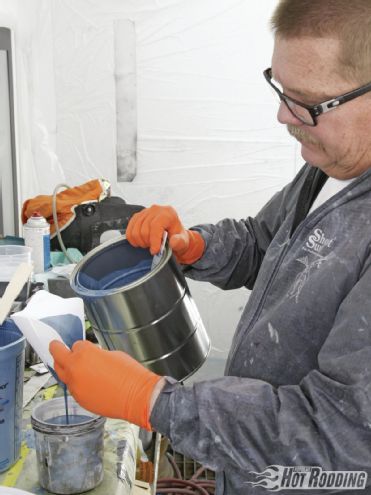 It’s time for color! All paints need to be strained, but make sure your strainers are waterborne paint approved, otherwise the paint will dissolve the glue. Thanks to its high-solid nature, waterborne paint flows through a standard 125-micron strainer much slower. As far as we know, this is the first water-based version of one of our favorite classic colors.
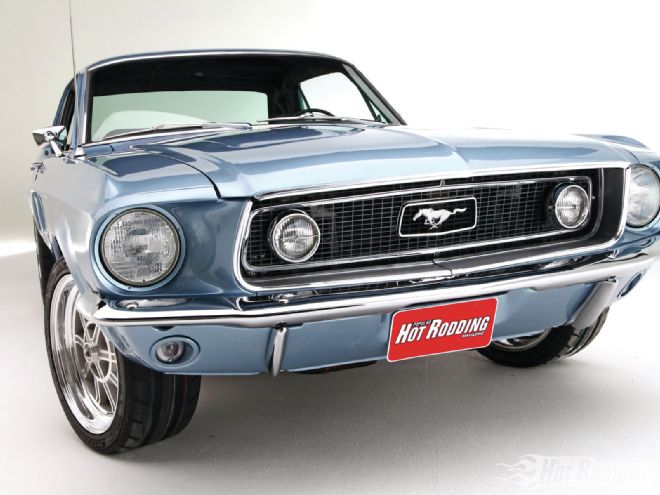 Which parts are NOS Ford, and which are reproductions from YearOne? Only the most observant and knowledgeable could possibly tell. The GT grille and the foglight are NOS, all other brightwork is YearOne.