It’s now been a year since we first introduced our project ’78 Malibu (The Ultimate Malibu .) If you’ve been following along, you’ll also know that for the first time, rather than mindlessly dropping in a mega-horsepower big-block and topping it off with a nitrous unit, we decided to build our version of the ultimate daily driver. This meant it had to be reliable, retain civil street manners, and, being the performance aficionados that we are, it had to have the ability to power through the quarter-mile as well as being able to take a corner.
We started our Ultimate Malibu by first addressing its poor braking and handling qualities. We upgraded the meek factory 10.5-inch brakes to the massive 1LE 12-inch brakes and concurrently rebuilt the front end (Big-Brake Upgrade For GM A/G-Bodies.) Next, we installed the complete line of Hotchkis G-body suspension components along with Edelbrock’s IAS mono-tube shocks (G-Rated.) Of course there was also the brutal slalom and skid pad testing. This resulted in a stellar 0.83 lateral g-force on the skidpad and an awe-inspiring 6.63 seconds at 61.70 mph through the 600-foot slalom course. What we didn’t tell you was that the tired carbureted 305 seemed to know it was time to retire as it limped back to our shop. With its final gulp of air, the junk box made us push her through the shop’s bay door.
It was obvious from our last outing that we had the suspension dialed in, but now we had electronic fuel injection (EFI) in mind to help it pass California’s stringent emissions requirements. We just weren’t sure how we were going to combine that with performance and reliability. With the 305 on a permanent vacation, we spoke with Mark Campbell, the fuel injection conversion specialist and owner of Street & Performance (S&P) in Mena, Arkansas, who had an immediate answer to our dilemma. Campbell recommended using GM’s venerable LT1 with his custom wiring harness, and he put us in contact with Contemporary Corvette in Bristol, Pennsylvania. For under $3,000, we became the proud owners of a ’95 LT1 that featured a potent 10.5:1 compression, aluminum heads, and a stout rating of 275 hp and 325 lb-ft. It was delivered right to our door with all of its accessories (see “Getting a Signal” sidebar), the factory computer, and the original 4L60E transmission on a pallet. If you’ve ever made the effort to find a complete LT1 (the company has LS1s too) with a transmission and a guarantee that it’ll run, then you know just how much of a bargain that was.
With the motor in hand, the next question was assessing the level of complexity involved in transplanting a late-model motor into our pre-EFI sedan. Like you, we don’t have super mechanics that do all the wrenching for us, so it’s no surprise that we had an overwhelming amount of questions that needed to be answered. Would the LT1 really drop in hassle-free? What about a fuel system? What about a cooling system? How would we fit the 4L60E onto the crossmember? This is where Campbell once again proved to be an invaluable mentor. Having stuffed nearly every combination of fuel-injected engine into every conceivable package from street rods to musclecars—even trucks—his vast knowledge enabled us to get our project to where it is today. So follow along and see what it takes to stuff a factory-injected GM motor into your Malibu Classic and fire it up on the first try!
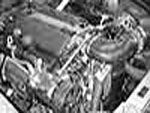
LT1 Install: Although we purchased our ’78 Malibu in California, it was originally destined for Arizona and tagged as a 49-state Federal car. Because of this, we weren’t burdened with smog equipment and miles of hoses languishing on the motor, which also made the removal as easy as it would have been on any musclecar-era vehicle. If you’re planning on doing this conversion with a car that originally housed a V-6, be sure to scavenge a set of V-8 mounts and swap them out. With the engine bay degreased and freshly fogged with both Eastwood’s Chassis and Underhood Black paint, we had high hopes of having the motor and tranny resting comfortably right away. Unfortunately, we found that the newer LT1 engine mounts are offset about 1½ inches on the passenger side in order to accommodate the A/C compressor bracket. A quick call to Campbell told us that our options were to either notch the frame or use one of S&P’s serpentine bracket and pulley kits to relocate the compressor. Considering that our welding skills are a far cry from sensational, we went with the bracket kit. With the brackets on order, we removed the A/C compressor and mounted the old 305 engine mounts where the compressor once sat. With some maneuvering of the engine hoist, the engine-trans combo dropped in beautifully. Mounting the tranny was easy thanks to G-Force Performance’s nifty engine-swap crossmember.
The new durable steel crossmember is designed specifically for G-body owners looking to install a 4L60E or TH700-R4 (G-Force also offers crossmembers for TH200-4R applications), and it features a dual hump to accommodate a true-dual exhaust system. At only $189, the price is very reasonable compared to the cost and hassle of fabricating a new crossmember. With the new drivetrain positioned, we found that the motor sat relatively low and offered plenty of engine-to-hood clearance. The stock Camaro exhaust manifolds exited free of obstruction, and there was ample clearance between the 4L60E and the trans tunnel. With the exception of the motor mount causing a few hours worth of frustration, it’s as if the LT1 was designed with the Malibu chassis in mind.
Fuel Plumbing: Unlike EFI systems, a carbureted engine’s fuel pressure demands are low, averaging only about 6 psi. On the other end of the spectrum, an EFI setup requires 40-plus psi, which obviously means some fuel system changes are in order. First we replaced the low-pressure rubber hoses with high-pressure braided stainless lines. We also needed a fuel tank with internal baffles to prevent the pump from sucking in air should the fuel level ever get low. We could have sumped the stock tank but opted to go with more of a factory-style system, mainly because if we ever have pump failure in the middle of nowhere, chances are that a replacement-style in-tank pump will be much easier to acquire than a trick external unit. To do this, we sent a brand-new stock replacement tank from SPI Distribution in Medford, Massachusetts, to Rock Valley Antique Auto Parts in Stillman Valley, Illinois, to modify it for our needs. Rock Valley first recessed the top of the tank by a ½-inch to prevent the fittings and fuel lines from hitting the bottom of the trunk floorpan. Rock Valley then installed a high-volume in-tank pump rated at 42 gph at 48 psi and cut an additional hole adjacent to the pump for a fuel-level sender.
For the fuel lines, we contemplated using prebent hard lines, but we later decided that AN-6 (3/8-inch equivalent) stainless braided lines from Goodridge would be much easier to route. Starting out back with the tank, we used two 90-degree 3/8 NPT-to-AN-6 fittings for both the feed and return. We ran the lines over the rear axle and then routed them to the front of the car along the passenger-side framerail. Once they were up in the engine compartment, we used a pair of AN-6 male-to-male unions and connected the lines onto S&P’s trick rear-exit fuel-line kit. If you plan on running the braided line, do yourself a favor and order this kit. S&P’s rail adapter is exceptional, and the kit includes everything necessary to attach the factory fuel rail onto AN fittings, making the job a breeze. All said and done, the fuel system was definitely the easiest portion of the installation—it took less than four hours to wire the pump, assemble the fuel-level sending unit, mount the tank, and do the final plumbing.
Wiring: The Fun Stuff: Wiring can be a horrifying experience. If you have to wire up every last sensor and sending unit onto a fuel-injected motor that you’re not familiar with, it can quickly become a lost cause. However, the S&P harness that we used made the job a snap since each wire was individually labeled. It used the same type of Weatherpack-connector as the factory system and plugged in effortlessly. Even the fuel pump relay is pre-wired and integrated into the harness. All it took to make the EFI pump functional was to connect the wire labeled “Hot lead to fuel pump” to the positive side of the in-tank pump. So if the only thing preventing you from dropping in an LT1 is the fear of wrestling with the OE harness, then get the S&P harness. It really does make it as easy as we claim.
Final Two Cents: Updating your car to the new millennium with fuel injection can be a challenging task for those unfamiliar with the technology. However, should you decide to take the plunge and follow in our footsteps, then know that it can be accomplished with a reasonable amount of time and money. The fact that we’re using a factory computer programmed by GM offers many benefits. First we don’t have to fiddle with any laptops or deal with tuning issues. Second, we can later hop it up with any late-model performance parts designed for its F-body donor. Although we still have some issues to address—including a driveshaft, an electric fan assembly, and an exhaust system—you can bet that the next time you see our Ultimate Malibu there will be a complete road test and evaluation. So, if you’re wondering whether a fuel injected LT1 was the best way to satiate our hunger for late-model performance, yes, it most certainly was!