
For those of you who have been shut out of driving or showing your Pontiac due to the off season, hope comes with the March 20 vernal equinox for the northern hemisphere. Spring is often used as a metaphor for rebirth, growth, renewal, and even better times. For Pontiac hobbyists, it signals the time to get serious about show season prep for our rides.
As a full-line retailer of car-care products, Showroom FX (SFX) and its owner, professional detailer Steve Pasztor, are in the business of helping hobbyists maximize the appearance of their vehicles, from a classic Pontiac to a late-model G8 and everything in between.
"As a hobbyist myself, it's my passion to educate and help others unlock the potential in their cars' finish, and then maintain it," says Steve. "In addition to formulating products that broke new ground in the car-care industry, such as our proprietary liquid carnauba and synthetic polymer waxes, I detail cars for discriminating owners who demand perfection. Over the years I've found that from a technical perspective, many enthusiasts don't know the basics of achieving a glossy finish or how to properly maintain it once achieved."
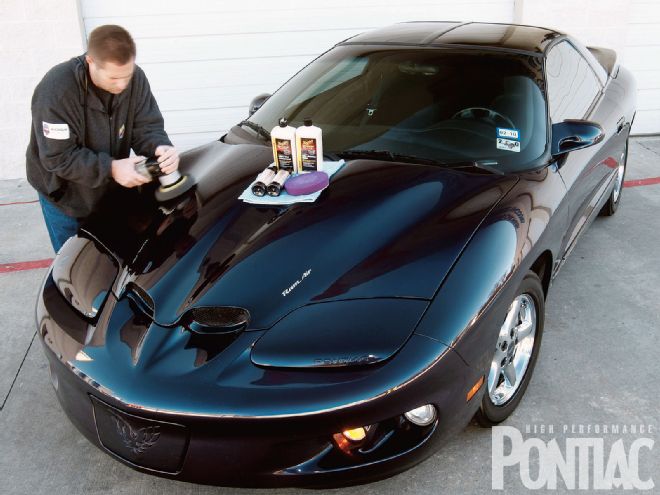
Follow along as we guide you through the basics of renewing the finish on an '02 Firebird Formula, owned by Brenda Neyra of Mesquite, Texas. In addition to cruises and shows, Brenda routinely bracket-races her Bird. Bought used in 2007, the Navy Blue Metallic Formula has 48,000 miles and a few preexisting cosmetic issues. Just as the natural renewal of spring arrives, so too will the rebirth of this Bird.
Note: According to Showroom FX, the proper procedures for washing your car can contribute greatly to the success of the detailing. HPP has included a review of proper car-washing techniques as part of this story. (See Proper Washing Techniques.)
Conclusion
Knowledge is power, and with the information provided in this article, you too should be able to either maintain your collector car or substantially increase its show-worthiness by following the outlined procedures and tips. Car detailing in its highest form requires a trained eye, patience, and experience. The key to your car's finish is washing and drying it properly so you don't introduce scratches and swirl marks; then applying a top-tier paint surface protectant such as SFX's line of crèmes, which blend synthetic polymers and carnauba waxes, or its acrylic paint sealant (PN SFX-03, retail $16.95).
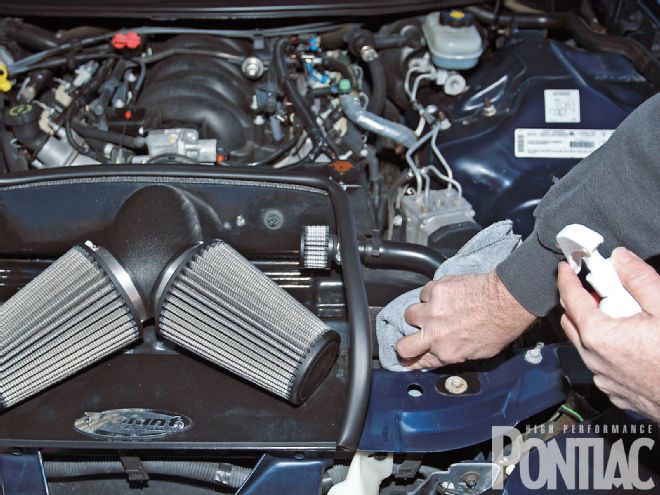 Then Steve applies the tire and trim dressing to all of the door and hatch seals, as well as the plastic and rubber under the hood.
"The procedures illustrated apply to all panels," says Steve, "except that wet-sanding isn't required on every panel, and the remainder of our panels were polished after the car had been buffed out with M105, and then thoroughly washed and dried to remove the compound's residue. Had the Bird been the victim of finer swirling, I could have used a gray finishing foam pad and either my Swirl Eliminator or Meguiar's M205 Ultra-Finishing Polish.
"Choosing the right products to maintain, protect, or renew the paint finish is only half of the battle. Educating hobbyists on how to detail is the key. Brenda's car took approximately 16 hours to complete, but it underwent a stunning transformation. By having a chemist on staff, I-along with selected beta testers-can use what we develop, examine the results, and then continually refine the products to raise them to the desired levels. Our in-house-developed products are offered because they have superior characteristics and performance. We spend money on R&D and product support, and let hobbyists advertise our products by word of mouth."
After having her car detailed, Brenda Neyra relates, "I recognized that the Formula already had swirl marks, paint chips, and paint defects when I purchased it; I planned on having it painted within the next few years. Steve worked absolute magic on the finish; seeing it for the first time after he completed it made me do a double-take to make sure it was really mine. Not only has the car been renewed, but it looks fantastic, with outstanding overall paint clarity and depth that draws your eyes toward the positive aspects of the finish and away from the problem areas."
"Professional" detailing runs the gamut from the mobile detailer armed with a van that's equipped with a chemical tank and high-pressure spray hose to elite paint-finish experts who are highly trained and specialize in hobbyist and exotic vehicles. SFX has a network of professional detailers serving several areas of the country, so look them up on the website if you don't feel comfortable tackling the project yourself.
In most cases, light swirl marks are easy to tackle, as is polishing your car and completing all of the ancillary detailing items, such as cleaning the interior and glass. Just remember that once you achieve the desired results, it will become your labor of love to maintain the detailing level and carry the techniques and tips given here to fellow hobbyists.
Proper Washing Techniques
Do's & Don'ts and Tips & Tricks
• Don't aim a high-pressure spray wand directly toward the painted surface of your vehicle. Spray the surface at an angle to diffuse the pressure.
• Exercise caution when running your car through any form of industrial car wash. The most advanced car wash still uses high-pressure water spray and harsh chemicals that can inflict marks in the surface.
• Don't rush while washing. More damage is done to a car's finish by washing and drying than any other process.
• Don't wash the car in direct sunlight, which might allow water spots to "bake" into the finish, nor under very low-light conditions where you may not see dirt on your wash mitt being drawn across to the paint surface.
• Don't dry your car with inferior products, such as large, embroidered bath towels (not 100 percent U.S. cotton content) and cheaper chamois rags. A clean, white bath towel is acceptable to remove the water from the glass surfaces of the car, but it may not be suitable for the painted surface.
• Don't wet-sand a scratch or paint aberration unless you know what you're doing. Use a sanding block for flat surfaces and sand by hand for curved areas. A good rule of thumb is that if you can just barely feel the scratch with your fingernail, you have a great shot at wet-sanding and buffing it out. If the scratch is deep enough to have gone into the primer, it will require either color, or color and clear in addition to buffing.
• Don't trust that the paint in a factory or aftermarket touch-up bottle matches the color of your car. Spend a few extra dollars and bring a small panel to the professional paint-supply company to have them color-match a small quantity of paint for chip repairs.
• To do chip repairs correctly, put the smallest amount of color-matched paint into a surface that has been prepared; then use multiple applications of clearcoat to build up the material over the surface so that you can wet-sand and polish it back down. This takes several days, as each minute layer of clear has to dry before the next application.
• Use microfiber wash mitts, drying towels, and polishing towels on the painted surfaces. All microfiber products are not created equal, so be safe and wipe a blank CD. Low-quality "unprocessed" microfibers will scratch the CD-and the finish on your car.
• The use of plastic "grit guards" inserted into the bottom of the buckets further ensure that no abrasive particles will be picked up from the bottom and transmitted back to the vehicle surface.
• Use 3M blue painter's tape to cover up all factory decals and trim pieces that abut to and around the glass surfaces. This protects them from the edges of the buffing pad and eases cleanup of the buffing compound.