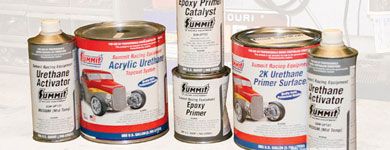
 Lucky for us hot rodders, Summit Racing Equipment, the world's largest direct mail and Internet supplier of high performance automotive parts, has introduced the Summit Racing Paint and Auto Refinishing System. The product line includes top coat paints, activators, clear coats, primers, and paint reducers--all at a significantly more affordable price than comparable brands. This is great news as it's just one more reason for us not to disregard the idea of trying our hand at paint spraying; at the least, more affordable materials will allow us to make a mistake or two and still spend less cash than we would have!
Okay, here we go again. Since I'm pretty long-winded on certain subjects, I ran out of space in the last issue, so I'm hoping to cram the rest of my paint and body ramblings into the precious space allotted to me this month. As you'll hopefully recall, in the first installment we ended by going over the different types of spray equipment common in the auto painting end of refinishing. Today we'll continue by spending a bit of time talking about spray gun operation, spraying technique, and gun and equipment maintenance.
Air Tool Maintenance
Now that we've gotten a look at the basic tools of the trade, seen their most important components, and explained how they operate, it's only logical to touch base on the techniques of using and maintaining `em. The spray equipment you've chosen, be they conventional or HVLP in design, will give you excellent results if used and maintained properly. Now, as you're all well aware, we can talk about how to use and take care of your tools `til we're blue in the face. But there's nothing like hands-on experience to get these things to stick in your mind. So grab a couple of the more frequently used air tools you've added to your arsenal (the DA sander, the long board sander, and the 5-inch grinder) and keep `em handy as we go along.
The first air tools to see duty in the body working process are more often than not the grinder and the dual-action sander. Most operations require that the existing finish be removed from the vehicle surface before continuing on with the repair. Sometimes it's a couple of layers of paint and primer, and sometimes there may be a layer of filler to contend with as well. The grinder and DA are actually quite simple tools. They're basically air-powered motors with handgrips and right-angle shafts to which a backing pad and disc are attached. A trigger actuates a valve, allowing compressed air to flow through the tool. When it's depressed, the compressed air passes through a passageway to a chamber which houses what can be best described as a miniature turbine. The turbine (or motor) is a machined disc that has a number of slots milled into its outer edge. Small vanes or blades usually made of a rigid, fibrous material are fit into these slots to form a sort of paddle wheel, or what looks like the type of blade you'd see in a jet engine.
The compressed air flows through the inlet of the DA, or grinder's air passage, into one side of the chamber that houses this turbine-type blade and, in order to escape, has to flow past the blades. The pressure and volume of air passing through the chamber spins the blade which, in turn, spins the shaft holding the backing pad and grinding or sanding disc. As with anything that spins at high rpm, proper lubrication is a must. As you're aware, bearings or bushings that surround a spinning shaft won't last too long if soiled by contaminants or with little or no lubrication.
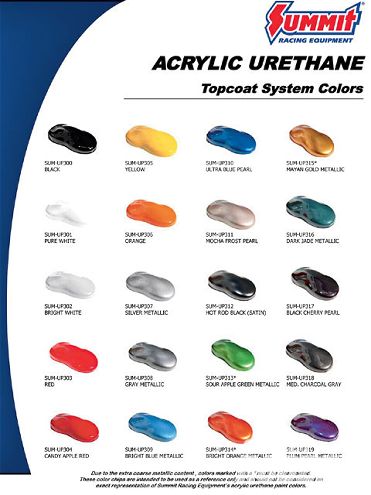 Summit's initial color selection is pretty broad as well, and I'm assuming it'll expand as time passes.
The same holds true with your long-board sander. The long-board is primarily used for sanding large flat expanses of body filler and it operates a bit differently than the other sanders. It uses an air-actuated piston (or pistons) to achieve its back-and-forth movement, and though it doesn't use a spinning, blade-type motor, it requires regular lubrication, even more than circular type sanders.
Solid particle contaminants shouldn't be a major problem if you've properly configured your air supply (like we talked about last month). But the massive amounts of hot, moist, compressed air that pass through these tools and the extremely high rpm at which they spin will. To combat the inherent wear and to ensure continued performance of these tools, lubrication of some type is a must. To make sure they stay in tip-top condition and are always ready to use, you've gotta keep `em oiled!
For those of us who know that we'll more often than not forget to lube our tools daily, there are many types of automatic oilers on the market today. These are designed to inject the correct amount of oil into the tool as you work, saving you from having to remember to do it on your own. You can choose between small tool-mounted units or larger capacity ones that can be permanently attached to the garage air supply system. If you choose the permanent air supply oiler assembly, it's important that you make sure it's on a line that's dedicated to your air tools only! You don't want to connect your spray gun to a line that's connected to a permanent oiler!
There are many brands of air tool oil on the market (available at any body supply or tool store), or you can use products like 3-in-1 or Marvel Mystery Oil. Whatever you choose to use, make sure it's a very thin, light lubricant and that you keep all your air-powered sanders and grinders oiled daily!
 Above and beyond paint and primers, Summit Racing also has a selection of solvents like wax and grease remover and surface wash as well. Heck, they even have spray guns, air regulators, compressors, and safety equipment, too--talk about one-stop shopping.
When it comes to your sanding equipment, there's another thing to remember. Whenever you set down any of your air-powered sanders, always place it so the sanding pad is on its face! Never lay a DA, grinder, or air-board on its side. The weight of a tool laying on the edge of its pad will cause a flat spot or deformation in the pad. If you've got a sanding pad that has a deformed edge, that edge will (depending in the angle of depression) either take more or less material off than the balance of the pad face. This will in turn cause the surface being sanded to become uneven.
Spray Gun Setup And Technique
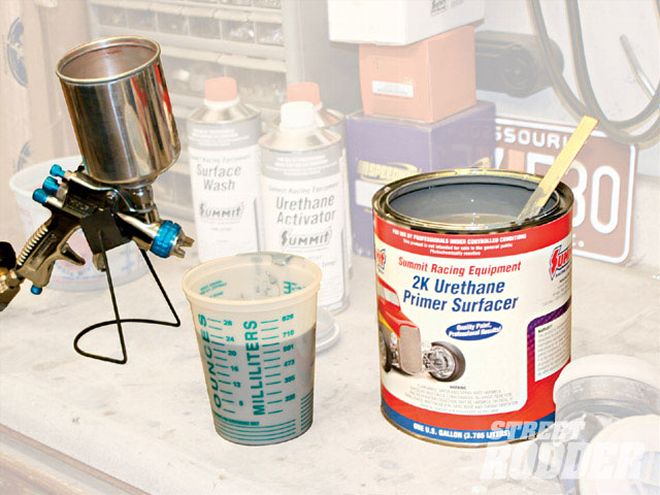
Okay, before we get into the really hands-on part of my rambling, this might be a good time to refer to the cover blurb from last month's issue regarding painting a car for around $300. Since you're gonna need paint and material for both your practice sessions and what we're hoping is your first successful paint job, I just have to take the time to clue you in to what I think is some pretty exciting news. It's exciting because in this day and age saving a big chunk of cold hard cash is paramount, and recently Summit Racing Equipment has introduced a line of high-quality and extremely affordable urethane paint, catalysts, reducers, and associated primers, sealers, and solvents.
Recently Candy and I purchased the paint and materials for her Hot Rod Girl Total Performance '27 T from Summit and were floored by the savings over equivalent materials from the local paint and body jobber. Take a second and look at the following comparison, keeping in mind that the Summit Racing Paint and Refinishing System products are every bit as good, or even better in performance and quality than what I normally use (a big-name brand that I hesitate to name for fear of pissin' somebody off).
SUMMIT VERSUS THE NAME-BRAND {{{Summit}}} Racing Paint & Refinishing Materials: 1 Gal 2K Urethane Primer Surfacer $39.95 1 Qt Urethane Activator $19.95 1 Qt Epoxy Primer $19.95 1 Qt Epoxy Catalyst $16.95 1 Gal Red Urethane Color $79.95 1 Qt Urethane Activator $19.95 1 Qt Reducer $9.95 1 Gal Urethane Clear $79.95 1 Qt Urethane Activator $19.95 1 Qt Wax and Grease Remover $9.95 Total Cost (less sales tax) $316.50 Name Brand Paint & Refinishing MaterialsThis works out to a savings of $124.55, and that's for the name brand's economy line of paint and material. The cost savings for Summit Racing's paint system versus the brand-name's high-line of product would increase your savings three or four-fold at a minimum! In fact, the name brand's gallon of the same color red urethane sells for over $350.00 alone. And believe me, it doesn't spray or look any better than Summit's $79.95 gallon!
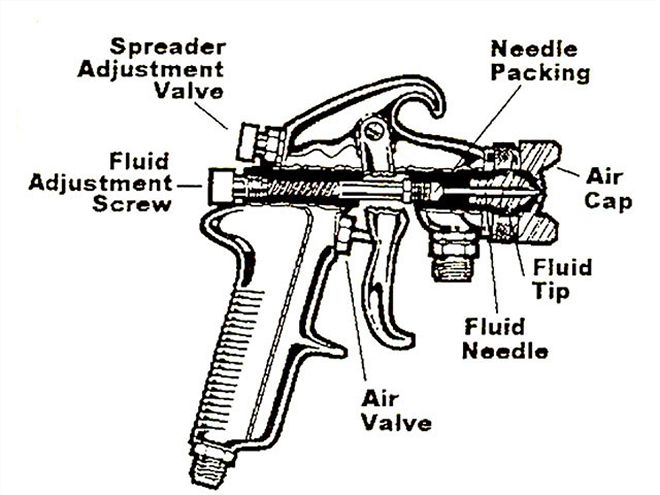 The principle parts of an air atomizing spray gun are the gun body, trigger, air valve, fluid needle, fluid nozzle, air cap, fluid adjuster, and fan adjuster. When a spray gun trigger is pulled, it operates in two stages. The initial movement opens the air valve, allowing air to flow through the gun. Further rearward trigger movement pulls the fluid needle from its seat at the fluid nozzle, allowing fluid to flow. As the trigger is released, the fluid flow stops, and then the air flow stops. The lag time in the trigger operation assures a full spray pattern when the fluid flow starts. It also assures a full pattern until the fluid flow stops, preventing incomplete atomization.
And here's another thing to keep in mind: When you opt to pay a paint shop to do your spraying, you better believe you're gonna get charged name-brand prices for the material, no matter what they use. So, now that I've got this bit of info off my chest, let's get back to the matter at hand--setting up and using your spray equipment.
Equipment Setup And Use
The initial setup of a brand-new, "out-of-the-box" suction-feed spray gun is pretty basic. What we tell you here should more than suffice for your initial spray experience, and we're sure that once you begin to get the feel of the gun, you will then be able to make some adjustments to flow, volume, and pattern that will be more to your liking.
First, attach the cup to the gun following the manufacturer's instructions. Once the gun and cup are together, go ahead and mix up the material to be sprayed. Make sure to follow the mixing instructions, adding the correct amount of thinner/reducer and activator if necessary. Then strain the mixture into the cup and tighten the lid. If they aren't already, turn the spray gun's upper adjusting knob (fan control) to the closed position (fully in), then do the same with the lower one (fluid control). Connect the air supply hose to the gun, and initially set the air regulator to the pressure recommended by the material manufacturer.
Next, back both adjusting knobs out (counter-clockwise) until the first thread of each is showing. Using a piece of cardboard or sheetmetal as a test surface, point the gun at the surface and give the trigger a quick, one-second pull. What you'll most likely see is a small, rather round spot of paint on the test panel.
Now, take the gun and point it at a fresh spot on the test panel. Pull the trigger back all the way, and at the same time turn the upper fan adjustment counter-clockwise. As you do this you'll notice that the pattern on the panel will get the long, fan-like shape that you'll need for painting. What you're looking to achieve as a starting point is about an 8- to 11-inch tall pattern (again, this is just a basic starting point, and can be adjusted as you see fit). The next thing you want to pay attention to during these test trigger pulls is the amount of material being transferred to the surface. You're trying to achieve a full, wet, even pattern. If you're getting a dry, spotty, starved pattern, you'll want to open up the fluid adjustment (try a full turn at a time) until you reach that point. But remember, the more you open the fluid adjustment, the more paint you're going to be spraying, and the more you're going to have to worry about runs and sags.
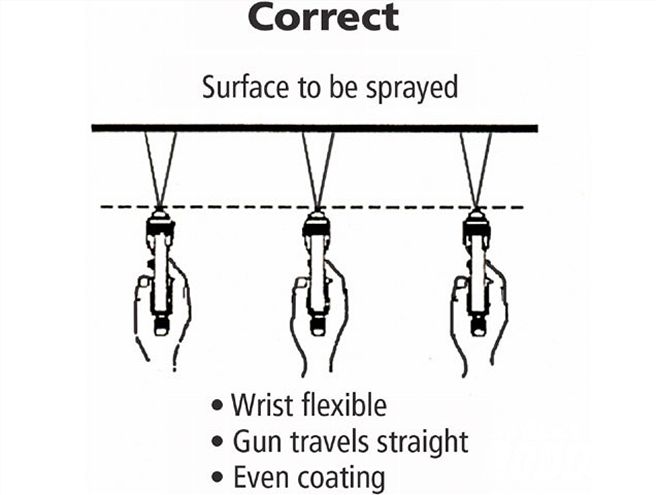 The first facet of spray technique is the spray gun angle. It's important that the spray gun be kept at a 90-degree angle to the surface being sprayed. You always want to move the gun back-and-forth over the area being sprayed in a perfectly perpendicular manner. This will mean that for larger areas you'll have to rotate your wrist at the beginning and end of each stroke to keep the gun at a 90-degree angle from the work.
Spray gun technique and its relationship to a quality finish are often misunderstood by many. It's important to know that there are three (actually four, but who's counting) important facets of proper technique that are essential for success. Learning and following these techniques is of the utmost importance for those who wish to apply finishes that will rival those of professionals. The facets are angle, distance, speed, and overlap. Once you've got the hang of these, you got the painting thing down pat!
Gun Angle
The first facet of spray technique is the spray gun angle. It's important that the spray gun be kept at a 90-degree angle to the surface being sprayed. You always want to move the gun back-and-forth over the area being sprayed in a perfectly perpendicular manner. This will mean that for larger areas you'll have to rotate your wrist at the beginning and end of each stroke to keep the gun at a 90-degree angle from the work.
In other words, let's say you're starting on a door panel. You'll want to position yourself at the door so that each end of the panel is about an equal distance from the center of your stroke. Positioning the spray gun so that your first pass begins at the left edge of the panel (and assuming that you're right-handed) will have your wrist automatically cocked to the right. As you slowly move the spray gun toward the right you'll notice that in order to keep the gun perpendicular to the surface, your wrist will automatically begin to straighten out. By the time you're mid-way through your first pass, your wrist should be about in line with your arm. As you move the gun farther to the right, your wrist will begin to rotate to the left. Pivoting your gun hand at the wrist in this manner will take a bit of concentration in the beginning, but it will become second nature by the time you complete your first paint job.
Gun Distance
The basic gun to surface distance recommendation is about 6 to 8 inches from the surface for fast-drying products like lacquers (for those lucky enough to live in less restrictive communities), and 8 to 10 inches from the surface for slower drying materials like enamels (and emissions compliant materials). Holding the gun too close to the surface will restrict the separation of the atomized paint particles, resulting in big old nasty runs, sags, or, as I've been known to create, "curtains." On the other hand, holding the gun too far from the surface will cause the paint to over-atomize and to go on dry, rough, and with poor hiding characteristics.
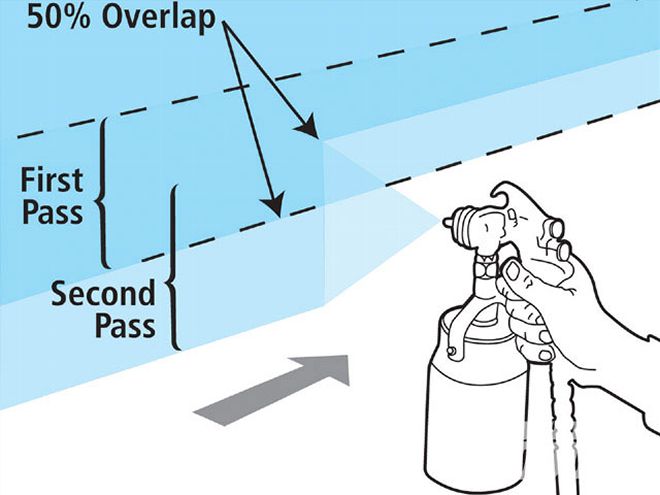 Overlap is extremely important to achieving a successful paint job--it's the amount of area that is re-covered with each pass of the gun. You don't want to make each pass at the bottom (or top) of each existing pass. There should be a 50-pecent overlap of each stroke. In other words, if your first pass lays down a 10-inch wide pattern of paint, your next pass should overlap the first by 5 inches, your third pass should overlap the second by 5 inches again, and so on.
Gun Speed And Overlap
Gun travel speed will vary greatly from one painter to another. There are lots of variables that come into play at this point that have a direct effect on just how fast the gun will have to move to deposit the correct amount of material on the surface for proper coverage and flow. The size of the fan pattern, the amount of material exiting the gun, the material viscosity, and the air pressure at which it's being sprayed all has to be considered.
Another thing that will make a difference in your finish is "overlap." Overlap is exactly that--the amount of area that is re-covered with each pass. You don't want to make each pass at the bottom (or top) of each existing pass. There should be a 50-pecent overlap of each stroke. In other words, if your first pass lays down a 10-inch wide pattern of paint, your next pass should overlap the first by 5 inches, your third pass should overlap the second by 5 inches again, and so on. This ensures that each pass actually gets two coats of material.
I've also got a couple of points I'd like to make at this time (and these come from experience, believe me). First, when spraying any enamel or urethane enamel, I always make my first coat a rather light "tack" coat. I've found that by the time I've made a full circuit of whatever it is I'm painting, that first light coat has "tacked up" enough to let a second heavier coat grab and hold on. It could just be my imagination, by it seems to allow the second heavier coat to "flow" a bit better without runs, sags, or drips.
The second thing I'd like to point out is that the selection of reducers and catalysts must be of the correct recommended type for the spray conditions, temperatures, and materials you'll be using. In this day and age of high-tech materials, a splash of this and a dash of that don't cut it! You've got to follow the mixing instructions for anything that's going to come out of your gun and onto the surface you've worked so hard to prepare. If not, you'll just have to prepare and shoot it again. Like it or not, I've learned that lesson the hard way!
 By the way, I should have mentioned this sooner, but gun control and technique aren't gonna do you a bit of good if you don't follow the mixing instructions pertinent to your material, no matter whose materials they are. If you start mixing brands and combining a dash of this and a splash of that you might as well make an appointment for a re-paint at the local body shop, cuz the job's gonna either look like crap or last a few months at the most--there, I feel better now.
Gun Control
Next, I'd like to add two cents worth on trigger operation (or what's called "triggering" or "feathering"). The spray gun trigger operates in sort of a two-stage manner. As the trigger is pulled rearward, the initial movement actuates the gun's air valve, which allows air (and only air) to escape through the gun nozzle. As you continue depressing the trigger it then engages the gun's fluid needle, opening the fluid passage and allowing the paint to start atomizing and traveling to the surface. The farther rearward the trigger is pulled, the more fluid is released and transferred to the surface. (You can compare the action to stepping on the gas pedal of your street rod--the harder you mash on the pedal, the faster you go.)
Triggering should begin just before the leading edge of the area to be sprayed. Again, let's say you're spraying a door panel, for instance. Starting with the gun to the left of the door gap (at the back of the fender), you'll begin pulling the trigger slowly, allowing air to begin escaping from the gun. As you begin your stroke toward the door panel, you'll continue depressing the trigger until the fluid needle is actuated and fluid begins to exit the gun. By the time the gun is even with the door gap and at the leading edge of the door panel, the trigger should be completely depressed and fluid flow should be at its maximum. At this point you can continue with your stroke, depositing a full wet coat across the whole panel. As you reach the rear edge of the door panel (at the rear door gap) you'll release the trigger part way ("feathering"), until the flow of paint stops but air continues to exit the gun. You'll then drop the gun down so that the nozzle is even with the lower edge of your first pass (this will give you your 50-percent overlap) and repeat the action, this time moving from the rear of the panel forward towards the starting point of your first stroke. Repeat this action until the panel has been completely covered and you'll be ready to move on to the next panel.
Now, as you're mastering trigger control, you've also got to keep concentrating on your stroke and overlap (kinda like chewing gum and walking at the same time). Remember that improper overlap will result in a streaky appearance on the surface, so maintain that 50-percent overlap. At the same time, you've got to pay attention to your stroke. As I stated earlier, your spray strokes should be made with a free arm motion, keeping the gun at a right angle to the surface at all times. Arcing your stroke will result in uneven coverage and excessive overspray. If your nozzle is arced at a 45-degree angle at the beginning or end of your stroke (versus a 90-degree angle), you'll be losing about 65 percent of your sprayed material as overspray; the gun always has to be at a 90-degree angle to the surface for proper coverage!
 The spray gun trigger operates in sort of a two-stage manner. As the trigger is pulled rearward, the initial movement actuates the gun's air valve, which allows air (and only air) to escape through the gun nozzle. As you continue depressing the trigger it then engages the gun's fluid needle, opening the fluid passage and allowing the paint to start atomizing and traveling to the surface. The farther rearward the trigger is pulled, the more fluid is released and transferred to the surface--these actions are called triggering or feathering. Triggering should begin just before the leading edge of the area to be sprayed and end at the rear edge of the area to be sprayed.
Spraying The Tough Spots
Here's the proper technique and sequence for refinishing tough spots. Difficult areas like edges and corners should, for the most part, be done first. When spraying an edge or corner, you should aim the gun directly at the center of the area so that half of the spray covers each side of the corner.
Hold the gun an inch or two closer than normal, or if you prefer, turn the fan adjustment knob in a turn or three to get a smaller fan and "feather" the trigger for better coverage (either method will reduce spray pattern size). If you choose to hold the gun closer, your strokes will have to be made faster to compensate for a normal amount of material to be applied to a smaller area.
When spraying curved surfaces, remember to keep the gun at a right angle to the surface at all times (just as you would with any surface being sprayed), and follow the curve, all the while remembering to maintain the correct overlap. While doing this isn't always physically possible, it's the ideal technique to produce a better, more uniform finish.
When spraying narrow surfaces, you can switch to a small "touch-up" gun, or use your standard gun and an air cap with a smaller spray pattern to avoid readjusting your gun. Though smaller touch-up type guns are usually easier to handle in restricted areas, your full-size gun can be used by reducing air pressure and fluid flow and by feathering the trigger.
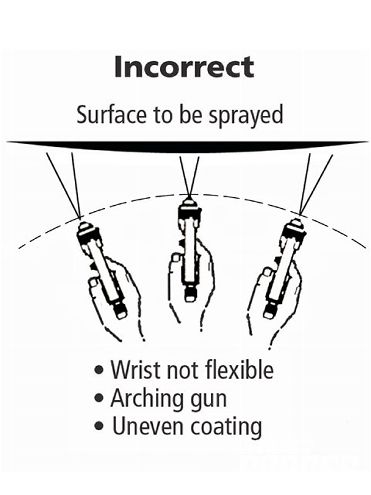 Like I've mentioned earlier, your spray strokes should be made with a free arm motion, keeping the gun at a right angle to the surface at all times. Arching your stroke will result in uneven coverage and excessive overspray. If your nozzle is arched at a 45-degree angle at the beginning or end of your stroke (as shown here) versus a 90-degree angle, you'll be losing about 65-percent of your sprayed material as overspray; the gun always has to be at a 90-degree angle to the surface for proper coverage!
Gun And Equipment Maintenance
Keeping your spray equipment clean and in good working order plays a huge part in achieving good refinishing results. Wiping the outside of your spray gun may help it stay looking fresh and new, but it's keeping the inside clean that's really important. As you've undoubtedly noticed from a few of my previous photos, I've got a couple of spray guns that look a little worse for the wear on the outside, but I assure you, I do spend my cleanup time making sure they're spotless on the inside. So, here's the correct way to clean your spray gun so it'll always be ready when you are.
First, remove the air hose from the gun and loosen and remove the gun and cup cover from the cup and let any remaining material drain back down out of the pick-up tube into the cup. Pour out the remaining material and properly dispose of it. (Never return any leftover catalyzed material to the original container when there is still non-catalyzed material in the original can. Even a small amount of catalyzed paint will contaminate the unmixed material causing it to gel up and harden over time, rendering it useless.) Then, wash out the cup with clean solvent (lacquer thinner works great) and wipe it out with a clean cloth. Then, fill the cleaned cup about halfway with fresh solvent, reattach the cup to the gun, and spray the solvent through the gun to flush out its fluid passages.
Once the gun's innards are clean, take a solvent-dampened rag and wipe the outside surfaces of the gun and cup. If you've got a Felix Unger complex (as opposed to my Oscar Madison complex), you could also take a bristle brush wetted with solvent and scrub the outside of that baby clean as a whistle. If you're like me, and just want to take care of the really important stuff, you'll hurry on to the next step, which is cleaning the air cap.
To clean the air cap, you've got to remove it from the cup and immerse it in clean solvent. Here, a bit of scrubbing with a small bristle brush is recommended (even by Oscar), since the paint residue on the air cap is usually dried on. If any of the small holes (fan, stabilizer, annular, and primary jets) are clogged with dry material, you'll want to let the cap soak in the solvent until the material softens and flows out of the holes. If you find it necessary to ream out the holes for any reason, always use something soft like a toothpick or a broom straw. Never use a piece of steel wire (or, God forbid, the tip cleaner for your torches), as it could damage the jet holes by enlarging them, resulting in a really messed up spray pattern!
Once the gun and cup are cleaned up and looking all spiffy, the next step is to re-lubricate it (that's right, I said lubricate). Cleaning the gun with solvent will remove any and all lubrication a gun may have, and believe it or not, spray guns need lubrication, too. (I may not keep the exteriors of my guns totally spotless, but I do make sure they operate to the best of their ability.)
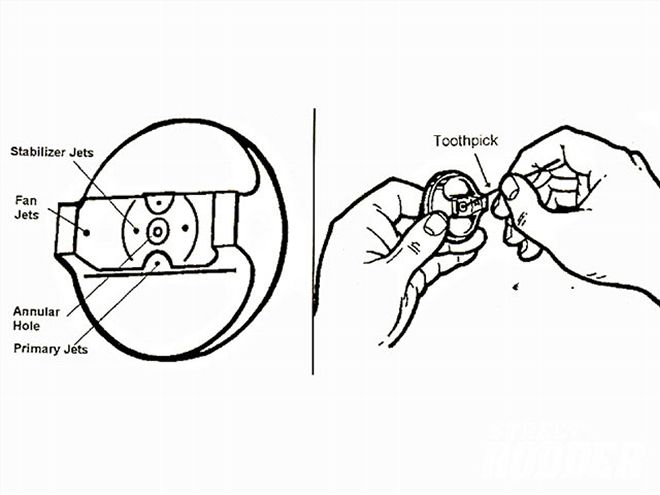 Keeping your spray equipment clean and in good working order plays a huge part in achieving good refinishing results. Wiping the outside of your spray gun may help it stay looking fresh and new, but it's keeping the inside clean that's really important. Here, a bit of scrubbing with a small bristle brush is recommended, since the paint residue is usually dried on by the time you get around to cleaning. The air cap is extremely important to successful spraying and must be kept very clean; if any of the small holes (fan, stabilizer, annular, and primary jets) are clogged with dry material, you'll want to let the cap soak in the solvent until the material softens and flows out of the holes. If you find it necessary to clean out the holes for any reason, always use something soft like a toothpick--never use a piece of steel.
There are four lubrication points on the average spray gun. The first three can be lubed with a non-silicone/non-petroleum spray gun lube (available at any auto body supply jobber). The three items to be treated with this type of lubricant are the air valve packing, the fluid needle packing, and the trigger bearing screw. The fourth item is the fluid needle spring (located in the inside of the gun body, behind the fluid adjustment knob), and this should be lubed with a small amount of petroleum jelly or non-silicone grease, like Lithium. If you'll follow these gun maintenance tips, you'll be sure to have a spray gun that'll seldom let you down.
Problems, Causes, And Corrections
While we're talking about spray gun maintenance, this would probably be a good time to touch base on a few common spray gun problems you might run into, as well as their possible causes and corrections.
Fluid leaking from the fluid needle packing nut could be caused by either a loose packing nut, or packing that's worn or dried out. This can oft times be corrected by either tightening the nut or by lubricating or replacing the packing.
Air constantly leaking from the front of the gun could be caused by a number of things. It may be due to a sticking air valve stem, which needs lubrication, or crap in the air valve or on the valve seat that needs to be cleaned out. A worn or damaged valve may need replacing, or a broken air valve spring or gasket that may have to be replaced could be the culprit, as well.
A jerky, fluttering spray could be caused by material that's too thick. It may also be caused by a clogged cup cover vent, the pickup tube resting on the floor of the cup, or a damaged gasket between the fluid tip and the gun body.
If your spray gun exhibits a spray pattern that becomes much heavier at the top, bottom, or either side, you'll want to check to see if the air cap or fluid nozzle is causing the problem. You can do this by spraying a test pattern on a piece of scrap material. Then, rotate the air cap one half of a turn in either direction. If the defect in the pattern is inverted, then the obstruction is in the air cap and it needs a good cleaning.
If the defect in the spray pattern stays the same after rotating the air cap, then the problem is in the fluid tip. If so, the first thing to look for is a fine burr on the edge of the tip. If a burr is found, it can be removed by scuffing it with a piece of 600-grit wet or dry sandpaper. If there's no burr found, then you've most likely got a bit of dried material just inside the tip opening, and a good cleaning with solvent should solve the problem. A mis-adjusted fan control valve, too low of an air pressure setting, or too thick a material may cause an extremely heavy center in your spray pattern, too.
A dry, rough finish could be caused by excessively high air pressure, trying to spray material that's too thick, or by holding the gun too far from the surface.
If all of this info seems a bit daunting, don't let it make ya nervous. Refinishing is actually pretty easy, and if you spend a bit of time practicing on some scrap metal or plywood, you'll be amazed at just how fast you can pick it up. As an aside, if you grab one of your back issues of STREET RODDER (the January '09 issue, to be exact) you'll see another article that may be of help: Troubleshooting Paint Problems. (Perhaps I should have rethought my story order, but I've never been known for my capacity of forethought.)
Now get your butt out to the garage and start picking out a color from the Summit Racing Paint and Refinishing color chip chart--time's a wastin'!