 Stripes are a great, inexpensive way to dress up your Mopar. Follow along and we'll show you how easy they are to install.
Before musclecars were officially deemed musclecars, Mopar was certainly building automobiles with performance worthy of the title. In fact, with the debut of the street Hemi in '66 B-body models, Mopar had cars that could take on anything Detroit had to offer. The problem was, these cars just didn't sell very well. It seemed the consumer public wanted a car that not only performed well, but also looked sporty. In 1967, Mopar finally took the hint and offered dressed-up versions of the Belvedere and Coronet dubbed the GTX and R/T, respectively. These cars not only offered 440 wedge or 426 Hemi performance, but also had special emblems, scoops, and stripes to attract attention. For the remainder of the '60s and into the early '70s, Chrysler performance cars were adorned with some of the most ostentatious stripe, scoop, and color combinations of the era.
Even if your Mopar wasn't equipped with stripes from the factory, chances are it will look better with a stripe of some kind installed. Stripes are a great way to add contrast to a single color car. if you're project is a clone, chances are you'll either need or want to add a factory stripe to make the car look correct. Regardless of the reason, adding a stripe to your Mopar is one of the least expensive ways to aesthetically dress up your car, and installing stripes is easier than you think.
There are several concerns people have when they are considering adding stripes to their car. The first concern is whether the stripe will look correct once it's on the car. Fortunately, companies like YearOne are reproducing the factory decals in the exact dimensions and colors of the originals, and in better quality vinyl. as long as you get your stripe kit from a respectable vendor, it should look just like the factory stripe when properly installed.
The next concern most people have about adding stripes is whether they can install it without the stripe bubbling. Well, we've never been able to install a stripe without at least a couple of small air bubbles under the vinyl, but if you follow our procedure, the stripe should go on with minimal bubbling. And if there are a couple of air bubbles under the vinyl, parking the car in the sun for a day should remove them. As a last resort, air bubbles can be popped with a needle and smoothed flat so they're nearly unnoticeable. Remember though, if the paint isn't smooth where the stripe will be applied, the imperfections in the paint will show through the stripe.
Speaking of paint, another concern with vinyl stripes is whether they'll lift the paint if and when they are removed. The answer to this question really depends more on the paint than the vinyl stripe itself. If the paint is not properly bonded to the primer, or the primer to the bodywork and metal underneath, then there's a chance that removing the vinyl stripe could pull paint from the car. If the paint job is high quality, there is really no concern about lifting the paint if the decal is removed properly. Also, since these stripes are high quality and made of ultraviolet resistant vinyl, they'll likely last as long as the paint job.
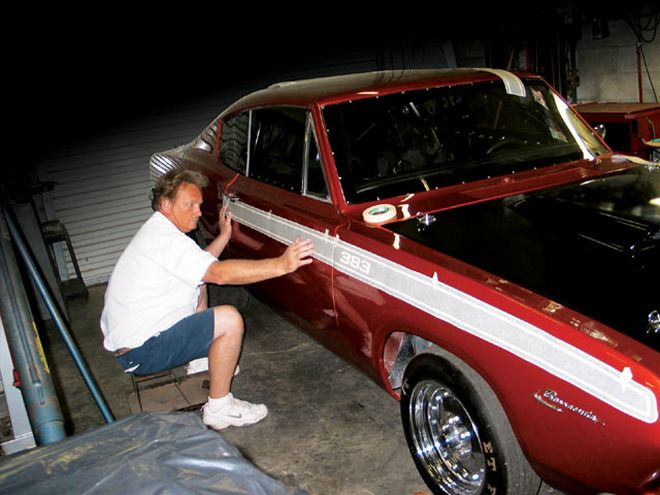
Mopars came with many stripe configurations, but the basic installation techniques are the same for most. For the purposes of this article, we'll be installing a longitudinal stripe down the upper body line of our '67 Barracuda bracket car using the dry installation technique. We will also install a vertical rump stripe on the project Timber wolf Super Bee to show you the soapy water technique. Installing the decal dry demands proper placement the first time, but usually results in fewer bubbles and works well for long stripes. The soapy water technique allows the vinyl stripe to be moved around for alignment and works well for multiple part stripes, but sometimes it's hard to get all the air and water bubbles from under the vinyl.
Though available from many sources, we got our stripes from YearOne. We're confident that the YearOne products are of the highest quality, and since we needed vinyl stripes for two distinctly different cars, we wanted to order from a vendor who would have both stripe kits in stock. YearOne quickly verified our stripes were on the shelf and shipped them the same day.
When our stripe kits arrived, we headed to J.D.'s Paint and Body for some help with the installation. It wasn't so much that we were afraid to do this job ourselves, but it always helps to have the advice of a professional, or at least someone who's done the job before.
All told, installing the stripes on each car took about 2-3 hours per car. There are really no special tools involved other than a squeegee, masking tape, and a tape measure to ensure proper placement. It also helps to have some body shop precleaner (NAPTHA) available to clean the surface the stripe will adhere to, and soapy water if using that technique.
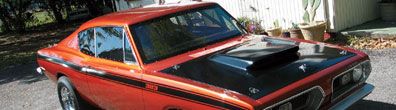
The end result of each installation was dramatic. Of course, a Super Bee just isn't a Super Bee without the stripe, and we think the project B3 Barracuda really looks better with a stripe to contrast the '05 Go-Mango paint.