Save for your bigger custom shops--and those phony TV shows we all love to watch--finishing a chopped car of pretty much any type is no easy task ... and I'm not even talking about the roof chop itself! Anyone who has ever dealt with trying to get a curved windshield cut down knows what I'm talking about. From there, things don't really get a whole lot easier until the cabin of your car is completely sealed from the elements--that means a backlight (and not necessarily the stock unit, as the tempered glass is near impossible to cut), quarter windows, and door glass that actually rolls up and down. Most would rather pull out their Sawzall and MIG welder than have to deal with modifying and installing glass in a chopped car, but if you want to truly say it's finished, ya gotta do it!
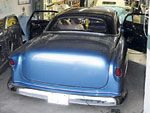
For me, driving around without side glass wasn't all that big of a deal until I got the Chevy painted. Once the shiny stuff was on, the lack of glass stuck out like a sore thumb, as did the lack of interior. It appeared I'd finally rounded the bend toward "Finished Custom Lane," and there was no turning back. Fortunately, the party responsible for chopping the top, Todd Gravelle, had masterfully taken care of the windshield (going so far as making a fiberglass template, which I still have) and installation of the Plymouth rear glass. I had a few options for the remainder of the glass, but, not wanting to screw anything up, I decided it was best to seek professional help.
Knowing no ordinary automotive glass shop in my area would even bother wasting its time with my Bel Air's unique requirements, I went straight to the source of SoCal custom glass--Mike Cox at The Glass House in San Dimas. He's fitted glass for everything from Concours-level restorations to Deuce coupes. I figured he'd say my situation would be cake to handle, and have me on my merry way in no time. Not quite.
Upon his introduction to the Chevy, he immediately inquired as to where the stock window regulator assemblies were. I was so anxious to get the glass done that I'd completely overlooked making sure the crucial internal door parts were still intact. They weren't, and neither were the window channels, or anything else for that matter. "OK, how about the vent window assemblies?" he asked. I quickly pulled out the freshly chopped frames. Seeing that they were only tack-welded together, he smiled, handed them back, and said, "Well, when you get these all welded and chrome plated, as well as all the regulator parts, come back and see me." Uh, OK. ...
A month later, I returned, parts in hand. But instead of trying to restore an old manual window mechanism, I ordered a power window kit from Electric-Life, hoping it would make things a lot easier for Mike. It did, fortunately. To conceal the presence of the power windows in a nostalgic manner, I ordered a pair of switches from Hotronics--the ones that accept splined cranks and mount in the stock locations. (Now I just have to make sure and alert all passengers to not try and roll the window down by hand!) We were finally able to move forward on making templates for the custom-cut safety glass that would eventually fill the voids on each side of the '53. Cool.
Probably the easiest part of the whole installation process was installing the cable-style power window kit. Mike had to make his own rear channel guides from universal stock, but other than that, everything went right in like it was meant to be. Due to the angle created by the chop, it was determined that fixed quarter glass was the way to go. That was good, 'cuz I didn't have the rear regulators either! Follow along as I get one step closer to finished--maybe it'll inspire you to do likewise.