Looking at the before and after shots, it's hard to believe this is the same engine bay. It took a lot of elbow grease over a period of about four weekends to get our Road Runner's engine compartment looking this good, but we feel the results were worth it. The good news is you can do it yourself with similar results.
In the first of our two-part series on engine bay detailing, we took you through the steps necessary to clean, prepare, and repaint your Mopar's engine bay for a better-than-factory appearance. This month, we'll detail and install the engine, then finish the engine bay off by restoring or replacing the accessories and wiring harnesses for a show-quality look. Why spend so much time on engine bay detailing? For starters, the engine bay is the most overlooked area during the restoration of a Mopar. When looking for cars to feature in Mopar Muscle, we have had to pass by countless examples of nicely built automobiles just because the engine bay was messy, the wrong color, or just plain ugly. Also, the engine of a musclecar is what enthusiasts care about most. We want to make sure you're not embarrassed to open the hood and show off what made Mopar famous-powerful engines. With some hard work, quality parts, and attention to detail, your engine and engine bay can be just as attractive as the paint job or interior that you spent so much time and money restoring.
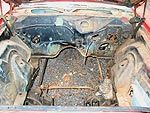
Those of you who read part one of our engine bay detailing project in our May 2006 issue will remember that our project started off with a fairly rough '71 Road Runner that we obtained minus an engine. To make matters worse, a previous owner had covered the original Winchester grey color by blasting everything under the hood with black spray paint. We also had the added work of repairing corrosion damage by performing a sheetmetal repair to the inner fender before replacing the battery tray. While our engine bay seemed as though it needed a lot of work, it was actually in pretty standard shape for a car of this age. Older cars, especially musclecars, have quite often had an engine change or two in their 30-some-year life, and have incurred the standard scratches or chips that come with changing a motor. Add to that a change in body color, in our case from grey to red, and it's common for the engine bay to be generically repainted black. Battery technology back in the day also wasn't great, as the unsealed lead acid units were known to boil over, leaking corrosive acid onto the battery tray and structures underneath and rotting them in the process. While our car may not be the pristine jewel that we would have liked to begin with, we have seen and repaired far worse.
As we showed in last month's issue, with proper cleaning, repair, and preparation, our engine bay ended up in better-than-new condition. This month, we'll clean and paint our engine and refurbish or replace the components in the engine bay to complete the package.
Since our project vehicle was obtained sans motor, we needed an engine to fill the space between the framerails. Rather than performing a rebuild from scratch, we decided to utilize a '68 383 engine that we had in the shop. This motor was pulled some years ago from a '68 Road Runner, which was rusted beyond repair, and we had since rebuilt it to serve duty in several street and strip vehicles. Though the rebuild was performed several years ago, the motor hadn't accumulated many miles so we decided to clean it up, repaint it, and use it in our project. The match seemed fitting as the engine was originally in a four-speed Road Runner and our project car was the same, though a few years newer. For a transmission, we decided to use the 23-spline unit that came with our car when we purchased it. we pulled it apart, inspected, resealed, and filled it with Klotz synthetic lube prior to installation. When it came to exhaust, we had to consider our options. We had a set of factory HP manifolds that we could use, but these would limit the potential of this engine. Since we have a hard time leaving anything alone, and this engine will likely see future cam-swaps as well as other performance upgrades, we decided that a good set of Hooker Super Competition headers would be the logical choice. As far as the rest of the accessories in your engine bay, the choices are endless. You can either clean up and re-use what you started with, or you can replace everything with new or rebuilt equipment. We usually compromise between the use of the original components or replacing them with new, and this project was no exception. Our headlight wiring harness, for example, needed a couple of minor repairs and was cleaned, retaped, and re-installed. On the other hand, our engine harness was butchered and spliced beyond feasible repair, so a new unit was ordered from Year-One. Always carefully evaluate the condition of your components before deciding whether or not to re-use them. That washer jar that seemed to look ok before, will look worn and yellow next to new paint and components, so now is the time to replace it.
Thankfully, companies like Year One are devoted to providing high-quality restoration parts for your project. We chose Year One parts for this build for a couple of reasons. First, aside from the quality, most of their cataloged products are in stock and can be shipped the same or next day so we don't have to wait, and we hate waiting for our parts. Next, Year One has virtually everything our project needed to complete the job, from the new clutch kit and motor mounts, to the rubber bumpers, wiring clips, and decals that adorn the engine compartment. In addition to the convenience of being able to order all our parts from one source, an added benefit was the discount plan offered by Year One. Substantial savings can be seen if a large enough order is placed, so try to do as we did and place one large order instead of multiple small ones.
With our new parts in hand and the old ones rebuilt or refurbished, we began the re-assembly of our engine compartment. This is a time-consuming procedure, but the results are worth the effort. Our underhood paint had turned out so well that we couldn't bear placing our components back in the engine bay without first cleaning and repainting them. We even cleaned up all the hardware, repainting the heads of the bolts before using them to install our components. This is a small step that not everyone will notice, but it does complement the overall look of our engine bay. It's attention to detail, like turning hose clamps so that the screw is hidden under or behind the hose, that will set an average job apart from a nice one. By spending the extra effort and doing the job to the best of your ability you should be able to achieve results similar to ours.