We've gone a little rotary engine crazy around here lately, but the more of these spinning triangles we throw at you, the more positive feedback we seem to get. In fact, I get more e-mails and social media messages asking rotary-related questions than anything else, and a Facebook follower of mine recently asked about the porting we did to the Renesis 13B in Project RX-8 and what exactly the difference is among street porting, bridge porting, and peripheral porting.
Since this isn't the only rotary porting questions I've had lately, and it is admittedly a pretty confusing topic, let's take a closer look at the weird and wonderful world of rotary engine porting. Keep in mind, though, that the different generations of rotary engines have different intake and exhaust port shapes and overall airflow characteristics, so you can't port them in exactly the same ways or use the same porting templates.
For starters, it's helpful to understand that porting refers to modifying both the intake ports, which are located on the side housings or irons, and the exhaust ports, which are located on the aluminum rotor housings in the case of earlier 13B engines and on the irons in the case of the Renesis. At its most basic level, porting the intake and exhaust ports on a rotary engine is the same as porting the cylinder head(s) on a piston engine, in that the objective is to improve airflow in and out of the combustion chambers.
Rotary porting can also have a similar effect to swapping higher lift and longer duration camshafts into a piston engine. That's because the shape of the port aperture or opening controls port timing, which in turn determines how early and how long the aircharge is allowed into and out of the combustion chamber. The outside edge of the intake port is the opening side, while the top edge is the closing side. So if you move the port opening to the outside (by reshaping it with a die grinder equipped with various types of cutting and grinding bits), you're advancing intake port opening timing, while extending the port upward delays the closing timing. On the exhaust side, the more you lower the bottom of the port, the sooner it opens and the longer the duration is. Also note that "overlap," or when both the intake and exhaust ports are partially open, is determined by when the trailing rotor apex closes the exhaust port relative to when the leading edge of the rotor opens the intake port.
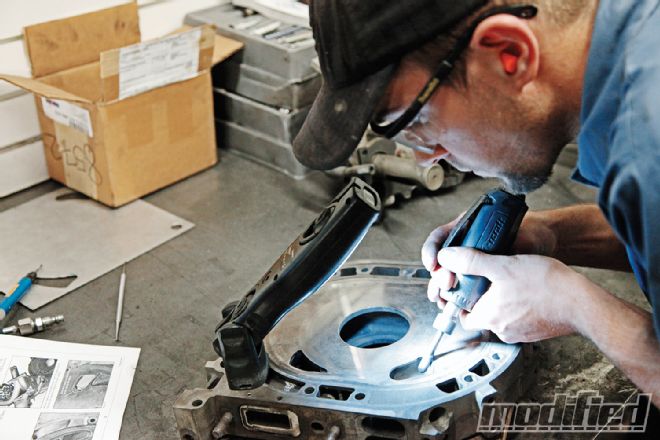
 | We used Racing Beat’s S-port templates when rebuilding our Renesis engine, which not only gave us the revised port opening shapes you see here, but also included detailed documentation about how much material we could safely remove within the ports.
With that basic explanation of the role port shape and position play, let's get on with the business of discussing the various types of porting that exist for these special little engines. On the mild end of the "street porting" spectrum is a basic cleanup of the port edges as well as some minor reshaping of the port openings. Although you don't necessarily need templates for a mild port job, unless you have some experience in this area, it's still a good idea to buy some templates so you don't start removing material in the wrong area and actually hurt airflow or port timing. Or if you're not the DIY type, you can always outsource the porting to a reputable rotary specialist.
We (meaning Joe Ferguson from RPM Motorsports) used Racing Beat's templates when porting our Renesis engine. Just as important as the metal templates that show you how to reshape the port openings are the detailed instructions that explain where you can safely remove material inside the ports, because the last thing you want to do is cut through the port and into a water gallery. With a relatively mild street port like this, the objective is to improve airflow without any of the low rpm power loss or driveability issues that come with the more extreme types of porting we'll be discussing shortly. As a result, power gains tend to be modest, but not insignificant (10 percent gained over stock power is a pretty common estimate for a street port).
A more aggressive "street port" takes this same basic approach a bit further, by extending the shape of the ports as a way of increasing duration. This tends to contribute to a bit of a rough idle and some power loss at lower engine speeds, but you do gain even more high-rpm power, and with rotary engines (especially naturally aspirated ones), it's all about the top end. So street porting on the aggressive end of the spectrum can start to hurt driveability a bit, but it's still considered a good compromise between performance and streetability.
The next type of rotary porting is called a "bridge port," which is generally considered the first stage in race porting. There are a few variations on the bridge port, but the basic concept is to add a new intake port or "eyebrow" next to the main ports, with a "bridge" on the side housing's surface left between them to support the corner seals and leading edge of the side seals they pass over this area. The objective with a bridge port is to add intake duration, which results in a significant increase in top-end power while also pushing peak power output up into the 8,000-plus-rpm range. The downside to bridge porting is a lumpy idle, poor low-rpm response, and increased fuel consumption, not to mention a pretty raunchy exhaust note—which is why this type of porting is more for race cars than street cars (though there are certainly plenty of rotorheads out there running bridge-ported engines on the street, just like there are pistonheads running big, lumpy race cams in their street cars).
There are a number of variations on the bridge port, including the "half bridge" and the "J port" or "monster port." The half bridge is when the additional eyebrow port is only cut above the secondary intake on the side housing, while the primary port is just street ported. This is meant to give you the best of both worlds, kind of like variable valve timing does on a piston engine, by having the smaller primary port deliver high-velocity but low-volume airflow for better throttle response and driveability at lower engine speeds, and then have the bridge-ported secondary intake port deliver the higher volume and longer duration aircharge needed for big top-end power.
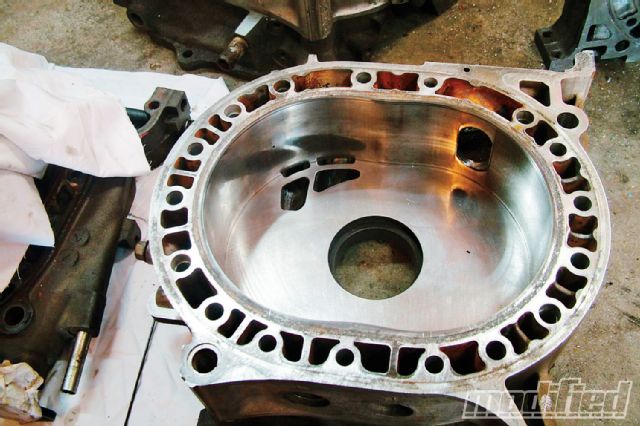 | Here’s a standard bridge port with “eyebrows” above the secondary ports on an end housing. The eyebrows would be longer and extend past the surface of the rotor housing in more extreme types of bridge porting, like the J-port or Monster port.
The J port is basically the furthest you can push a bridge port on standard side housings. The eyebrow is thicker and extends past the face of the rotor and into the water seal O-ring area, a step that requires the seal be cut back and filled with a metal sealant like Devcon. And with a so-called monster port (basically the most extreme version of a J port), the eyebrow is much larger and extended well past the rotor housing's trochoid surface and into the water gallery. This requires the water passage in this area to be blocked off, plus the rotor housing needs to be "port matched" to expose the full length of the eyebrow. The downside to monster porting is that it tends to shorten the life span of the engine since cooling is compromised, but the upside is an even crazier top end.
The last and most extreme type of rotary engine port is called peripheral porting. Since it's not possible to port the side housings any further than a monster port, a peripheral port approach actually replaces (fills in) the side housing intake ports and replaces them with large circular ports on the rotor housings. This means port timing is no longer determined by the leading/trailing edge of the rotors, but rather by the apex seal passing over the big peripheral port openings. This result is extreme intake and exhaust overlap, which pretty much kills low-end performance and driveability, but the far more direct intake path means you get massive top-end power that's delivered at 9,000 rpm and beyond.
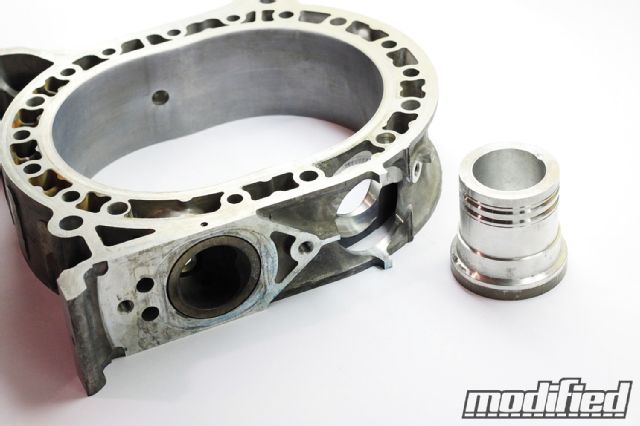 | Racing Beat’s peripheral port housings are great examples of how to convert your 12A or 13B engine to this racing style of intake.
In fact, it's not uncommon for peripheral port rotaries to rev to 10 or 11k rpm and make well over 300 hp in naturally aspirated form. And although coolant flow isn't as compromised as a monster-ported engine, engine life is shortened by the sustained high-rpm use its powerband necessitates. That said, peripheral port rotaries are normally a race-only engine setup, so engine life expectancy isn't the focus, nor is the insanely loud exhaust note, horrendous fuel consumption, or total lack of low-rpm driveability. A semi-peripheral port, in which street-ported side housing intakes are used at lower rpm and smaller peripheral ports are used at higher rpm, is another option.
So there you have it, rotary porting in all its flavors—from the mildest of street ports to the wildest of peripheral ports. The intriguing thing (to me, at least) about rotary porting is how it not only improves airflow the same way porting a piston engine's cylinder head does, but also how reshaping the ports alters timing the way a piston engine's camshafts do. It's a two-for-one proposition, which makes it all the more important to either use the most-tested and well-documented porting templates or outsource the work to a skilled and experienced rotary engine specialist like Racing Beat or Mazdatrix.