 | Project Time Attack Part 3 - 1995 Mazda Miata
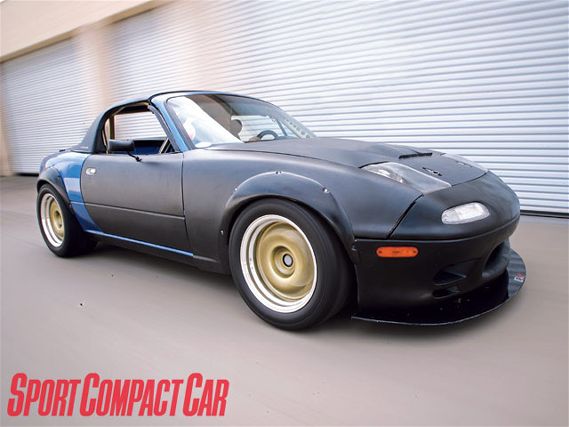
In the last two installments, we made Project Time Attack Miata safe to drive, cheap to maintain, and lighter than Nicole Richie. We've had a blast driving it at the track. It gives great driver feedback and--even with its scant 100 wheel-hp stock drivetrain--has been able to keep up with much more powerful cars. A smart owner would enjoy the car in its present form, or maybe install some modest bolt-on upgrades to give it a little more grunt, without losing the crisp response and character that make it easy to drive.
No one ever accused us of being smart. This time, we're unleashing a whole new level of complexity by adding turbo power. And lots of it. But this doesn't come without some undesirable consequences: reliability and heat. Both require significant investment in monitoring equipment, heat exchangers, and other items--which add weight to a car we've worked so hard to make light.
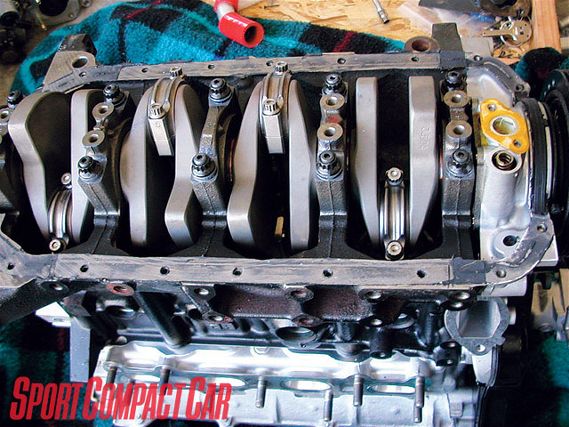 | The view from the bottom. Not only can you see the new crank and rods from this angle, but also the uncompressed oil pump spring on the right-hand side. We placed a shim on top of this spring before we compressed it and inserted the cotter pin to raise oil pressure.
The robustness of the 1.8-liter four-cylinder BP engine has proved itself repeatedly in past Miata project cars. Designed for use in boosted applications overseas, the turbocharged BP engine can provide 250 wheel-hp (with proper engine management) and still run many miles of track before giving out.
To make more reliable power, the stock bottom end has to be strengthened. Since any budget was cast aside long ago, we looked once again to the folks at Flyin' Miata to help us build the ultimate Miata engine. Our goals were not only to build an engine that would withstand high boost for long periods, but also spool a healthy sized turbo quickly, making gobs of torque across the rev range.
Flyin' Miata has been boosting Miatas for a long time, working out a formula for ultimate power that centers on a custom crank, cut from a single solid 350-pound billet of steel and designed to increase stroke by 4mm to 89mm. This is the only Miata crankshaft we know of that is not reground from the stock piece. While the process of welding on additional material and rebalancing has proven to be inexpensive and reliable, starting from a uniform piece of steel provides greater strength and longevity compared to something that's cut, welded and ground many times. A freshly cut crank is also easier to balance.
 | Project Time Attack Part 3 - 1995 Mazda Miata
The added stroke, combined with an increased bore of 84.5mm to accommodate larger Wiseco pistons, increases the BP's displacement to 1995cc with a boost-friendly 9:1 compression ratio. This is not the largest bore size seen in a Miata, but we hesitate to go larger for two reasons. First, a larger bore decreases cylinder wall thickness, thereby cutting our margin of safety for a fairly expensive bottom end. More importantly, since the engine is now more undersquare, the bore/stroke ratio has decreased from 0.976 to 0.949, which significantly increases piston velocity, crank load and sideload. Coupled with the increased mass of larger pistons and boost, the new engine will generate significantly more load on the rings.
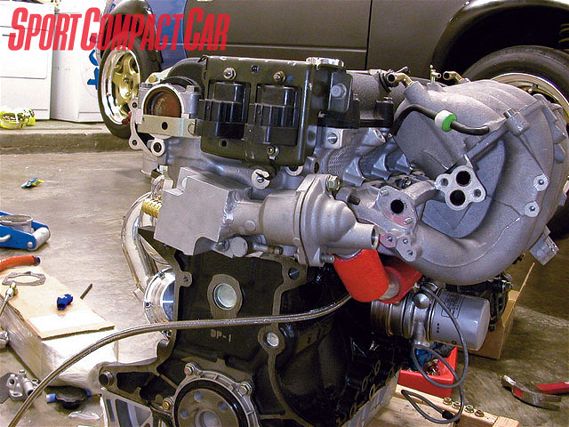
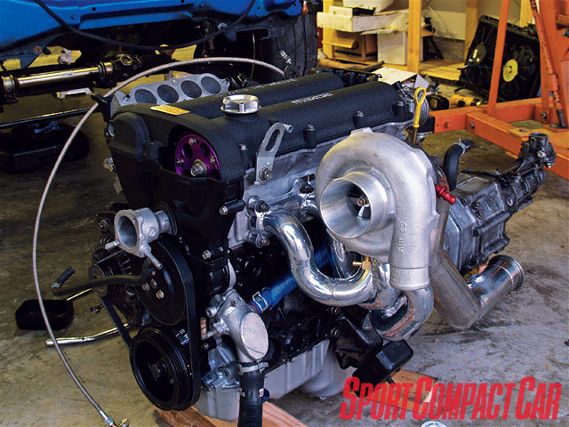 | Our new engine--ready to drop in. It was tricky getting the Boostlogic tubular manifold and three-inch downpipe to clear the firewall and frame rails. While lighter than the cast alternative, the tubular manifold takes up more space.
Usually, this is compensated by lowering the redline to preserve engine life. Flyin' Miata's design, however, also moves the wrist pin inside the lower oil ring, which keeps the rod ratio consistent, with the stock engine taking some piston/rod acceleration load off the crank pins. Combining this piston size and mass with a stock rod ratio (when linked to the crankshaft by Carrillo A-beam rods) has created an engine that is still happy to spin at 7500 rpm.
While building a bottom end that can take such abuse serves a purpose, we also wanted to maximize the amount of air coming from the turbo into the combustion chamber. One of the most significant incremental improvements Mazda made for the Miata engine came in 1999 when it reworked the top end. This redesigned head features intake ports raised from 39 degrees to 51 degrees, creating a straighter flow path. When matched with the revised intake manifold, flow efficiency is increased dramatically. Mazda also replaced the cam angle sensor with a magnetic sensor on the front of the intake cam sprocket and added a toothed wheel on the crankshaft for more accurate engine management. We simply inserted the old cam angle sensor (CAS) back into the new '99 head, which allows us to use adjustable cam gears on both camshafts. We also used the newer-designed solid lifter camshafts with longer duration and increased intake lift, which will also mitigate some of the high-rev valve float issues of the old hydraulic design.
 | Seriously tight clearances for the turbo manifold and downpipe mean a complicated engine install.
Into this head, Flyin' Miata has stuffed Supertech 1mm oversized stainless steel intake and exhaust valves, springs and titanium retainers. With healthy polishing and port matching of the intake and exhaust manifolds, this will allow up to 15 percent more airflow at peak lift, according to Flyin' Miata.
Strangely, when we built this engine, Flyin' Miata was between turbo kits. The old design (used on our previous car) had been discontinued, with the new kit still to be completed. While it would have made sense to use a full `end-to-end' build from one shop, we called the fabrication specialist at Boostlogic in Austin, Texas. Boostlogic recently purchased a Miata and prototyped an equal-length runner tubular manifold from stainless steel. This design was matched with an external wastegate that dumps to atmosphere and a three-inch downpipe, which has the potential to produce more power at the limit than traditional log-style manifolds utilizing internally gated turbos.
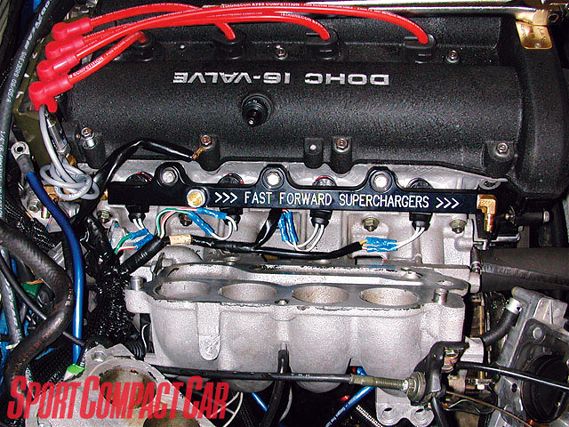 | The Fast Forward Superchargers fuel rail was designed for its custom intake manifold in conjunction with its supercharger. But that means the fuel pressure regulator (FPR) can't be mounted onto the rail as intended in our application. We had to plug that hole and run an external FPR in order to clear the upper half of the stock intake manifold.
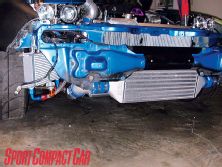
The downpipe and exhaust are also made of polished stainless steel. While stainless steel is heavier than some options, it does not transfer heat very well. This means that the heat from the exhaust gases will stay in the exit plumbing and not transfer its energy into the engine bay as quickly as with other materials. Boostlogic also built an intercooler kit large enough to support 350 wheel-hp. The 6.5x3.5x1- inch bar and plate core barely squeezes between the frame rails in the mouth of the car. While thickness helps in dropping the intake charge temps, it also generates a larger pressure differential, which restricts the velocity of flow getting to the radiator. We'll see what happens when summer arrives.
Boostlogic's intercooler piping kit uses polished aluminum tubes with a HKS-style BOV flange welded on the hot side just before the intercooler. And now that the engine management uses speed density (MAP) instead of a flow meter, we chose HKS's Super Sequential Blow Off Valve. During manufacturing, something went out of alignment on the jig, which positioned the downpipe just slightly into the header when everything was tightened up. This minor interference was easily remedied by couple of well-placed whacks with the universal BFH (Big F*ing Hammer).
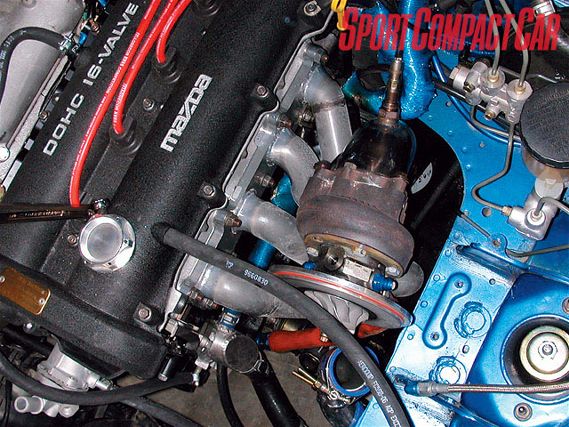
 | It's a tight fit for our fuel pressure sensor coming off the fuel rail.
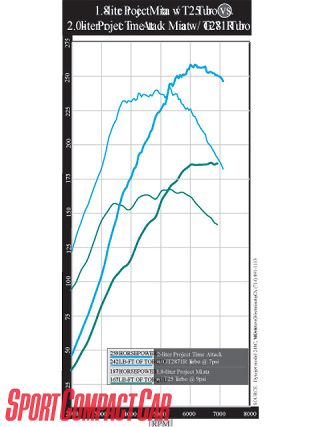
After talking with several different sources about turbos, we ended up selecting a Garrett GT2871R with a .68AR. The goal isn't ultimate power, but good throttle control and roughly 300 to 325 horses at the wheels. Of course, this is shooting from the hip, since our previous Project Miatas only reached 187 wheel-hp and the new target is just a stab in the dark as to what the `right' power level is to maximize lap times without breaking driveline parts.
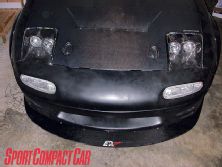
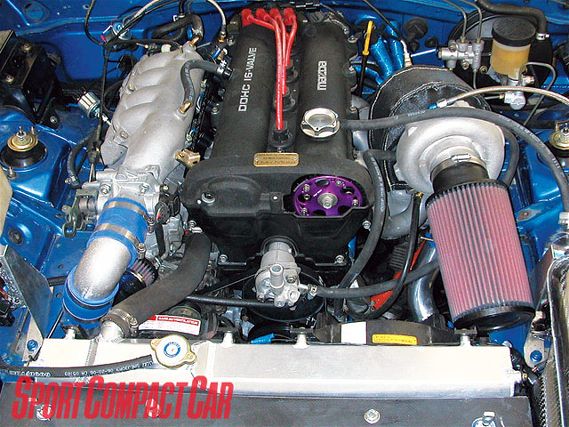 | Take a good look. It's probably the last time the engine bay will look this clean.
So what does all this net us? 259wheel-hp and 243ft/lbs of torque at a low break in boost of 7psi. The real story here, though, is the power under the curve. From 3400rpm to redline, we have full boost. Boost response is not like our last Miata--that felt like we were driving a naturally aspirated car. But it's direct enough to make controlling the car on the throttle perfectly possible.
Hot and Fast Unfortunately, the Otto cycle isn't the most efficient power generation process--most of the energy ends up as wasted heat. Now that Project Time Attack will be making three times its stock power, it will probably eat three times as much gas and make even more heat. The stock Miata engine already does a piss-poor job of heat management, so we have an uphill battle to control the monster we've created.
The same lineage that makes this engine take so well to boost also provides its Achilles heel. As a transversely mounted Mazda 323 GTX turbo engine, coolant was routed in one side and out the other. But in the longitudinal configuration for the Miata, Mazda determined the cleanest way to route the coolant was in through the water pump up front and out of the front of the head. Everything on the firewall side of the engine just cooks, since there is minimal circulation.
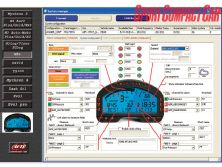
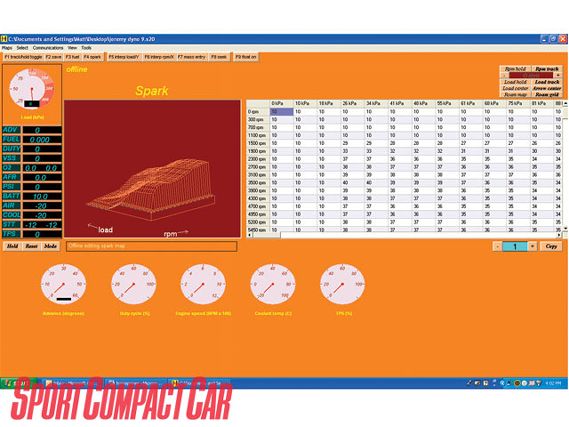 | When on the dyno or fine tuning, the Hydra Nemesis software interface allows wholesale changes to fuel and timing curves, based on multiple-input data. It only logs this data with the laptop attached, unlike the Pista dash which holds all engine vitals in a memory buffer to be accessed off the track. This makes the interface strictly a tuning tool and not a hot lap analysis tool.
The best remedy is to plug the original front coolant exit, uncap the heater supply fitting on the back of the head and route the coolant beneath the intake manifold. We did this with a custom pipe fitting (fabricated to hold the stock thermostat), going directly into a newly designed three-core radiator sourced from AWR Racing and Ron Davis Racing. According to AWR, the new radiator core is so massive and efficient that stock fans provide enough flow to control the heat at steady-state loads.
Much of the heat generated by a turbo is carried off by engine oil. While the factory cooling system uses an oil-to-coolant sandwich plate at the oil filter, it's nowhere near capable of dissipating the added thermal load, especially since the coolant is also sucking up heat from the turbo. We ordered a 6x11x2-inch, 18-row core from Mocal along with a Mocal sandwich plate with -10AN fittings and stainless steel lines, since we didn't feel existing Miata oil cooler kits had large enough cores or fittings to avoid unnecessary pressure drops. We placed this core in front of the passenger-side front wheel-well, behind the vents in the Racing Beat Type-2 bumper.
The added cooling and additional 25-percent oil capacity should get the car through hot track days. Larger lines might contribute to a slight pressure drop, so the oil pump has been shimmed with a 1mm spacer on the spring, as a precaution. We're seeing oil pressure of 48psi at idle--right where it should be.
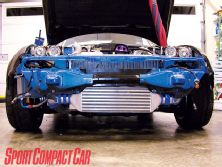
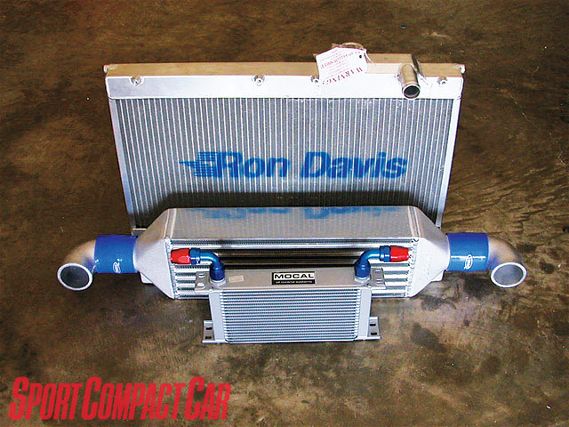 | We're serious about cooling. Big power creates high temps. Quantities of fluid and the volume of air that crosses them matters, but often overlooked is the efficiency of the heat exchangers. Among other things, the high fin count per square inch on these units made them a good choice.
All this thermal transfer efficiency doesn't mean crap if you can't supply air to carry the heat away. Unfortunately, the path of least resistance is around the radiator rather than through it. This is why duct-fed heat exchangers are key, especially for a car that doesn't have to sit in traffic and idle. We just didn't have a chance to finish it at the time of writing. In the meantime, the APR Performance front splitter does give a mild advantage by splitting the oncoming flow and generating a high-pressure region right above it and into the bumper opening.
We also found some radiating heat issues from the turbo at a recent track test. Even with fresh brake fluid in the system, the brake pedal would get soft under mild braking, which meant the brake booster and hydraulic assembly was too close to the turbo and manifold. Boostlogic sent us an asbestos heat blanket to cover the exhaust side of the turbo, which is effective.
Dumb turbo, smart computer As the saying goes, boost is only good when you can manage it. Our previous Project Miata had run two different ECUs. The Link ECU, while superbly supported by Flyin' Miata, was limited in processing power and the ability to provide fine tuning for safe on-the-edge power. We switched to the AEM EMS, which, with its more modern tuning parameters and flexibility, has become a standard in other car communities. Too bad it hasn't been widely adopted by the hairdresser racing community and so has limited support.
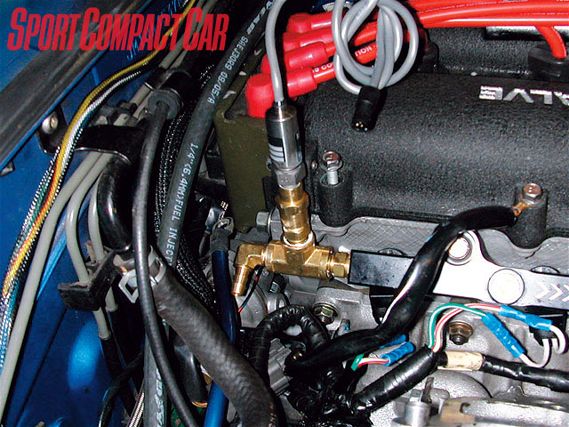
 | Unfortunately, by mounting our intercooler in front of the radiator, we are sacrificing cooling efficiency. To help combat this, we unplugged the cooling passage in the back of the head in an effort to cool the engine. Here you can see the hunk of aluminum we had machined to reroute the heated coolant under the intake manifold and back up to the radiator.
As good fortune would have it, there is now an option that combines the strong points from both our previous choices. The Hydra Nemesis ECU is gaining traction in multiple markets (including Subaru and Honda) for its sequential injector and spark control, and multiple features such as water injection, traction, anti-lag, boost control and staged injectors. It also helps that Flyin' Miata is now a supplier of this plug-and-play ECU for Miatas of any vintage, so the support and community for this ECU in this platform could soon be the standard. This is good because while we like the cutting edge, we also appreciate driving our cars more than blowing them up.
Installing Nemesis is straightforward. An adapter harness allows it to plug into the factory wiring with no modification. With a MAP sensor built into its casing, all we had to do was run a vacuum line through the firewall and take out the Mass Air Flow meter. Optional hardware--such as a two-wire knock sensor, intake air temp sensor, and five-wire wideband oxygen sensor--is connected into the pre-made harness adapter. Flyin' Miata also preloaded base maps for our 750cc/min. injectors on this particular engine configuration. The only set-ups required are TPS and wideband oxygen calibrations, which takes five minutes. This is as plug-and-play as it gets. Once the maps are in the ballpark values, the ECU's self-learn fine-tuning takes over and sorts the rest out.
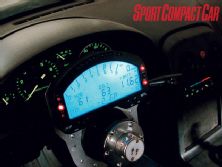
We also ditched our multitude of gauges. It's good to see what's going on, but eyes should be on the track, not the dash. So we've installed an AIM Sports MXL dash to simplify monitoring, not to mention the nightmare wiring of conventional gauges. AIM Sports main market is monitoring and data acquisition equipment for race cars and karts. The MXL dash gives all essential data in one centralized location, in a completely customizable display with warning and shift lights. The best part is that data is pulled directly from the Hydra ECU using a serial cable. AIM Sports has spent a lot of time developing serial interfaces for many popular aftermarket computers such as the AEM, Nemesis, and Motec family, as well as many factory control units. We only had to run three harnesses to the engine bay for aftermarket oil pressure, fuel pressure, and oil temperature senders. Each one is powered and managed by the AIM display, which shows up to six selectable parameters with configurable warning lights for each.
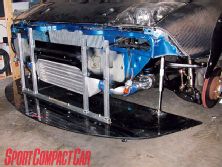
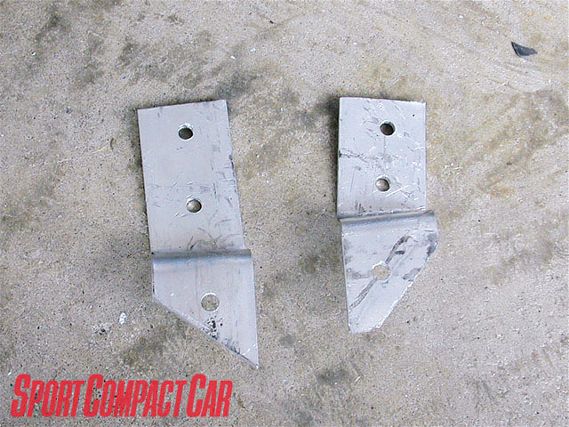 | With some creative use of a hammer and a dremel, we created simple brackets to mount our intercooler. Ugly, but they get the job done.
While the Hydra Nemesis will data-log engine activity, it requires a laptop--ruling out the option of logging hot laps. The MXL makes up for this by having 128KB of memory constantly logging all inputs. All this is combined with telemetry data, so we can figure out what the car is doing under track conditions and ultimately make the car faster. With the optional GPS plug-and-play sensor, the MXL can data-log a vehicle's position on-track and display on-the-fly predictive lap times on the dash. This is a serious competitive advantage during time attacks.
Project Time Attack has the main ingredients for being fast. All we have to do is spend some hours at the track, shaking systems down and finding the right balance of grip and boost. It's clear the car is faster even with less than maximum power being applied. We may consider using a scramble boost solenoid to allow high boost for the straights with a more manageable power level in the turns. But for now, we'll focus on getting the suspension, chassis, tire choice, and power output to work together. Next stop: SoCal time attack events.
Other Installments:
Project Time Attack Part 1
Project Time Attack Part 2
Project Time Attack Part 3