| 1957 C6 Chevy Truck painting
The most important contributing factor to the complete custom-truck equation is its body and paint. A straight body with flawless glistening paint will attract smiles, thumbs up, and words of praise.
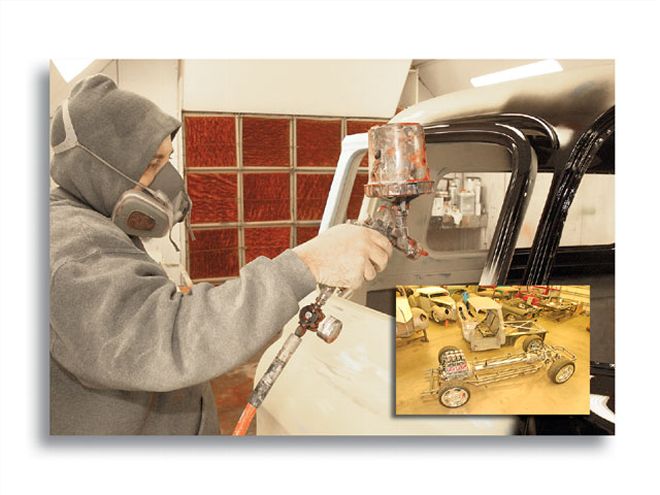
From the beginning of the '57/ C6 Chevy Black Gold project, we have been working with Rodger Lee and his talented crew at Ironworks Speed & Kustoms in Bakersfield, California. They have been creating this one-of-a-kind custom pickup for its owner, John Fisher. We began with the chassis design, fabrication, suspension, drivetrain, exhaust, body mods, and now this '57 was ready for bodywork and paint.

| 1957 C6 Chevy Truck frame
After some minor sheetmetal patching, welding, and grinding, the original door hinges were replaced with new Hagan hinges and Bear Claw latches, then precisely aligned with the doorjambs. The cab, doors, front fenders, hood, bedsides, rear fenders, and tailgate were removed from the insane custom tubular frame and delivered to the Soda Blast Man, David Presley. David then removed the old paint and decades of surface rust, which exposed the fresh bare metal. Then, the body parts were delivered to Kyle Gann, the paint wizard and owner of K-Daddyz Kustom Paint in Bakersfield. Some of the '57's skin was skimmed with a thin layer of Evercoat Z-Grip 100/282 metal filler. Next, the body surfaces were block-sanded, which took out the high spots and any imperfections. This process was repeated three times to create a smooth and flawless surface. After that, the entire skin received multiple coats of DuPont sandable Buff primer and was block-sanded and wet-sanded repeatedly. Because the body was going to be sprayed black, it was very critical the body surfaces were as smooth and straight as possible. To achieve a high-quality paintjob, it was all about emphasizing the quality of pre-paint preparation.
When painting black, Kyle likes to lay down a couple of black basecoats, then let it cure for a couple of weeks to let it move and shrink. The surface was again sanded smooth as glass. Then, Kyle lays down a couple other coats of black so that any imperfections are then wet-sanded out and sealed with multiple coats of clear, which then creates a glistening, deep black.
After some time had passed-about six weeks-to harden and cure, the entire truck's surface was then cut, buffed, and polished with 3M compounds.Stay tuned ...
Materials Used:Evercoat Z-Grip Metal FillerAssorted sanding blocksDupont Chroma sandable Buff PrimerDupont Chroma primer Activator PN 12305SDupont ChromaSystem BasemakerPN 7185S High TempDupont ChromaBase 99K Black Base CoatDupont ChromaClear 2400S low VOCMulti Purpose Clear CoatDupont ChromaClear 2475S low temp ActivatorSand paper wet/dry assorted 1,000- 4,000 gritMasking tapeMasking paperTack ragsCleaning solvent
Tools needed:Paint booth, air compressor with a moisture trap, and a Sata paint gun.
Equipment Used:DA (Dual Action) pneumatic sanderSata Jet (gravity fed) Paint GunDeWalt 7"/9" HD Electrical Variable Speed Polisher DW849 1,000 rpm-3,000 rpm with a wool pad
Cut and Buff Compounds:3M Perfect Rubbing Compound, PN 059333M Ultra Fina SE 06068
YOUR QUESTIONS ANSWERED: Time Spent Working: 300 hours Degree of difficulty: Advanced Total Cost $15,000 (Including bodywork, prep, and paint)


