The Dodge Neon was first introduced in 1995, and wore both the Dodge and Plymouth names. The Neon was the last car to ever wear the Plymouth nameplate when Plymouth was eliminated in 2000. The 2000 Neon was equipped with a 2.0-liter, in-line, 4-cylinder engine. It has an independent front suspension. The ball joints on the 2000 Neon are the primary pivoting and rotating joints between the wheel hub, steering, and suspension parts. The lower ball joint accepts the majority of the vehicle's weight during driving and cornering.
Remove the initial torque from the wheel nuts, on the side of the Neon that you are going to work on. Use a tire iron to loosen the lug nuts. Raise the side of the car you are working on with a 2-ton jack or a jack with greater capacity. Place a jack stand beneath the sub-frame rail on the front of Neon. The sub-frame is the narrowed frame that is also known as the engine cradle. Remove the wheel from the Neon on the side of the car you are working on .
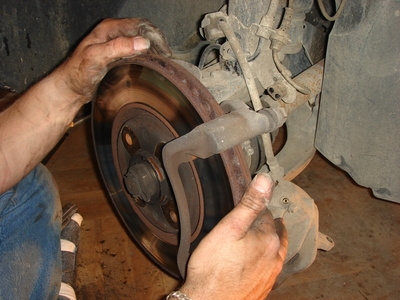
Remove the caliper mounting bracket bolts from the rear of the brake assembly, using a 3/8-inch drive ratchet and socket. The bracket bolts are not the caliper bolts, but are the bolts to the bracket that holds the caliper in place. Removing these bolts will save time, rather than removing the caliper separately. Turn the bolts counterclockwise until you can remove them by hand.
Insert a pry bar between the top of the brake rotor and the caliper. Pry the caliper free from the brake assembly. Hang the caliper and bracket assembly from one of the coil spring rungs on the front of the Neon, using a high strength steel hook or a metal clothes hanger. Do not let the caliper and bracket hang freely or you will damage the rubber hose between the rear of the caliper and the frame of the Neon.
Remove the brake rotor from the Neon by hand. Install a 32-millimeter axle nut socket on the end of a 1/2-inch ratchet or breaker bar. Turn the axle nut in the center of the wheel hub counterclockwise, until the face of the nut is flush with the outer edge of the CV axle.
Hammer the end of the CV axle to push it backward through the wheel bearing, using a large rubber mallet. Having the axle nut flush with the end of the axle will ensure that you do not damage or "mushroom" the end of the CV axle, causing the axle to have to be replaced. Hit the end of the axle repeatedly until it pops free of the wheel bearing. Remove the CV axle nut completely from the end of the CV axle.
Remove the lower ball joint castle nut using a 3/8-inch drive ratchet and socket. Turn the nut counterclockwise with the ratchet using one hand, while simultaneously pushing the CV axle back through the wheel bearing to create room for the ratchet and socket. Remove the nut completely from the lower ball joint.
Strike the outer front corner of the lower control arm, using a hammer. You want to hit the lower control arm downward and toward the rear of the Neon. Continue striking the lower control arm until the lower ball joint pops free of the steering knuckle. Hit the lower ball joint downward through the lower control arm, once it is free of the steering knuckle. The lower ball joint is held to the steering knuckle with the nut, and the lower control arm by friction. Hitting the ball joint downward will allow it to pop free of the lower control arm.
Raise the lower control arm up near the steering knuckle, using a 2-ton jack beneath the arm to lift it. Insert the new lower ball joint through the bottom of the lower control arm, upward and through the mounting hole in the steering knuckle. You can adjust the alignment of the lower control arm and steering knuckle holes, using the jack to maneuver the lower control arm into place. Install the lower ball joint nut onto the upper end of the ball joint and tighten the nut using a 3/8-inch drive ratchet and socket.
Lower the jack when you have the lower control arm and ball joint assembly properly mounted. Push the CV axle shaft toward you from behind the steering knuckle, and install the 32-millimeter axle nut onto the axle. Tighten the axle nut onto the axle, using a 1/2-inch drive torque wrench to tighten the axle nut between 90 to 110 foot-pounds.
Install the brake rotor back onto the wheel hub by hand. Install the caliper and caliper bracket assembly over the rotor. Insert and tighten the caliper bracket bolts between 60 and 70 foot-pounds of torque, using a certified torque wrench and socket.
Place the front wheel back onto the Neon, and tighten the bolts so that they are snug. Lift the Neon off of the jack stand, and remove the jack stand. Lower the Neon the ground. Tighten the wheel lug nuts between 90 and 110 foot-pounds using a certified torque wrench.