Chevrolet Astro vans have a greased wheel bearing design that can wear out and require complete replacement. The bearings, used on the front hubs to reduce friction between the hub and the wheel, can be replaced by the average backyard mechanic in about twenty minutes per hub.
Lift and remove the wheel and brake rotor. This will involve removal of the brake caliper and the splash shield on the back of the rotor. Both are held in with two bolts on the back side. Once these are removed, the primary axle nut will be visible.
Remove the axle nut and large washer. The nut is held in place with a cotter pin, which will come out once bent straight and pulled with the vice grips or pliers. Once the nut and washer are removed, rap on the axle bolt with the end of the adjustable wrench without damaging the threads on the bolt. The heavy strike will shock the bolt and make removal easier.
Remove the wheel speed sensor's bolt and connector, and lay it aside.
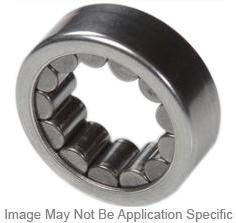
Unbolt the main bearing mounting bolts, and slide the hub out. There are four bolts holding it in, and once it is removed the wheel bearings will be clearly visible.
Replace the wheel bearings. Apply a liberal amount of axle grease to each bearing assembly, then put it into position. Reassemble the wheel hub and bolt it back onto the bearing mounts. Before it is fully connected, smear more axle grease into the wheel bearings for good measure.
Reconnect the speed sensor connector and bolt.
Attach the axle nut over its washer and tighten firmly. The cotter pin is designed to fit into its hole when the nut is tightened to the proper depth. Once the cotter pin is in place, bend its tip around the nut with the pliers.
Reassemble the caliper and rotor, then replace the wheel.