The 2001 Chevrolet Impala came standard with a stereo cassette deck and the option of adding a factory-installed CD player. Nowadays there are numerous options for stereo systems that you can install into the Impala, including satellite radio receivers, units capable of playing MP3 files and DVD navigation systems. Installing an aftermarket stereo requires removing the entire upper dash panel of the Impala to access the stock radio.
Lift the hood of the Impala, and remove the rubber cover over the negative battery terminal. Loosen the clamp that holds the grounding cable to the negative battery lead, using a 10 mm wrench. Remove the cable from the battery and rest it away from the negative lead.
Pry the ignition cover from the steering column, using a flat-head screwdriver.
Open the fuse compartments on either side of the dashboard (near the front doors), and remove the screws near the top of the opened panel with a Phillips screwdriver.
Push down the tabs on the closeout panel below the steering column. Remove the lower dash panel above the closeout panel by hand. Remove the screw on the bottom of the upper dash panel that is revealed by the lower dash panel's removal.
Remove the two screws above the speedometer on the upper dash panel, using the Phillips screwdriver. Pull the entire dash panel away from the dashboard by hand. Start at one side and work your way all the way across to the other side of the Impala.
Pull the wiring to the hazard light and traction control switches away from the panel.
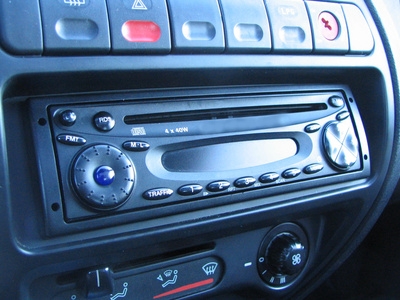
Remove the two screws on either side of the stereo mounting bracket with the Phillips screwdriver. Pull the radio from the mounting dock. Disconnect the wiring from the back of the stock radio.
Insert a faceplate adapter into the now-vacant stereo mounting dock. Feed the wiring harness adapter lead through the back of the faceplate adapter.
Connect the stereo wiring from the Impala to a wiring harness adapter. Connect the leads from the harness adapter to the back of the aftermarket stereo. The leads on the adapter will be clearly marked to show where the appropriate connections should be made.
Slide the aftermarket radio into the opening provided by the faceplate adapter.
Replace the dash panel to the dashboard of the Chevy. Connect the wiring for the hazard and traction control switches, and snap the dash panel back into place.
Replace the screws at the top of the panel on the driver's side, just above the speedometer. Replace the screw on the bottom of the panel to the left of the steering column. Replace the screws on either side of the dash panel in the fuse panel compartment. Replace the covers for the fuse panels.
Replace the lower left-side dash panel. The panel will snap into place. Lift the closeout panel and press it against the lower driver's side panel until the clips are engaged, locking it into place.
Replace the ignition cover. Place it over the keyhole and push it until it snaps into place.
Place the grounding cable clamp around the negative battery lead post. Tighten the clamp with the 10 mm wrench. Replace the rubber covering over the negative battery terminal.