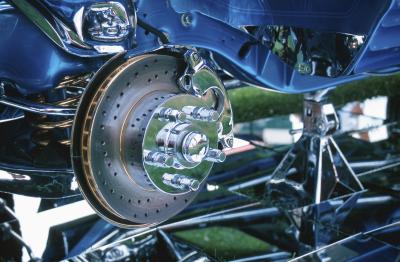
The 1999 GMC Suburban 2500 4x4 is a four-wheel drive, heavy duty 3/4 ton full size SUV made by General Motors. Built upon the same frame and power train as the full-size pickup by GMC, the Sierra offers a stout ride. Having this full size truck power train gives the Suburban large, heavy duty disc brakes on all four wheels. Often changing the disc brakes simply entails swapping the old brake pads for new brake pads, though the brake rotors that the pads press against occasionally need replacing.
Park the suburban on a flat and solid surface, like a cement garage floor.
Use the tire iron to loose the lug nuts on the wheels where you are replacing the brakes and rotors. Replace both sides simultaneously, even if only one needs replacing as they word in tandem.
Place the floor jack under the end of the truck where the brakes and rotors need to be replaced and lift the truck high enough to place jack stands under the frame. Use the rear differential and the front frame cross-member to lift the truck.
Place a jack stand under the frame at each wheel well and lower the truck onto the jack stands.
Remove the lug nuts after the vehicle is securely in the air.
Use the ratchet and socket set to loosen the outer set of bolts on the back of the disc brake assembly, and then remove the inner set of bolts. The bolts should be 15 mm.
Separate the brake caliper from the brake assembly.
Place the wooden block over the caliper piston and then hook the C-clamp over the wooden block and the caliper housing.
Tighten the C-clamp until about 1/8 inch of the piston is exposed from the housing.
Hook the arms of the drum puller equally around the brake rotor and tighten the center bolt until the drum puller is firmly secured to the brake rotor.
Tighten the center bolt by 1/4 of a turn using the ratchet and socket set.
Gently tap around the outer edge of the drum portion of the brake rotor with the ball-peen hammer and then tighten the center bolt by another 1/4 of a turn. If the rotor comes from the axle, remove it, otherwise continue tapping the drum and tightening the center bolt, 1/4 of a turn at a time until the drum comes off.
Push the new brake rotor all of the way back onto the axle hub.
Place the brake assembly, with new brake pads, over the brake rotor and insert the bolts to hold it in place.
Remove the C-clamp and the wooden block from the brake caliper and immediately place the caliper over the brake assembly.
Insert the caliper pins to hold it in place and then tighten both the caliper pins and the assembly bolts.
Repeat the changing procedure for the other side of the Suburban.
Place the tires on the axle hubs and evenly screw down the lug nuts until the tire is fully seated on the axle.
Jack up the truck in the same way you did previously, remove the jack stands and lower the truck to the ground.
Tighten all of the lug nuts on all of the tires using the tire iron. Be sure to tighten the lug nuts in a star pattern to ensure the tire is aligned properly. Tighten each lug a little bit in this pattern to ensure even pressure is placed upon the tire until the lug nuts are securely tigthened.