Drag racers who compete in sanctioned events around the country must be able to produce a vehicle that has reliable performance in order to win. Reliability comes from repetitive results. In order to win, a race car, dragster, funny car or other car must be tuned so that it runs well every time. It needs to be the same way it was when it was new, and one of the important features of a good running engine is the reliability in the valve action inside the engine. Intake and exhaust valves must open and close at tremendous speed, all the time keeping in rhythm and distance for each stroke. To keep these important parts running well takes an adjustment after a set number of rounds of racing.
Remove or raise the vehicle's engine covering or hood. Disconnect the black, negative battery cable from the battery to disconnect the engine from a power supply. Move or tie back any wiring or hoses that obstruct access to the valve covers of the vehicle. Use a rag to wipe the valve covers clean of any dirt or debris.
Loosen the bolts that secure the valve covers in place. Don't loosen and remove each bolt one after another. Instead, loosen each bolt, then remove them in a cross pattern to avoid causing the valve cover edges or bolts to be twisted or bent. Remove equal pressure all around and then remove each bolt crisscross, one at a time.
Take the valve cover off and separate the valve cover gasket from the cover. Discard the old valve cover if the gasket is made from anything other than metal. Only reuse metal valve cover gaskets to avoid fluid leaking from the covers after installation. Clean the inside of the valve cover with a lint-free rag. Set the valve cover aside.
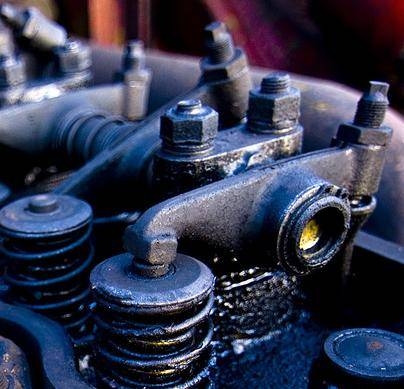
Secure a socket onto the end of the radiator fan shaft or main pulley coming out of the center bottom of the engine. You'll need to turn the engine so that it's at 0 degrees. When the engine is at 0 degrees as told by the engine's timing markers on the front of the engine or main pulley, adjustments to each valve can be made in order. Each valve has a partner. Adjusting them to be the same is critical. Measure the distance from under the rocker-arm to the top of the valve spring.
Slide a feeler gauge in between the correct intake valve and exhaust valve when the engine is at the correct degree marker. The engine spins 360 degrees. You'll be using the 0-degree and 180-degree locations to get the valves in the right position to be tested. At each of these locations, the valves are in a raised or lowered position. The valves must be in a completely raised position to be tested with the feeler gauge.
Loosen the rocker-arm retaining bolts that hold it in place. Make an adjustment using the rocker-arm bolt. Loosen or tighten the rocker-arm bolt to raise or lower the rocker-arm. Fasten the rocker-arm retaining bolts after adjusting and check the distance in between the rocker-arm and the valve shaft again. When the adjustment is correct, turn the engine again with the ratchet until the next pair of valves are raised, and repeat. When completed, the valves will all be adjusted and the valve covers can be replaced.