When it comes to building late-model Wrangler vehicles for everyday street driving and regular trail use, nothing beats the proven combination of larger meats with minimal lift. Few will argue that high ground clearance and a low center of gravity are considered to be the Holy Grail in the rough. However, to achieve this arrangement, something has to give. Simply bolting on a 2- to 3-inch suspension lift may allow room for a 33-inch tire, but what if you wanted to go bigger?
Typically, one would need to add a few more inches of lift to accommodate, say, a 37. Common knowledge confirms that the factory sheetmetal limits how much flex you will get with a specific tire and lift kit, and by "factory sheetmetal" we are talking, specifically, about the front fenders. Lots of companies build tube fenders that claim to increase tire clearance on Jeep vehicles. However, it wasn't until we discovered MetalCloak, formerly Rev111, that we had the opportunity to evaluate a set with different-sized tires on our beloved project Jeep, the Teal Brute. Throughout our three-year evaluation, we received many inquiries from readers wanting to know where to get the trick-looking fenders we installed.
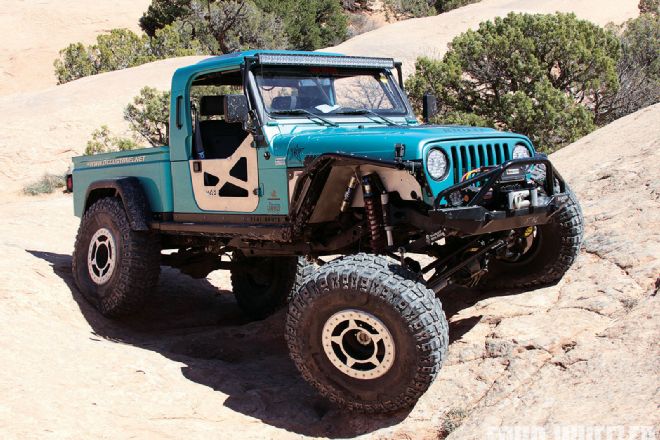
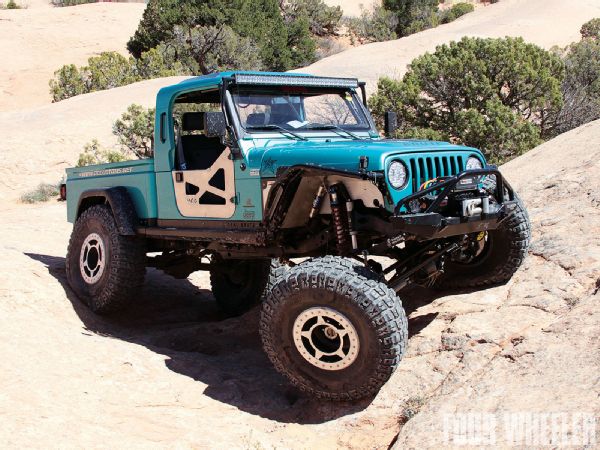 Over the past three years, we have tested a variety of different tires with our MetalCloak fenders. First it was a set of 37x12.50 BFG Krawlers. Then we installed a 37x13.50 Mickey Thompson Baja Claw. Next, it was a 40x13.50 Goodyear MT/R, and today it's a 40x13.50 ProComp Xterrain as seen here. The 40-inch rubber would not have been possible without MetalCloak's original arched front fender conversion.
Unfortunately, the company that built them, Rev111, fell victim to the economic downturn in 2008, and the product was basically unavailable for a little over one year. However, in early '09 a new group of engineers bought Rev111's design and refined it further, expanding both model offerings and styling options to better suit the needs of the consumer. In addition, Metalcloak developed a product line for the Wrangler YJ as well. For this story, however, we are going to focus on the newest product in the MetalCloak portfolio: the Overline flat fender conversion for Jeep TJs. Check it out.
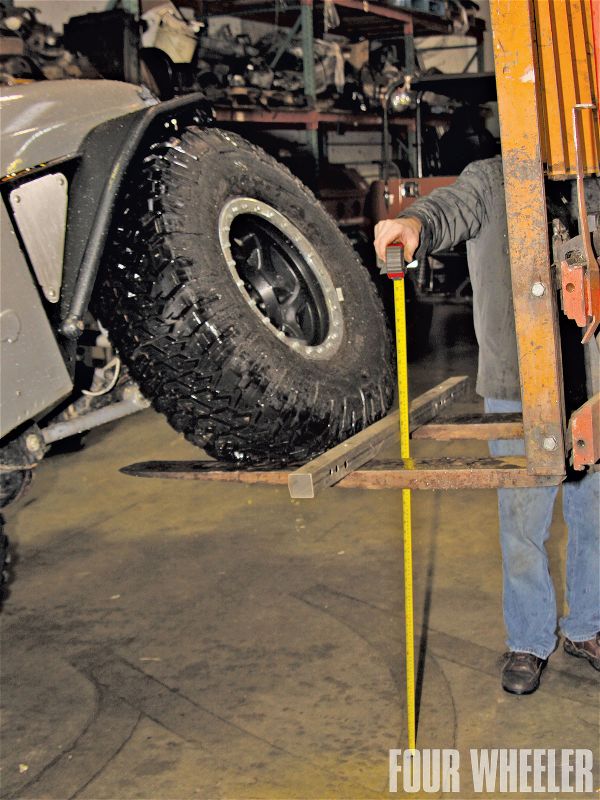
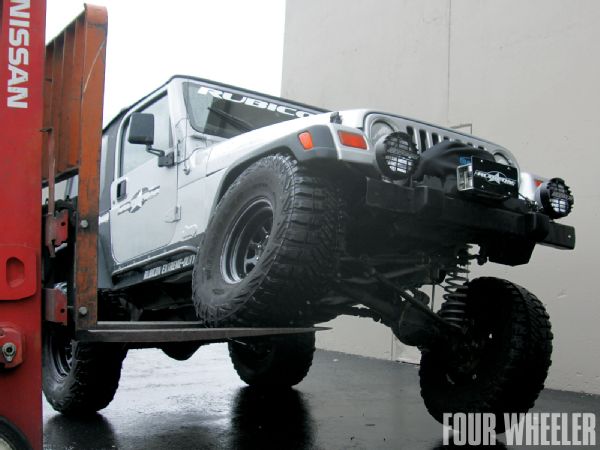 To kick off this project, we wanted to do a little flex testing with a typical Jeep TJ. Our donor rig came from our friends at Rubicon Express. The good folks at Extreme Gear Off Road in Rancho Cordova, California, helped us by allowing us the use of their shop and forklift, and a technician for a day. As you can see here, our donor Jeep did not exactly flex-out like a rock star, but the 3.5-inch Rubicon Express short-arm suspension did enable us to pinpoint where the 35-inch Goodyears touched the underside of the OE sheetmetal.
Individualized Bumpers for All
When the people at MetalCloak designed their new Jeep bumper line, they wanted to give consumers plenty of options in terms of configuration, fit, and finish. There are 300 possible combinations available currently for Jeep vehicles. We were impressed with the quality of the frame-built and bolt-together design, simplicity of installation, and uniqueness of these units. Completely interchangeable, and infinitely configurable, these bumpers are making it possible for enthusiasts to express an individualized look without the worry of seeing a duplicate on the trail.
The coolest part about the whole MetalCloak bumper program is that it is ever-evolving as the imaginative designers at MetalCloak come up with new ideas every day. These ideas are then transformed into accessories and are available in aluminum, hot-rolled steel, and stainless steel. We love that MetalCloak names each bumper configuration after the very first customer to purchase said combination, so if you've ever wanted an aftermarket part to bear your name, now you know where to go. Look for a story on our own unique build in coming months.
PhotosView Slideshow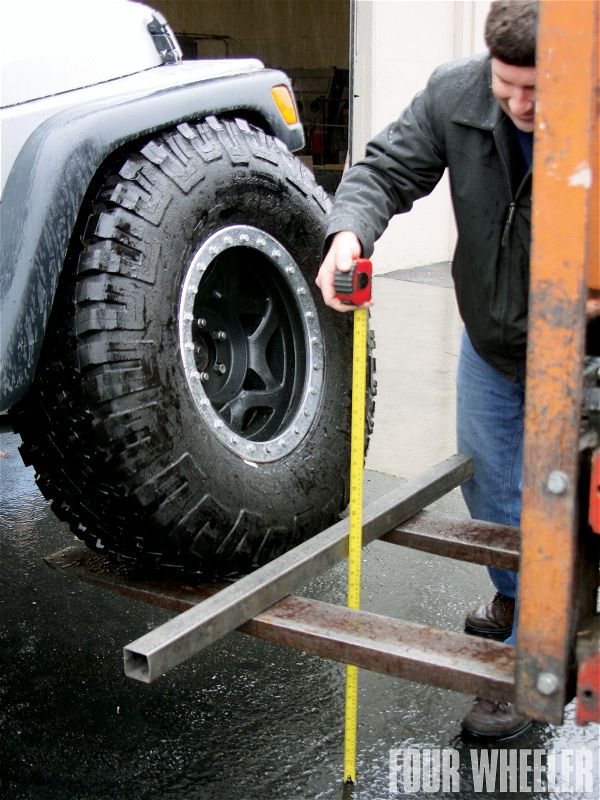
1. Two areas of our donor Jeep's wheelwell made contact with the tire when fully flexed. Vertically speaking, the tire rubbed the underside of the factory fender flare where it mounted to the fender. The second point of contact was found near the full right steering lock point; the contact was at the rear of the inner fenderwell, just below the battery tray. This is a common contact point for TJs. We measured the total vertical change required to reach these contact points was right around 28 inches off the ground.
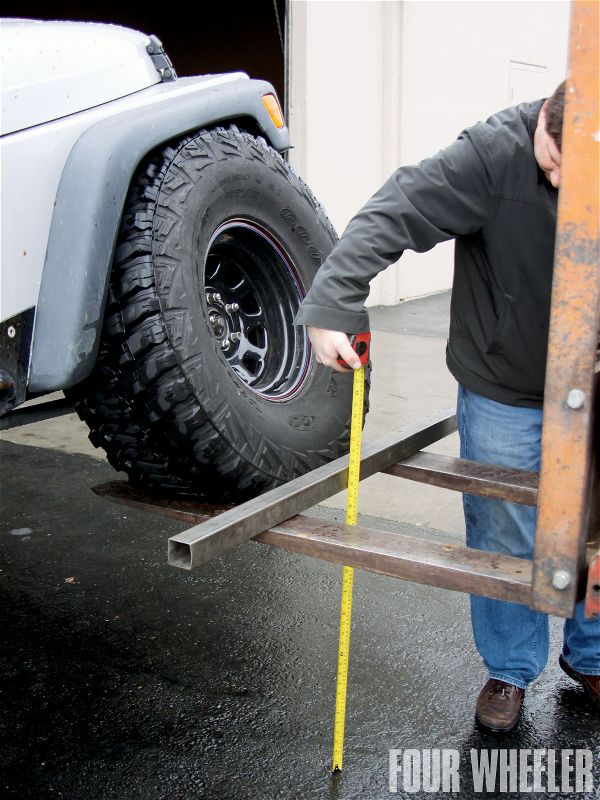
2. For the next phase of our testing, we removed the 35-inch Goodyear MT/R and replaced it with a 37-inch Goodyear MT/R with Kevlar. We use the forklift to recreate the same test again and found the larger tire made contact in the exact same location at just 201/2 inches off the ground.
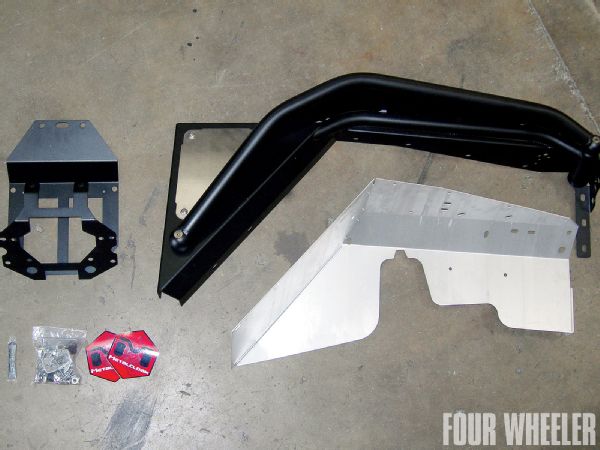
3. This is how the front Overline passenger-side front fender looked prior to installation. Notice the aluminum inner fenderwell and battery relocation mount; these parts were designed to make life simple for the purchaser. While other tube fenders require you to cut up your original fenders to allow fitment, the MetalCloak fenders do not. We like this arrangement because it allows you to retain the factory parts in case you decide to sell the vehicle later on down the road. The installation of MetalCloak's front fender system requires only basic hand tools. No drilling, welding or grinding is necessary.

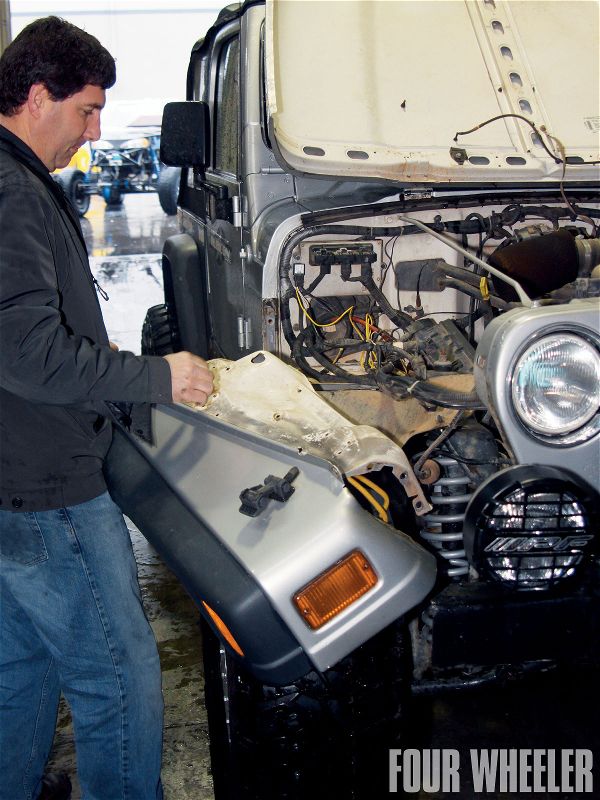
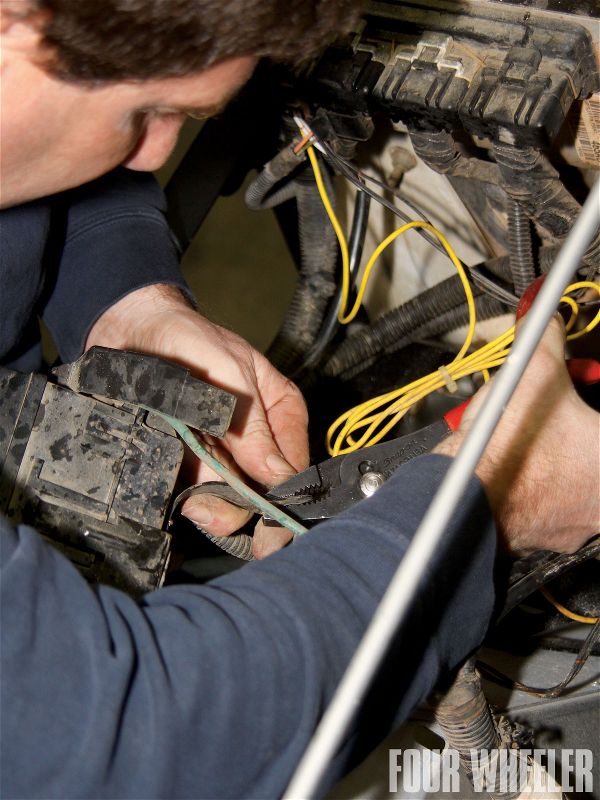
4.The first step of installation is removal of all under-hood items that mount to the inside of the factory metal fenders. Here you can see the OE fuse distribution block as it was being removed.
5.Next, each of the factory bolts securing the rear portion of the fender to the tub were removed. To do this, the battery was removed from the engine compartment to allow access.
6.After the rear-most bolts were removed, the fasteners securing the front half of the fender to the grille were removed. In addition, there were a few wire loom fasteners and hose isolation retainers to remove. Also, the wiring for the turn signal had to be disconnected prior to extracting the fender from the vehicle.
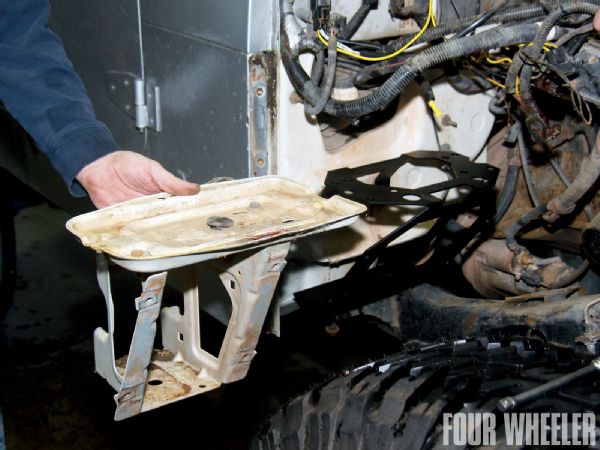
7.The powdercoated MetalCloak battery mount moves the battery down and over slightly to provide additional clearance between the inner fenderwell and the tire. The original mount is also shown for comparison.

8. With the new aluminum inner fenderwell roughly in place, the new fender frame assembly was installed. The easiest way to do so was to loosely install one bolt in the tub side, and then another to the grille side, to get everything lined up properly. Once each bolt hole was lined up, each of the additional mounting bolts was installed on each side of the fender. Note that the access panel was not present during this step-this allowed for easy access to the mounting bolts at the tub side.
9. Here you can see how the interior aluminum fenderwell interfaces with the tubular fender frame assembly. At this point, the bolts used for securing the aluminum panel to the fender frame assembly could be installed. We just love the clean look of these inner fenders.
10. A simply modification was necessary to secure the power distribution block. The block mounting bracket required a slightly more acute angle to match that of the new aluminum inner fenderwell. This was performed with a pair of pliers. Once the power distribution block was mounted, the factory airbox could be replaced. The new Overline fender flare was now ready to be mounted on the fender frame assembly.
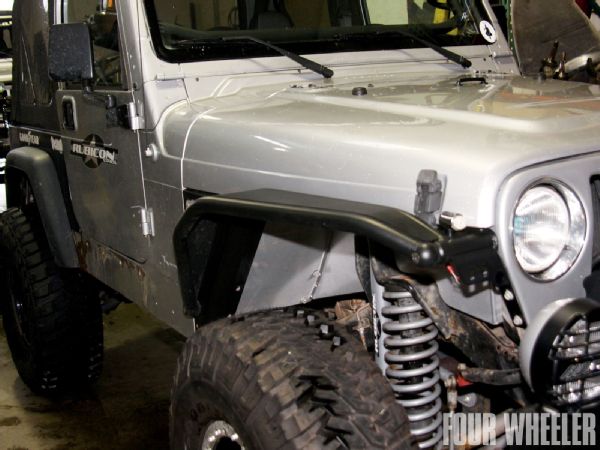
11.This is the completed front Overline front fender on the passenger side of our donor TJ. The driver's-side fender installs in much the same fashion, though the windshield washer reservoir and (in some models) a charcoal canister take the place of the power distribution block and air filter housing.
12.With the new Overline front fender securely mounted, we were excited to performed the same flex test as before with the forklift and see what the results were. The 37-inch Goodyear MT/R tire was able to stuff much further into the fenderwell, allowing the front tire to move up 341/2 inches before the rear tire started to lift off the ground. We could have gone further in terms of tire clearance, but the bump stop was already touching and we didn't want to risk rolling our donor Jeep. The rear portion of the inner fenderwell was no longer an issue, and the backside of the 37-inch Goodyear MT/R no longer came into contact with it at full right turn while flexed out. Besides adding functionality, the fender's looks gave the Jeep an aggressive appearance that we just love.

 Forklift Flex Test Results
Inches Vertical
Stock fender with 35-inch MT/R
28
Stock fender with 37-inch MT/R
20 1/2
Overline fender with 37-inch MT/R
34 1/2
(14-inch gain)
Forklift Flex Test Results
Inches Vertical
Stock fender with 35-inch MT/R
28
Stock fender with 37-inch MT/R
20 1/2
Overline fender with 37-inch MT/R
34 1/2
(14-inch gain)