
 Ken Brubaker
Senior Editor, Four Wheeler
Ken Brubaker
Senior Editor, Four Wheeler
When Tony West, eastern regional sales manager at Bushwacker, set out to build up his brand-new 2010 Jeep Wrangler Unlimited, a vehicle with unlimited potential, he chose an interesting array of products. Then he called us to see if we were interested in covering the build. When we heard what he had planned for his JK, we were very interested. Not only was he using some cool products, he was also planning to fit the rig with 35-inch tires without installing any sort of a suspension lift. We figured that experiment alone was worth the trip.
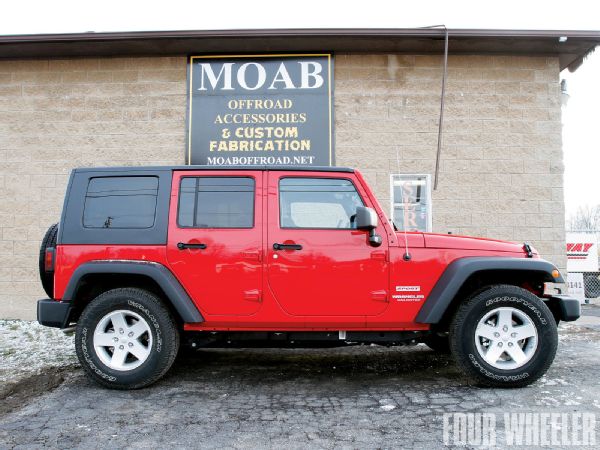
Before
Another bonus was that the build would take place at Moab Offroad in Louisville, Kentucky (see sidebar). We've never had the opportunity to work with the team at Moab Offroad before, and that lured us in as well.
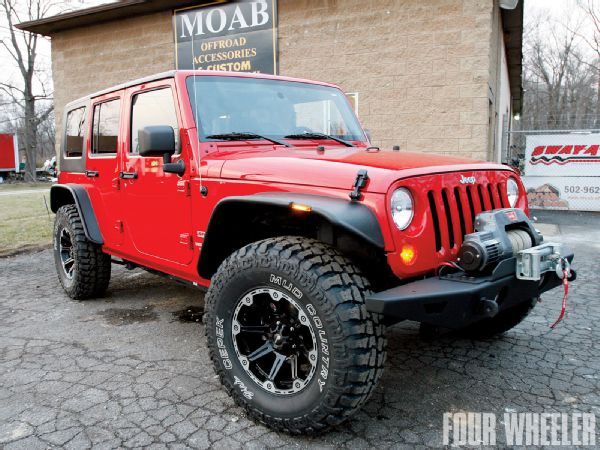
So what components did West install on his JK? Well, the list included a Warn Rock Crawler front bumper with winch mounting plate and Warn 9.5ti winch; Warn Rock Crawler rear bumper with tire carrier; JKS Quicker Disconnects sway bar disconnects; Bushwacker Flat Style fender flares; and Dick Cepek Mud Country tires with Torque wheels.
So how did the installs go? Did the 35s fit? Read on.
Bottom Line
Everything installed as expected and there were no problems for the techs at Moab Offroad. The quality of the Warn bumpers was outstanding, and they look great in addition to being functional. We like the tapered ends that improve approach and departure angles, the welded eyelets for "D" shackles, and the powdercoated wrinkle finish. Both bumpers are CNC-formed and robotically welded from 3/16- and 1/4-inch steel. The optional winch plate mounts the Warn 9.5ti winch in such a manner that all controls are easy to access, and the drum is clearly visible-there's no mystery as to what's up with the cable.
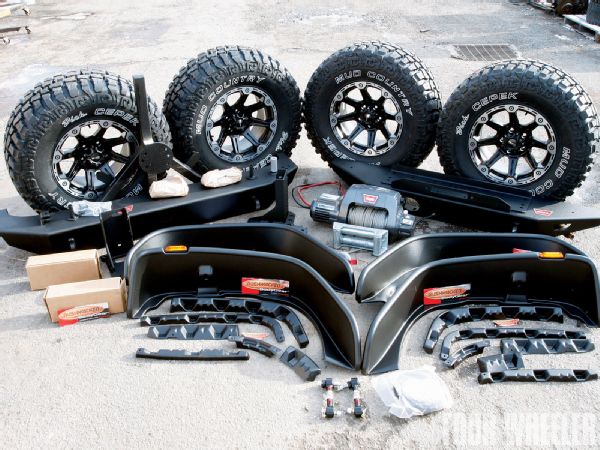 1.This photo shows all of the products we installed on the JK. All of it is quality stuff from Dick Cepek, Warn, Bushwacker, and JKS.
We also like the sturdy optional rear tire carrier and the fact it gets the weight of the spare tire off the tailgate. The JKS Quicker Disconnects are made from beefy heavy-gauge steel, and they're robotically MIG-welded before being powdercoated. JKS says they offer up to a 30-percent increase in front wheel articulation. The Bushwacker Fender Flares are a neat setup, look great, and are incredibly sturdy. We dig that they offer 91/2 inches of tire coverage and they're made from Extreme Duraflex 2000 TPO material that bends instead of breaks and then returns to its original shape. We also like the fact that they'll never rust. Finally, the flat black Dick Cepek Torque wheels look handsome and the Dick Cepek Mud Country tires are a vast improvement over the stock tires, both in traction and ruggedness.
The stock tires on this JK were approximately 31 inches tall, so the rig gained about 2 inches of height from the tire diameter increase. With the addition of the front and rear Warn bumpers, with their tapered ends, the approach angle (measured tire-to-bumper) increased by an impressive 13 degrees (to 66 degrees) and the departure angle increased nicely by 10 degrees (to 47 degrees).
PhotosView SlideshowDid 35s fit?
So did the 35-inch tires fit this JK with the modifications we installed? Well, after fitting the 35s, we didn't see any tire-to-vehicle contact at the front of the vehicle, either on flat ground or when flexed out on the RTI ramp. However, on flat ground the rear tires were only about 1/2 inch away from the splash shields on the inside of the wheelwells and the lower body lip (Figure 1). When we ran the vehicle up the RTI ramp, the rear tire on the side of the vehicle that was compressing contacted the splash shield (Figure 2), which caused the JK to travel 5.5 inches less up the 20-degree ramp compared to stock.
This made us wonder how 33s would fare, and it just so happened that Punisher Offroad owner Tim Aker was kind enough to let us borrow a pair of 33x12.50 Mickey Thompson ATZs off his JK. With the 33s installed in the rear, and the modifications we made, we hit the RTI ramp again, and at full flex, there were no contact issues (see Figure 3).
Since the install, the owner of the JK says that only once has he had tire-to-vehicle contact issues during normal driving and light off-highway travel with the 35s. It consisted of light rear tire-to-splash shield contact and happened when pulling into an angled driveway approach with a little too much speed.
Bottom line: Even though the 35s rarely contact the rear splash shields, the owner of this rig wants to eliminate that possibility while enjoying unencumbered wheel travel both on- and off-highway. He also wants to keep the rig's center of gravity as low as possible. With that said, he's looking at installing a simple 2-inch suspension lift. He has plenty of options because there are numerous kits in that lift range available for the JK in the aftermarket. As a bonus, they're easy to install and inexpensive.
PhotosView SlideshowAbout Moab Offroad
Moab Offroad in Louisville? Yep, it bears the name of one of the nation's hottest wheeling destinations in Utah, but it's in Kentucky. Sure, there's a story behind the name, but the real story here is what Moab Offroad has going on.
They're a 10-year-old, six-bay shop owned by Max Dollinger and they currently employ five people. About 99 percent of their work is Jeep-related, but they also do quite a bit of Toyota tech. One look around the business and it becomes clear that they're comfortable with everything from simple bolt-ons to extreme custom builds.
So the next time you're in Louisville, go to Moab and say hi.
PhotosView Slideshow

 PhotosView Slideshow


 PhotosView Slideshow


 PhotosView Slideshow


 PhotosView Slideshow


