
 Ken Brubaker
Senior Editor, Four Wheeler
Ken Brubaker
Senior Editor, Four Wheeler
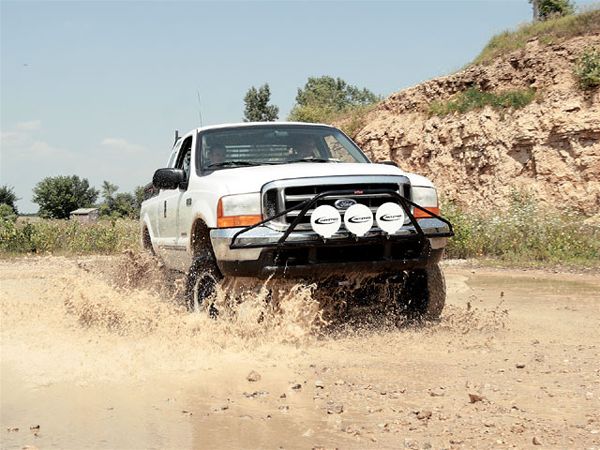
We've said it before and we'll say it again: Our '99 Super Duty is a workin' dog. It's almost always tethered to a trailer, it rarely ever gets washed, and the cluttered interior has a manly aroma of spray lube and dirt. Yep, it's a four-wheel equivalent of a strong, trusty pack mule.
In the July '08 issue ("Workin' Dog"), we actually showed it a little love and installed a 4-inch Superlift suspension, Bilstein 7100 Series remote-reservoir shocks, Weld Racing Method wheels, and Nitto Dune Grappler tires, among other things. All of these items have performed flawlessly. Now we have to turn our attention to a few other items that need upgrading.
The stock headlamps are awful. They emit a feeble amount of light that is just not acceptable. To help solve this problem we contacted the folks at N-Fab. This Texas-based company offers a cool option for mounting three forward-facing lights. It's called the Pre-Runner bar and the application for the '99-'07 Super Duty simply bolts to the front of the rig without any modifications. It's made from 1.50-inch-diameter, 0.095-wall tubing and it only weighs approximately 39 pounds. It has a zinc primer base and comes standard in a rugged high-gloss black powdercoat finish, but other colors and textures are available.
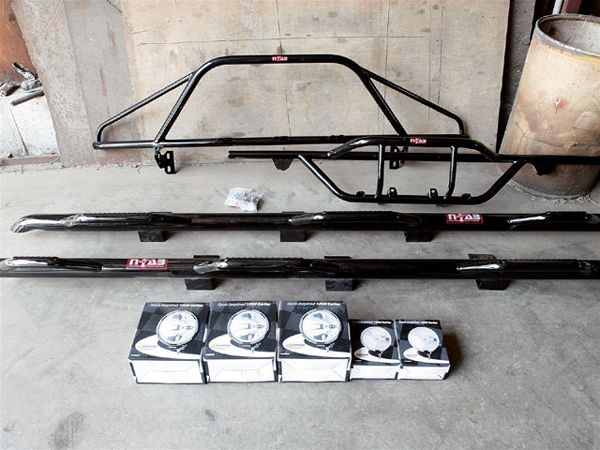 Here are the items we installed. From top to bottom: N-Fab Pre-Runner bar, N-Fab Rear-Runner bar, N-Fab Nerf-Steps, and Daystar 8.6- and 5.7-inch lights.
Naturally we needed lights. For these we turned to the folks over at Daystar. Yep, Daystar even has lights. They sent us a trio of their race-inspired 1000 Series KU80000 lamps. These 55-watt halogen H1 lamps have a high-impact resin housing, low wattage position bulb, and an outside diameter of 8.6 inches. They fit perfectly in the N-Fab Pre-Runner bar.
Connecting to trailers in the dark and snowplowing in the middle of the night was challenging with nothing but the stock taillights and back-up lights to illuminate reverse maneuvers, so we wanted to get some light on the tail of the truck as well. Once again we turned to N-Fab for help. They recommended their Rear-Runner bar. It fits over the stock rear bumper and is made from the same material and comes in the same finish as the Pre-Runner. It weighs approximately 32 pounds. It has two light tabs for rear-facing lights. For lighting we once again turned to Daystar. This time we installed its powerful KU80003 5.7-inch-diameter, 55-watt halogen lamps.
Our last item to address was the taller step-in height created by the previously installed 4-inch suspension and larger tires. Doing Las Vegas showgirl-style high kicks to get in the cab wasn't working for us, so we installed a pair of new, full-length six-step N-Fab Nerf-Steps. More than just a standard nerf bar with steps at each cab entry point, the Nerf-Steps have an added step at the rear of each bar so accessing the cargo box is easy. The main bars are made from strong 3-inch-diameter, 0.084-wall tubing, each step is welded-on, and each bar features a zinc primer base and high-gloss black powdercoating. N-Fab says that each bar has a healthy 445-pound weight rating at 10,000 cycles with less than a .250-inch deflection.
We installed all of these items in our garage in less than 2 hours. It actually took longer to wire the lights and mount the switches than it did to bolt on all of the components. Follow along as we cover the highlights of this super-easy install.


 PhotosView Slideshow


