Trailer-Ready Dodge Ram - Four Wheeler Magazine

Correctly optioned, the 2010 Dodge Ram is already setup to tow some serious loads, complete with a factory receiver, the appropriate electrical trailer connections, and even a built-in brake controller. As long as it's a regular bumper-pull trailer, that is. Those with gooseneck or fifth-wheel trailers will have to add the necessary hardware, and there's no reason you couldn't do it yourself-well, with a little help from a friend at one point in the installation process it's more feasible, but still plenty doable in the driveway.

129 1010 Trailer Ready Dodge Ram turnover Ball Hitch Kit And Bed Photo 34353066 
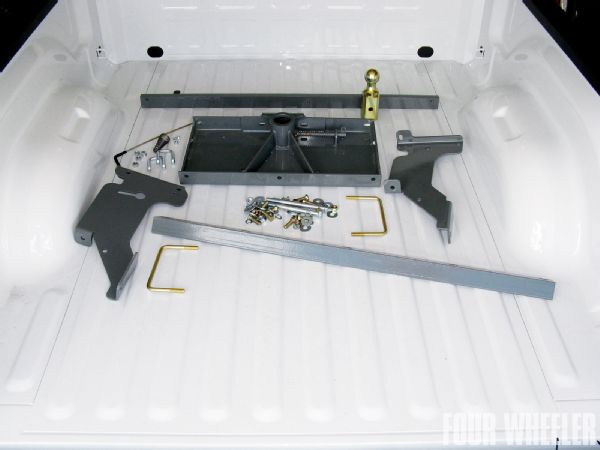
This is a typical starting point: All the bits and pieces of a Turnover Ball hitch -- and a pristine pickup bed. Needless to say, it would be really stupid not to pay very close attention to the instructions and mark the bed accordingly before striking the center punch in preparation for drilling the first, and largest, hole.

There are several gooseneck hitches to choose from, and one very popular version is the Turnover Ball by B&W. This patented hitch has a distinct advantage over the competition in that the base for the removable trailer ball is square. No big deal? Well, for one, it effectively prevents the ball from turning in the base instead of the coupler turning on the ball, so there should be less wear on the permanently installed hardware. Also, notice that we said "gooseneck/fifth-wheel" earlier. Those are obviously two completely different setups, but the square design allowed B&W's engineers to come up with the Companion Hitch-a fifth-wheel that drops into the same hole as the ball, with no other attachments needed. In other words, you can have a flat and fully usable bed as before, or the gooseneck ball installed upright, or a fifth wheel-all using the same underbed hardware, and in the case of a 2003-10 Dodge Ram 2500 or 3500, that hardware is Model 1306R. That companion hitch is quite a nice piece in itself, but that's another story.

Following are some of the highlights of a Turnover Ball hitch installation, which took way longer than the one hour mentioned on B&W's website, partially because of working alone and trying the virtually impossible, partially due to using only hand tools, except for a cordless drill motor.

PhotosView Slideshow Normally, a big old 1/2-inch drill motor would be the weapon of choice for turning a 4-inch hole saw (the only tool you may not have handy, but it's not essential, either-it just makes a neater hole). As it turned out, a cordless drill motor set on a relatively high torque setting (not the drill setting) made the holesaw stop when it inevitably grabbed every now and then, rather than flinging us out of the bed. Not mentioned in the instructions, plastic fender liners blocked not only the visible access, but access, period. Cutting the lower part of the liner is one option, while temporarily removing the liner is another. Also, while it may be possible to squeeze the crossmembers in between the bed and frame, it seemed a lot easier to loosen the six mounting bolts and lift the bed slightly on the passenger side (there's a floor jack below that 4x4). This also prevented having to cut a notch in the sheetmetal right above where the front crossmember is in the picture. As you can see in this photo,  there's lots of wiring and lines that the center section must be guided past on the way up, and had it only been feasible to remove the rear part of the exhaust, things would've been much, much easier (notice exhaust at far right). Unfortunately, modern clamps crimp the pipes, which make it impossible to simply slide the pieces apart. Another place where the exhaust reared its ugly head was when it came time to install the vertical bolt for the right side plate. As mentioned in the instructions, the exhaust may have to be moved to the side. Somehow. Again, the cheapo ratchet strap came in handy. When working alone, you gotta do what you gotta do. It was a move of desperation that prompted this "hoist," as it was impossible to wrestle the heavy center section in place without some sort of help. Once human help arrived, and after removing the spare tire and grunting for a while, the center section was finally in place and ready to be bolted to the crossmembers. Tips: The 4-inch hole in the bed is a near press-fit, so things must line up just right. Also, use screwdrivers, drifts, or something to hold the center section in place rather than trying to start any bolts at this point. Torque all the fasteners to the values and in the order mentioned in the instructions. And good luck getting a torque wrench on all of them, especially without taking the wheels off as well. Actually, by pure luck the meager tool assortment on hand for this install happened to include the excellent GearWrench Pass-Thru Ratchet Set (seen to the left in the photo) , and its very low profile was most helpful in a number of cases where access was tight, to say the least. Notice how the right side plate has a nice relief for factory wiring (left of decal) and the drop-down for the emergency-brake cable bracket (lower center). Contrary to the instructions, it was not necessary to undo a clip for the wiring in order to get the left U-bolt in place, but it could be very close to a hard brake line once installed. Almost there. After attaching the latch pin release handle-which thankfully becomes completely hidden behind the fender liner, yet easy to operate-you'll have to drill four more holes, for the safety-chain U-bolts. Lacking a 1/2-inch drill bit, a borrowed transfer punch was used to mark the holes from underneath. Then the resulting bumps were carefully center-punched from above and a uni-bit used to drill the sheetmetal out. A small drill bit and a round file would've worked, too. Done. Except that the crude rust-prevention paint job will eventually be covered up with a Line-X spray-on liner. So there it is-a pickup bed modified to accept a gooseneck or fifth-wheel hitch. With the ball inverted or removed, the bed's floor is as unobstructed as before.  Yeah, it was a bit of a DIY chore, but you'd be hard-pressed to find a shop that won't cut at least some corners, even literally. And here's the gizmo that started it all. Having built some truly weird contraptions for towing, seeing this at the SEMA Show a few years ago had us stumped. For backing a trailer off a cliff? Nope, it's B&W's 4-inch extender, which goes in the same hole as the regular ball (or the Companion Hitch) and is used for shortbed pickups pulling camping trailers where space can get tight between the cab and corners of the trailer. <strong>Under Control</strong><br />
While a correctly optioned Dodge will already have a brake controller in the dash, this one did not. At a mere 3.8x2.9x1 inches, the new full-featured Blackbird from Valley Industries was extremely easy to find a suitable spot for in the Dodge's cabin, as was plugging in the dedicated brake control wiring harness. Yep, a complete plug-and-play installation. The same goes for Valley's fifth-wheel and gooseneck wiring harness, but you're on your own for drilling yet more holes in the formerly pristine bed to accommodate the trailer plug.