Hella Rallye 4000 Compact Off Road Lights Install - Four Wheeler Magazine

Hella Rallye 4000 Compact Off Road Lights Install - Light Up Your Life Craig Perronne Brand Manager, Dirt Sports & Off Road Photographers: Hella hella Rallye 4000 Lights mouted Hella Lights Photo 18916924

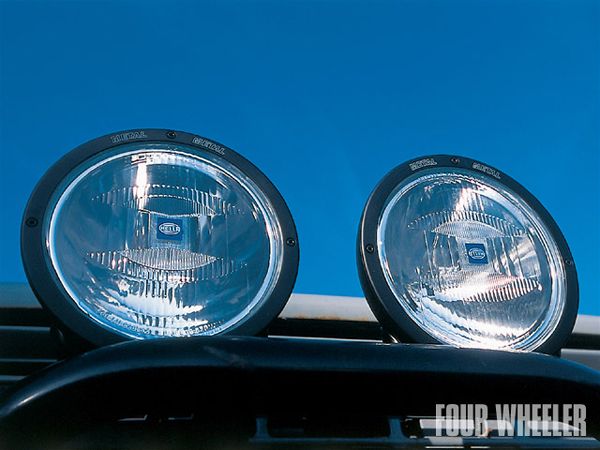
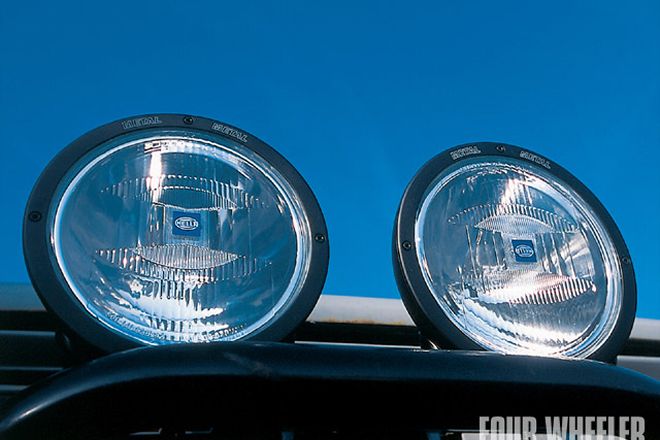
Nighttime trail expeditions are lots of fun. Whether your after-dark 'wheeling involves powering to the top of a monster dune or creeping along some nasty terrain in low range, there is something about doing it at night that adds a whole different element. However, to navigate safely after the sun goes to bed, you are going to need a bit more light than your headlights can provide. Luckily, installing an auxiliary set of lights is a fairly easy process that only takes a couple of hours at the most. Follow along as we throw on a set of Hella Rallye 4000 lights to provide us with all the light we need.

PhotosView Slideshow 1. Hella lights are a little different from most, as they come disassembled. To tell the truth, this is what made us go back and read the instructions. 2. After pulling the lens off, the next step is to put the bulb into the back of the reflector. Remember to never touch the lens of a halogen bulb with your bare fingers, as the oil from your skin will shorten bulb life. 3. Next, the wires to power the bulb are attached and the reflector is then put back into the housing along with the lens. The wiring loom for the bulb comes with this nice weatherproof connector that helps to seal the housing. 4. When choosing a mounting location, make sure to keep the lights out of the way of airflow to the radiator. We mounted ours up high on the bumper. 5. Make sure that your light mounts are actually wide enough for the bottom of the Hella's mounts. They use a little wider mount than normal and our tabs weren't wide enough, which might allow the light to vibrate. We decided to give them a shot until we build some new tabs. 6. The wiring loom that comes with the Hellas at first might look complex. It helps to lay it out according to the wiring diagram so you can visualize what goes where. 7. The phrase "you get what you pay for" definitely applies to the Hella lights and their wiring loom. While they might be a little more expensive than some, the Rallye 4000s are of very high quality. The wiring loom also comes with these nice weatherproof connectors that snap into the back of the light. 8. A key part of the wiring loom is the relay. It allows for full power to reach the lights and should be kept dry and away from engine heat. We also routed the rest of the wiring loom up as high as possible in our engine bay to keep it out of harm's way. 9. After routing the wires into the cab, a place must be found for the switch. We mounted ours on the bottom of the dash where it is accessible but still out of the way. 10. The next step in our light install was to attach the power lead directly to the battery. Going directly to the battery is always the best route, as this supplies maximum power to the lights. 11. After the lights are hooked up, the final step is to go out and adjust them at night. The Hellas use these knobs to make adjustment easy.

Know Your Beam
The most important consideration when choosing a light, besides quality, is beam pattern. We chose the Rallye 4000 light in the Euro beam application because it throws a wider pattern when compared to the pencil-beam pattern (see accompanying photos). The Euro beam still throws a ton of light, and while this is great for running the dunes and high-speed derbying, it's a bit much for low-speed trail work, as it would burn out the retinas of the drivers of the next few vehicles ahead of us. A better choice for low-speed trail work would be Hella's Luminator, which actually uses the same housing as the Rallye 4000, but sports a lens with more fluting to throw a wider and shorter pattern of light. The best of both worlds would be a set of Luminators and a set of Euro beams. To help make selecting the right light easy, Hella makes a very informative poster of its lights and be---am patterns so you can choose the proper one.

PhotosView Slideshow Euro Beam Pencil Beam