 Jerrod Jones
Former Editor, Off Road
Jerrod Jones
Former Editor, Off Road
Do you own a set of coilovers yet? Why not? Your neighbor just sold off two kids to get a set for his Chevy LUV. Why don't you step up? Do you think they're not important enough to your suspension? Do you think they're too complicated? You'd be wrong on both counts if you did. They're probably one of the most versatile components you can add to your suspension, and really not all that expensive when you think about it. They give you the option of changing valving stiffness, spring rate, and even ride height, and it can be done after they're already purchased. You can break down the damping and ride qualities and abilities into different replaceable components with coilover shocks, giving you the ultimate in owner-adjustability. No other suspension component does this so well and at such a sensible price.
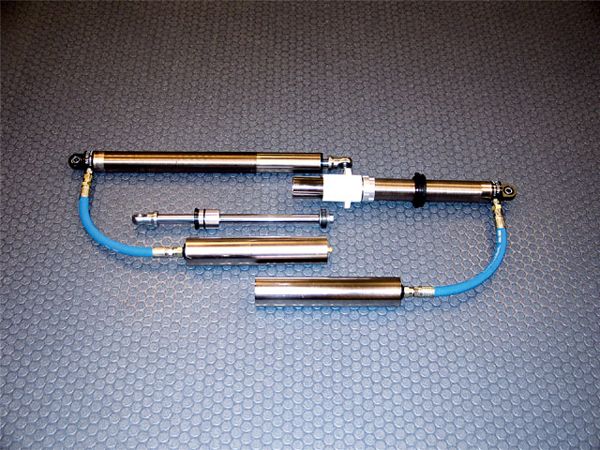
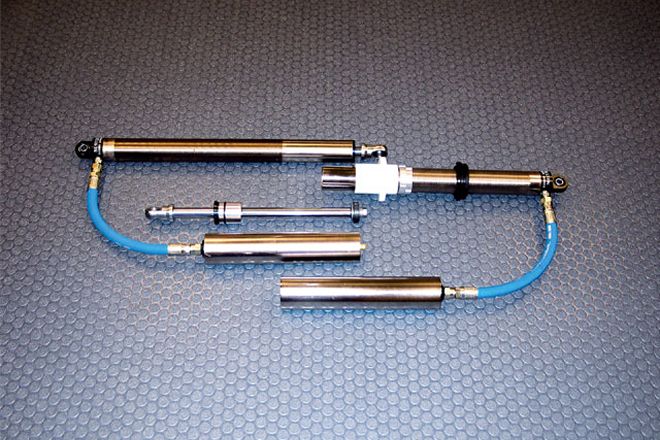
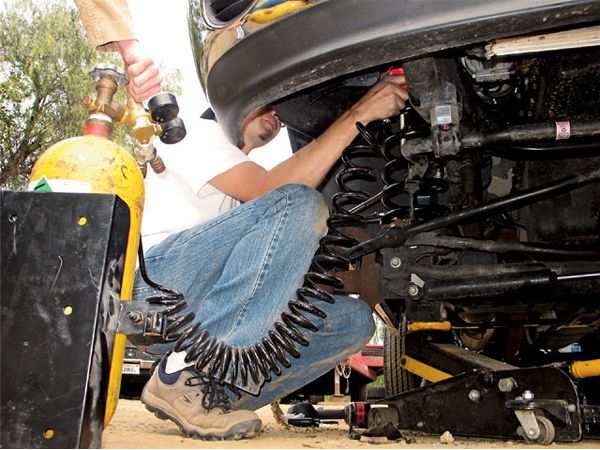
We felt confident enough to maintain and set up up our own coilovers after taking a little time to sit down with Bilstein's Joel Ward and Shane Casad to take a look at how a typical coilover shock (in this a case a 9100 Rock Crawler with digressive valving) can be modified and maintained to perform the way we wanted. And luckily we snuck in a camera as well so we could show you how to become an unauthorized pro at working on your own coilovers. Mind you, we're demonstrating on a set of Bilsteins, and this might not be the shock you have, but most steps are either the same or very similar, so use this as a general guide.
By the way, any type of valving and spring-rate generalities we make go right out the door once you turn your shock more than 10 degrees sideways. For shocks turned at an angle, valving and spring rate will have to be much stiffer.
This month we only have enough room to show you the routines for shock maintenance and setup of a coilover on your ride. Next month we'll cover the coil setup rituals you can use to dial in on your own truck.
Before we delve into this, we should probably explain how a standard coilover remote-reservoir shock dampens. This is not an external or internal bypass shock we're talking about, just a standard remote-reservoir shock that controls compression and rebound via the valving (mostly).
First of all, the shock is pressurized with nitrogen. The nitrogen does not mix with the oil in the shock, but instead holds pressure on a dividing piston inside the reservoir, which in turn puts pressure on the fluid in the shock to keep it from cavitating. The shaft of the shock travels up and down inside the body of the shock, with a valve stack and piston on the end of the shaft that controls how fast or slow the shaft travels into or out of the body of the shock.
Whether you're changing the valving or rebuilding the shock, you're going to have to know how to tear it apart and put it back together. Most of the steps can be done with a rubber mallet, a torque wrench, a couple of Allen wrenches, a towel, a pick, snap ring pliers, and a gallon of oil. We're working on a Bilstein Rock Crawler shock, but this should be pretty much standard teardown for all coilover shocks.
To disassemble the shock, start by unthreading the coil retainer ring and removing the coil equipment. Release the nitrogen via the Schrader valve on the reservoir, and place the shock in a soft-mouth vice, holding it by its cap (upside down). Incidentally, this top cap should never have to come off the shock tube, and if it does for any reason, then it should probably not be done by you.
On our Bilstein coilover, three Allen screws hold the shock together. Once these are pulled, the wiper (lower) cap will come off the body. A rod guide is in the bottom of the shock's body doing exactly as its name implies. The rod guide is held in by a snap ring that needs to be removed. Using either the special shock-rod guide hammer (which we're sure few of you own) or by finding another way to do it, gently tap down on only the rod guide to make room to get the snap ring off, taking care not to pound on or near the shaft or its bushings, nor on the body tube of the shock. Once the snap ring is removed, slowly and gently slide out the shaft, rod guide, and valve stack. With any luck, you won't displace too much oil out of the shock body and the only reason you'll need to add any is if the shock oil should be replaced (call your shock manufacturer to find who sells their shock oil or a compatible substitute).
Now that you have the shaft out of the shock's body, you can start to work on what you need to. If the shock tube or the reservoir needs replacement or maintenance, you'll have to empty the shock of its oil (into a proper oil receptacle).
The rod guide allows the shaft to slip in and out of the shock body with very little friction. The rod guide will come off after you remove the valve stack at the end, but before you slide it off the shaft, you should check for any play or wear in the bearing on the guide. If it seems a little sloppy or the seals look a bit trashed, don't hesitate to buy a rebuild kit since they're cheap and well worth the price of a well-working shock. To pull out the seals and replace them, use a dental pick (once you touch them with the pick, they're shot, so don't pull them out if you don't have extra ones).
The valve stack in a coilover remote-reservoir shock is what gives you the compression and rebound damping you are so eager to get perfectly set up. The trouble is that it's hard to even find a starting point, not to mention tearing down a shock each time you need to revalve it. Your best bet is to call the manufacturer or people with similar trucks/builds and see what valving they recommend. This will be a great starting point and, if you're lucky, end point as well.
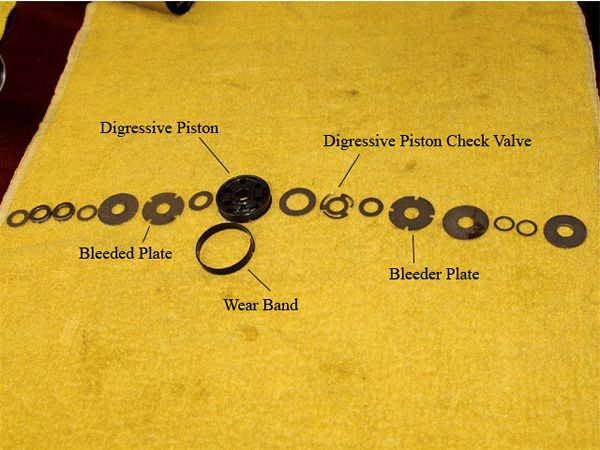
When removing the valve stack, be careful to lay it in the order it was removed. You'll give yourself extra insurance by taking a picture of the valve stack laid out just in case someone bumps the table. The thicker the valve plates or shims, the stiffer the valving, as the damping is done by passing oil by the valve plates which bend to allow passage. The piston itself is an important part of oil passage, and is placed on the end of the shaft with the valve stack. Bilstein has two types of pistons in its remote-reservoir coilover shocks: a digressive piston and a linear piston. The digressive piston is found in the Bilstein Rock Crawler shock and is technology brought from street-handling shocks. It has a check valve and seal that does not allow oil flow when the shock is at a standstill, basically not allowing the shock to compress and the 4x4 to just roll sideways as it sits. As soon as shock oscillation starts, the digressive piston's check valve opens up and allows normal flow.
Bleeder plates built into the valve stack will always let a little oil pass through without bending the plates to an open position, an important action to take the edge off normal shock absorption.
The linear piston is more conventional for a remote-reservoir shock and will be found in other non-rockcrawling- specific remote-reservoir shocks. The linear piston is designed to work much better at high speeds and with intense oscillations, so this will be the one you want in your prerunner.
Also, note when placing shims and washers on the shaft, there is sometimes a "soft" edge and a sharp edge on the washers/spacers. The soft side points towards the oil, not toward the piston.
With the shaft removed, you can easily check for straightness on a flat surface by simply rolling the shaft along with your fingers. If the shaft is bent at all or you find any chips or pits in it, then just throw it away and get a new shaft.
The rod end on the shaft should last a while, but if it wears out, you can simply get a replacement spherical bearing. A snap ring holds it in place and takes 30 seconds to remove and replace.
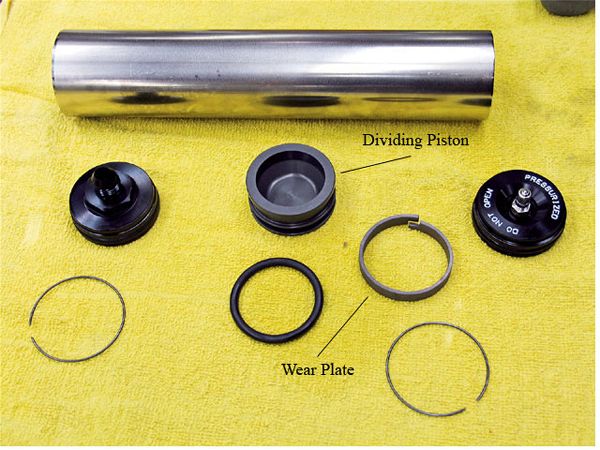
The reservoir on the end of the shock holds the nitrogen and the dividing piston that separates the oil and nitrogen. Yes, there is an added benefit of another heat sink (the reservoir itself) and of more oil for better cooling, but really its main purpose is to float the dividing piston and keep pressure on the shock's oil without having to place it all in an overly long shock body. The reservoir should almost never fail you without seeing some kind of trauma, but if it does, it will most likely be oil or nitrogen making it past the dividing piston's wear band. If this is the case, then you'll need to disassemble the piston and pull the parts. The easiest way to get into the reservoir is (first release the nitrogen pressure!) to tap down on the Schrader valve cap and remove the snap ring (much like pulling the rod guide), and then using a Schrader valve puller (found in most tire stores) to remove the cap. The dividing piston inside will have its dished side facing the nitrogen gas, and should sit about 8 inches down in the reservoir to leave enough room to be pressurized via nitrogen. If the dividing piston is pushed too deep and not enough oil resides in the reservoir once rebuilt, the nitrogen could push the dividing piston all the way to the end of the reservoir, therefore not putting the proper pressure on the shock's oil.
You will need to charge your shocks before using them on your truck or 4x4. All remote-reservoir shocks we've ever seen were shipped without nitrogen because it's much easier to ship (and install for that matter) something that doesn't have a giant shaft trying to protrude from the shock body with 200 pounds of pressure.
By the way, 200 pounds is standard pressure in most shocks. Rockcrawlers say to use around 180 psi, and higher-speed applications call for above 200 psi. They are filled via a Schrader valve on the end of the reservoir. Your question right now is probably about adjusting shocks via the nitrogen pressure. In short, yes, you can (only the compression), but it is more like a Band-aid than a proper way to adjust ride. Most shocks will work with anywhere from 160 to 320 psi of nitrogen being forced onto the oil. The more nitrogen in the shock, the stiffer the compression. If you feel this is the way you need to adjust stiffness, do it in 20-pound intervals of nitrogen so as not to overshoot what you're looking for.
Assuming your remote-reservoir shocks are valved correctly, they'll work great for a long time, but will wear with use and time like anything else. And there are some good indicators that it's time for a rebuild that you can usually find with a quick shock inspection.
* Spongy feel to the shock damping-first check for loss of nitrogen as culprit
* Nitrogen loss-many times a bad Schrader valve; check with water on valve
* Oil leaking-usually due to bad seals, bent shaft, or pitted shaft
* Shock won't collapse-jamming due to bent body tube or shaft of shock
* Rattling-rod ends on either end of coilovers have worn out
* Excessive wear spots on shocks-coil has suffered warping and the rate has probably been affected, or the shock is wearing on the frame/mounting points
* Crashes can lead to bent shafts. If you do take a hard crunch, check to make sure you did not bend your shock's shafts before you try to send them up into the body tube again.
* Pitting on shock shafts from rocks can lead to oil leakage. The rough surface will tear up the seal surface and allow oil leakage.
* Oil on the nitrogen side of the reservoir, or nitrogen in the oil-both very bad for damping; this means oil/nitrogen is leaking around the dividing piston in the reservoir
Warnings
* Do not weld near the coilover shocks, allowing current to be conducted through them. This could lead to welding the shock together and it no longer compressing, in which case you're done. An arc through the shock can also cause the seals to leak as current jumps through it.
* When setting up your coil package, be careful not to scratch the coils. Most shops will swap your coils if they are in perfect condition and you find you have too stiff or too soft a coil rate.
* Price of a rebuild-Before you rebuild your coilover shock or send it somewhere to have it done, make sure it's worth it. You'd be surprised what wasted shocks can be rebuilt into, but sometimes the labor and parts can get close to the price of a complete shock, so make sure a new shock wouldn't make it easier for around the same price.


