 Jerrod Jones
Former Editor, Off Road
Jerrod Jones
Former Editor, Off Road
How many times have you heard that "it's the last 10 percent of the project that takes the longest?" Well, that certainly rang true with our solid axle S-10 project.
During the last two issues, we took our lifted '96 Chevy S-10 Blazer, removed the independent front suspension, and added solid axles front and rear, new suspension, and 35-inch Baja Claws.
While it did take a fair amount of labor, most of the solid axle swap performed on the '96 S-10 Blazer was fairly simple and our Almighty Dime project was able to leave the doors of Revolution Vehicle Dynamics (RVD) under its own power soon after the build was started. Mike Gold of RVD got a Sky's Offroad solid axle spring hanger welded on, bolted on front Wagoneer leaves, swapped in Dana 44 Wagoneer axles, made up a steering draglink, and even got the original rear driveshaft to work. But then came the little things that took nearly double the time of the big things. The tires rubbed the leaf springs at full turn. The front swayed a little too much. And most importantly, we had no front-wheel drive. Not only were small additions still in order, revisions were now needed, too.
While we certainly won't claim to be S-10 experts, we feel we've learned some things we can pass on, from experience and from talking to guys like the Dezert Dimes, Sky's Offroad, Revolution Vehicle Dynamics, and Jim Reel.
If you've got an S-10 or S-10 Blazer and you're thinking of a solid axle swap, make sure to keep these notes handy to help make your solid axle swap job easier, and maybe even better than ours. We did the basics and then went some steps further by adding the premium parts that weren't required but sure did make a big difference in the end.
IFS Removal
This was pretty straightforward. We pulled out most of the frontend as one piece prior to cutting the hangers. Having it all come out as a few pieces saved us time and allowed us to move the leftovers out of the shop more easily.
As expected, the front framerails flexed more easily without the IFS crossmembers in. The weld-in Sky's solid axle swap spring hanger acted as a new front crossmember once welded in place, but we'd suggest adding some sort of other framerail-to-framerail bracing (perhaps an upper bar in between the two shock hoops).
PhotosView SlideshowSuspension
With subpar IFS suspension, our S-10's handling, braking, and ride quality was improved by doing the solid axle swap using Jeep Grand Wagoneer axles.
Using Sky's Offroad $200 SAS hanger kit and Wagoneer suspension parts, the solid axle swap went fairly easy. There was some fabbing that needed to be done for the front springs' shackle mounts, a track bar needed to be built, and we eventually swapped the stock Waggy springs for Rancho 2-inch lift front springs.
Getting the rear axle on was as simple as changing the spring perch locations on the Wagoneer axle.
The shocks' mounts were almost as easy. The rear Wagoneer axle's shock mount tabs lined up with the upper rear shock mounts on the S-10 Blazer's frame. Sky's Toyota shock hoops were welded in place over the front axle's shock tabs so that was no problem as well.
PhotosView SlideshowAxles
We're sure you could fab up mounts for Dana 60s or Dana 30s if you wanted to, but our Sky's SAS hanger kit called for '80-and-up Wagoneer Dana 44 axles (no earlier than 1980 because the differentials are on the passenger side in '79-and-older fullsize Jeeps). The Dana 44s are not overkill, but they're definitely much stronger than the stock S-10 equipment. You get bigger brakes, bigger differentials, stronger axleshafts, and a 6x5.5 Chevy/Jeep/Toyota wheel bolt pattern.
Wagoneers are full-time 4x4s, so adding a locking hub kit to the Wagoneer front axle is a good plan since 4WD S-10s have a 2WD transfer case option.
The width of the Wagoneer axles (they are not wide track axles) is just a couple inches wider than our S-10's track width prior to this swap.
The biggest advantage of using Wagoneer axles is that the front bolts right up to Wagoneer leaf springs using the Sky's SAS hanger kit.
Lastly, stock Wagoneer gear ratios are not acceptable for the S-10's 4.3L V-6 and 35-inch tires however. We can barely hit 65 mph in the flats.
PhotosView SlideshowTransfer Case/Driveshafts
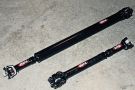
The transfer case presented the most problems. We knew we'd have to do some modification to the transmission crossmember for the front driveshaft since it'd now be moving up and down (it was fixed when the vehicle had IFS), but it wasn't until we pulled the front driveshaft out that we noticed that the electronic-shift NP233Cs found in S-10s have slip-yokes front and rear. Swapping transfer cases was an option, but the existing T-case was recently rebuilt by Supershops and further modifications for linkage would have to have been made since this was an electric-shift vehicle. We started calling around to driveshaft shops as we finished up other things, but it wasn't until we hit up Jim Reel at J.E. Reel Driveline that we started getting some answers. While J.E. Reel could've made us something for the slip-yoke, it wouldn't have worked well and would plague us with problems. He advised the best thing to do would be to find out how to change to a fixed yoke front output. It turns out that Jeep NP231 and NP233C T-cases have many similarities—so many in fact that we were able to use a NP231 front output and yoke to solve our front driveshaft problem.
In the rear we successfully reused the original S-10 slip-yoke driveshaft by simply switching to a conversion U-joint to meet up with the 1330 yoke of the Dana 44. It worked perfectly well. And then we decided to spend hundreds of more dollars thinking that a NP231J fixed yoke kit and new CV driveshaft would look mighty nice on the back of our NP233C. In our defense, we will really appreciate this modification if we ever break a rear driveshaft. Unfortunately we opened up a new can of worms by doing so. While the hard parts fit fine, we now needed to use a Jeep speed sensor to plug the hole in the new fixed yoke tailhousing. The Jeep sensor uses three wires and there are two wires on the S-10 speed sensor plug. We recently came across a fixed yoke kit specifically made for the S-10 T-case, but the cost is double that of the Jeep kit (although it would negate any speed sensor issues).
PhotosView SlideshowSteering
Getting to the axle's steering linkage with the stock steering box presented a bit of an issue. In stock form our '96 S-10 had a ball joint built into the end of the pitman arm that connects to the factory IFS steering linkage. We checked into applying new pitman arms and didn't come up with much. Revolution Vehicle Dynamics eventually ended up pulling the ball joint out of the stock pitman arm, welding in a sleeve, and making a new rod end draglink to meet up with the Dana 44's original steering tie rod.