T-Case Cheapskate Novak Rebuild Kit - Jp Magazine

Christian Hazel Brand Manager, Four Wheeler

Okay, okay, technically it's not a new T-case. But if you have a little common sense and a decent set of hand tools, you can make your Jeep's T-case as good as new in an afternoon. With the exception of some of the modern torque-biasing, full-time T-cases, there's really nothing to rebuilding these things. Crack 'em open, replace the bearings, seals, and thrust washers, and slap 'em back together. Maybe pay a little attention to the front output shaft endplay on the gear-driven models.

154 1008 T Case Cheapskate Novaks Rebuild Kit t Case Front Photo 34195353

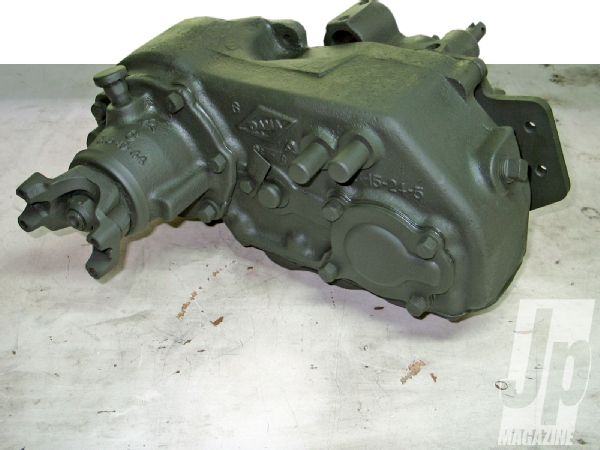
Novak Conversions offers very high-quality T-case rebuild kits for Jeep Spicer 18, Dana 20, Dana 300, and NP231 models. The PN 20MR rebuild kit we got for our '73 Commando's Dana 20 included all the necessary bearings, seals, gaskets, shim packs, and thrust washers, a full set of instructions, and Novak's unrivaled hardened intermediate shaft. In fact, we don't think there's a better intermediate shaft available for the Spicer 18, Dana 20, or Dana 300 T-cases. So follow along as we use Novak's $185.22 rebuild kit to make our Dana 20 like new in just a couple of hours at home.

PhotosView Slideshow Every Novak kit, whether for transmission, T-case, or adapter installation, comes with a very complete set of instructions that walk you through the teardown and rebuild or installation. After draining and cleaning the case, we popped out the rear output assembly as a unit and removed the inspection pan. Then we removed the intermediate shaft retaining bolt and lock plate and drove the shaft out with a brass drift. The intermediate gear comes out and the front yoke can be gunned off with an impact wrench. Then the front output shaft bearing cover plate can be removed. Be careful to keep the stock shim pack together. It's best to clean and reuse the stock shim pack to set up your front output shaft endplay, but if you can't clean them or you damage them, use a micrometer to measure the pack thickness so that you can duplicate it with the new shims that come in the rebuild kit. Remove the rear output shaft shift rail set screw, shift lever, shift rail, and front cover. You can then use a brass drift to carefully knock the front output shaft free. The rear bearing race will knock out of the case and the forward bearing will come off the shaft during this operation. Just be careful not to nick or damage the gears, as the shaft frees the case. Use a puller to remove the rear bearing from the front. You can drive the rear output shaft out of its housing with a dead blow hammer or a brass drift. Carefully put aside the speedometer gear drive and shim pack before using a bearing puller to remove the rear output shaft bearing. It's a stubborn monkey, but it'll come free with a good bearing puller like this Matco unit shown. You'll want a similar clamshell-type bearing puller because there's little room to get a standard three-jaw puller under the bearing. Your local auto parts store should rent or sell clamshell bearing pullers for the job. Remove the remaining shift rail from the case and clean and inspect all your gears and components to be reused. Check the Novak rebuild kit up top. It included top-quality gaskets, all new bearings and races, an intermediate shaft, two sets of intermediate shaft O-rings (in case you have to pull it out for some reason during the rebuild), shim packs, thrust washers, and everything else you need for a complete and successful rebuild. We began the assembly by driving the front bearing race into the case and coating the front cover gasket and mating surfaces with Permatex Aviation Form-A-Gasket. We've used this form-a-gasket successfully in the past and like that it cleans up easily with brake cleaner and doesn't harden like silicone. Just remember a light coat on every mating surface will do ya.
Install the front cover and torque the bolts to 30lb-ft. Drop the spring and poppet ball into its bore and slide the front shift rail into the case. Use a flathead screwdriver to depress the poppet ball so the shift rail can go in. Once it's in, install the shift fork onto the rail and torque the set screw to 14lb-ft using some red Loctite. Note the front output shaft forward bearing race already installed in the case behind the front cover. We used a 11/4-inch socket to drive the rear bearing onto the front output shaft. You can see in the photo the order of things on the front shaft as they're installed inside the case. Don't forget the spacer between the forward bearing and gear. Once the gears and bearings are slid onto the output shaft inside the case, insert the rear bearing race and drive it in with a dead blow hammer until it's seated. We carefully cleaned and reused our old shim pack to begin setting the front output shaft endplay. Factory specs call for 0.002-0.005-inch endplay. Torque the cover bolts to 30lb-ft and give the snout of the output shaft a good whack or two with the dead-blow hammer to seat the bearings and races. Then, use a dial caliper to measure the shaft end play. We wound up needing to mix and match shims between the new and old shim packs, making our new pack thicker than the one we started with. With the front output shaft and gears in place you can install the rear shift rail. Put the front rail in Neutral so that the interlock will clear as the rear rail is installed. Then install the shift fork and set screw. The sliding gear and shift fork must go in before the intermediate gear. We use Dr Tranny's Assembly Goo to hold the needle bearings inside the intermediate gear for installation. Vaseline also works, but heavy axle grease may not fully dissolve once the T-case is up to operating temperature. The Vaseline or Tranny Goo will dissolve completely and won't impede oiling. Lube the new intermediate shaft with some engine oil and install the new rubber O-rings. Use a little Assembly Goo on the thrust washers to stick them to the case. Slide the intermediate shaft just through the thrust washer and carefully drop the intermediate gear down into place taking care not to cause the other thrust washer to drop. Once everything is lined up, gently tap the intermediate gear through the bore and secure the locking plate and bolt to 14lb-ft. Use a length of exhaust tubing or pipe to hammer on the new rear output shaft bearing on the shaft and then install the original shim stack and speedometer drive gear. Novak includes a new shim pack, but our stock pack was thicker than the sum of the new Novak shims. The assembly can then be installed into the output shaft housing and the outer bearing driven on. Then install the output shaft assembly and gasket on the case and torque the bolts to 30 lb-ft. We prefer to lube the output shaft and shift rail seals with a little motor oil and then work them onto the case after the shafts and rails are installed. Carefully work the seals onto the shift rails to avoid nicking the rubber and then drive them on with a deep well socket. You can use a piece of appropriate-sized exhaust tubing to drive the output shaft seals on. Or, if you have a ball joint service tool, the included cup spacers make a nice seal installation tool. Novak even includes factory-style felt yoke seals that install between the yoke and seal housing. Normally we run a bead of silicone inside the yoke to prevent any 90W weeping through, but this time we're trying a simple trick that we came up with. Yup, that's an ordinary garden hose O-ring that we got at our local hardware store for a couple of pennies. Hopefully it'll keep leaks at bay without the messy cleanup next time we have to pull a yoke off this thing. Once it's all together, spin the outputs to make sure the gears spin freely and shift nicely. Then pop the inspection cover back on, slap it back in the Jeep, and fill it up with some good-quality 90W gear oil.