 Jerrod Jones
Former Editor, Off Road
Jerrod Jones
Former Editor, Off Road
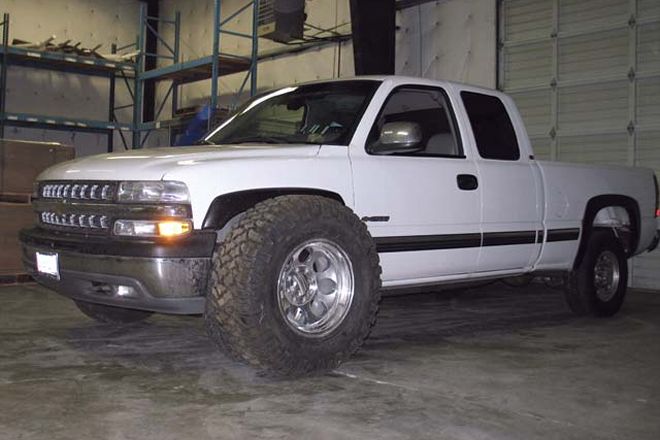
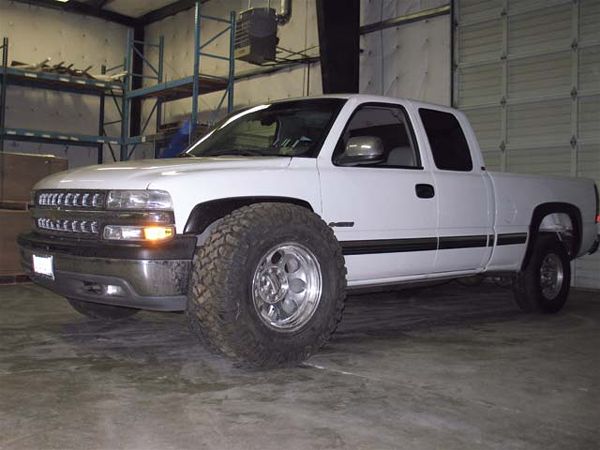 Our '02 Chevy 2500 was going to go from puddle master to trail killer in hopefully just a few days. Of course it would take us longer to install this kit than it would for a normal customer, since we were also designing and prototyping the kit while installing it. We'd also be doing our install without the use of a lift, just as you would have to deal with in your garage or driveway.
If you've never noticed, we're not into redundancy. Seeing the same old truck builds gets kind of tiresome. Don't get us wrong; tried and true hard-core suspension, engine, axle, or whatever buildsare killer, but we're in the business of bringing you new and innovative ideas and products, so we intentionally seek out and promote the next big idea.
So what has been on our minds lately? Solid-axle swaps for IFS 4x4s.
But this is nothing new, and especially not for fullsize IFS Chevys. At least a dozen companies offer leaf-spring solid-axle conversion kits. Yet, how many coil-sprung kits are there? The only solid front axle vehicles currently built in the U.S. are coil-sprung frontends, so why would you take your newer truck and put an old-school leaf spring on it? The simple answer: It's easier.
But what if it wasn't easier? What if you could bolt on a coil and radius-arm kit in just a weekend, and have it completed enough to drive it to a muffler shop on Monday?
We'd been looking at CAGE Off-Road's radius arms and solid axle brackets for some time and wondering how easy it would be to get a do-it-yourself kit like that together. We gave Jim Cole at CAGE a phone call and quickly learned that he'd been thinking the same thing, but didn't have a truck to build a kit off of. Funny he should mention that....
A few weeks later, we were in Oregon with a guinea pig Chevy to spend a few days prototyping and installing what will be a really neat and affordable coil-spring solid-axle swap kit for both the 1/2-ton and 3/4-ton '99-'06 Chevys.
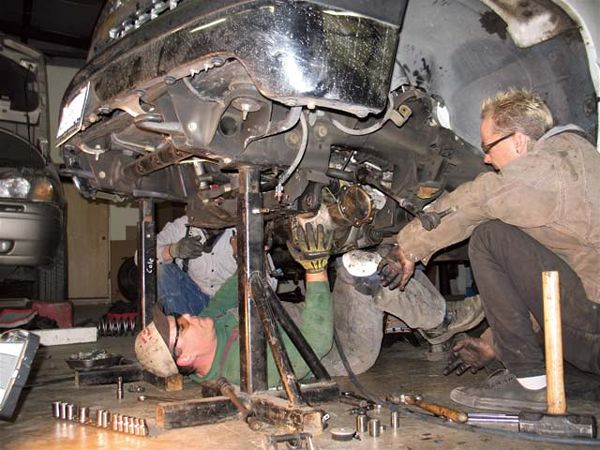
The IFS deletion started with putting our truck up on jackstands and making sure that they were secure. You'll have to have some tall jackstands (go buy some if you don't have them; don't stack concrete blocks or anything dumb like that) because the truck is going to be sitting nearly a foot taller when you're done. We loosened the torsion-bar keys, pulled out the torsion bars, removed the torsion-bar crossmember, unbolted the CV shafts, upper A-arms, lower A-arms, and threw it all into a pile (remember to disconnect the ABS lines and wrap them up-you won't use them anymore either). Cole benchpressed the differential down to the ground, after first remembering to disconnect the 4WD electrical harness. You can tuck that up and zip-tie it out of the way now, because you'll never use it again. Lots of stuff has to be cut off for a solid-axle swap. Both front and rear lower crossmembers for the IFS have to be cut off the frame, and the outer horns for the upper A-arms need to be removed as well. You basically want clean, rectangular framerails without anything protruding from them. The biggest pain in the butt of this entire solid-axle swap is the grinding. If you have a plasma cutter, use it. If not, then buy a lot of grinder wheels.
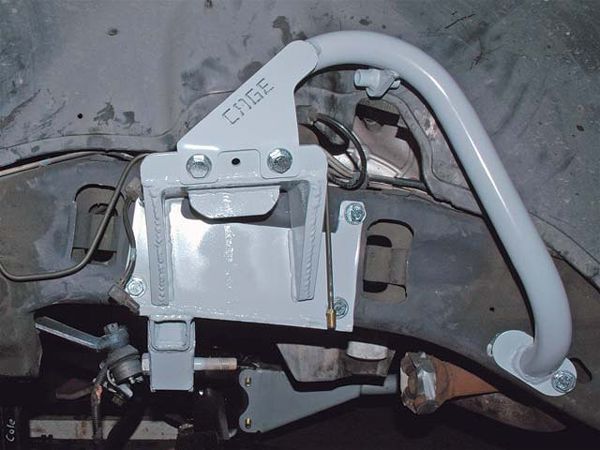
The axle was in place under the truck and Cole had taken his necessary measurements, so he worked through the night building brand-new coil buckets to bolt onto the frame. The plan was to build them similar to a Bronco coil bucket, and incorporate some kind of heavy-duty crossmember between the framerails to replace the two factory IFS ones we removed. We arrived the next morning to find some heavy-duty coil buckets bolted onto the frame with a bolt in each corner. A dual shock hoop bolted to the top of the coil bucket and ran down to meet the frame. For a crossmember, Cole had decided to go with square tubing that would sit flush against the bottom of the coil-bucket brackets. This also allowed a track-bar bracket to be built off the crossmember more easily since it was flat on all sides.You will notice our crossmember is welded to the frame brackets. This was for simplistic placement purposes while spending time designing other facets of the kit. The production piece you get will be able to be bolted up to the frame, making the brackets on the axle the only things needing to be welded in this entire kit. You can also spot the brake lines we had to bend for this picture. CAGE will include these hardline extensions, as well as flexible brake hoses to plumb the brake system.
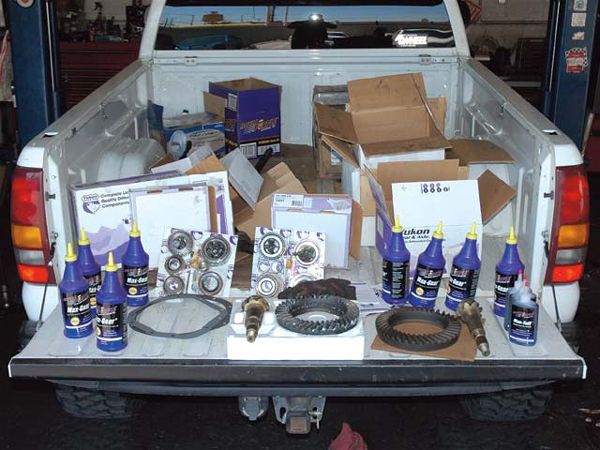
We had ordered two sets of Yukon 4.88 gears and install kits to match the front and rear gear ratios to the tires. The front high-pinion Dana 60 ring-and-pinion (YK D60R-488R-T) is a special application with a thick ring gear to fit a 4.10-and-down differential case. We also ordered a master overhaul kit (YK D60) since we had just purchased this axle and did not know its history. In the back, we had a 33-spline, 9.5-inch ring-gear 14-bolt axle that received the same gear ratio (YG GM9.5-488) using a standard installation kit (YK GM9.5-B) since we knew the rear axle to be in good condition. Though we can understand the monetary argument of not putting expensive synthetics in your engine all the time, how could you cheat yourself out of some nice Royal Purple gear lube for your axles? Gear oil is rarely changed (if at all) and spending a few extra bucks on the fancy synthetic will pay off in the long run. Our drivetrain shop, South Bay Truck, bolted the Yukon Gear ring gears onto the differentials (stock open carrier in front, Gov-Loc in back) and pressed the new bearings on. Though it is seldom done, it is a good habit to use assembly lubricant like Royal Purple's Max-Tuff when putting together drivetrain pieces.
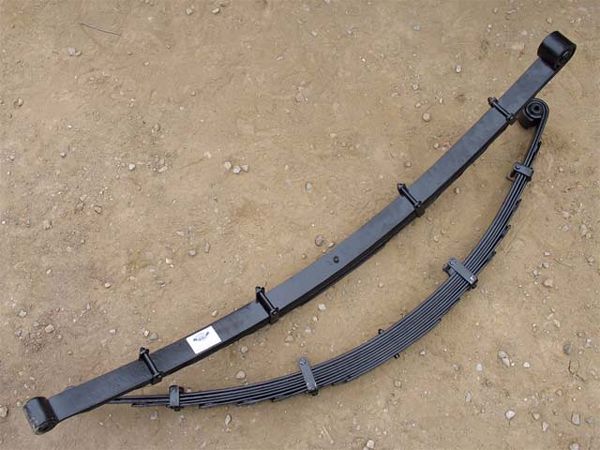
Well, not really. Technically they never went away, but the company did see some downward spirals for quite some time. Not anymore though, as National Spring has been recently bought by a family that knows the leaf-spring industry well and is ramping up to bring the National Spring name back to its full glory. And they certainly proved it to us by producing this impressive 10-leaf prerunner pack that would not only lift the rear of our truck, but also dramatically improve the ride quality. National can build all sorts of leaf springs, but since this truck was never going to be hauling more than a couple of jet skis or a motorcycle, we could have some long-travel units built without overload leaves for a smooth ride.
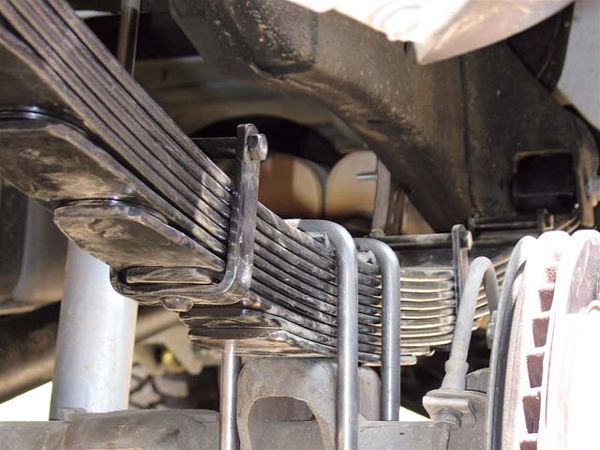
When installing leaf springs, it's easiest to do one side at a time. We unbolted the U-bolts, threw out our temporary blocks, and removed our stock leaf springs, one at a time. We like to jack up the side we are working on, throw jackstands under the framerail (in front of and behind the leaf-spring perches), and let the axle hang from the leaf spring. Using a jack under the axle, we can now easily remove the U-bolts and drop the axle or raise it back up. The new National Spring leaves bolted directly in place of the factory springs. This is easier said than done since we had to drop the gas tank to get the front driver-side spring-perch bolt out of the frame. Remember to order new U-bolts when getting your new leaf springs!
We love this truck! The solid-axle swap portion of this project really could be done in a weekend, in time to drive (in 2WD) to work on Monday. The front flexes really well and is surprisingly stable, even without a sway bar. For SoCal freeway speeds and high winds, reattaching the sway bar would not be a bad idea, though it would most likely inhibit off-road twist. The rear National leaves complemented the front end extremely well and smoothed out the bumps that used to throw the back of the truck around. As far as power goes, the truck can squeal the tires at a stoplight with the 4.88 Yukon gears and 37-inch Baja MTZs.
With the fiberglass fenders, we were able to squeeze on the 37-inch tires without any fender interference, plus give the truck some unique styling to boot.
The pushbutton 4WD shifter works just fine with the solid axle as well, though the "Auto 4WD" is now useless and the little light will now blink when in 4-Hi or 4-Lo (because it is not getting a sensor reading from the front actuator, which was deleted with the IFS).
Also, the ABS and brake lights are now permanently on when we drive the truck. We also have no ABS, something that we are pretty happy about considering how many times ABS has tried to kill us off-road when the rear end started to slide. And with the big Dana 60 brakes in front, our braking ability feels like it has actually been improved over stock.


